This is the multi-page printable view of this section.
Click here to print.
Return to the regular view of this page.
Docs
An Open, Unified, Lightweight, Simpler Containers as a Service (CaaS).
Welcome to Drycc
Drycc Workflow is an open source container cloud platform.
We also call it Container as a Service (CaaS) that adds a developer-friendly layer to any Kubernetes cluster, making it easy to deploy and manage applications.
Drycc Workflow includes capabilities for building and deploying from source via git push, simple application configuration, creating and rolling back releases, managing domain names and SSL certificates, providing seamless edge routing, aggregating logs, and sharing applications with teams. All of this is exposed through a simple REST API and command line interface.
Getting Started
To get started with Workflow, follow our Quick Start guide.
Take a deep dive into Drycc Workflow in our Concepts, Architecture, and Components sections.
Feel like contributing some code or want to get started as a maintainer? Pick an issue tagged as an easy fix or help wanted and start contributing!
1 - Quick Start
Step-by-step guides for deploying your first app and mastering the basics of Drycc.
1.1 - Quick Start
This guide helps you set up the Drycc workflow.
Get started with Drycc Workflow in three simple steps:
- Install CLI tools for Helm and Drycc Workflow
- Boot a Kubernetes cluster and install Drycc Workflow
- Deploy your first application
This guide helps you set up a cluster suitable for evaluation, development, and testing. When you are ready for staging and production, view our production checklist.
Step 1: Install Workflow
Install Drycc Workflow on your infrastructure.
Install the Drycc Workflow CLI tools on your local machine.
Step 3: Deploy your first app
Finally, log in and deploy your first application.
1.2 - Install Workflow
Install Workflow on a bare metal host, which can be a cloud server, bare metal server, virtual machine, or even your laptop.
If you have a bare metal host, which can be a cloud server, bare metal server, virtual machine, or even your laptop, then this chapter is very suitable for you.
Operating Systems
Drycc is expected to work on most modern Linux systems. Some operating systems have specific requirements:
- (Red Hat/CentOS) Enterprise Linux, which usually use RPM package management
- Ubuntu (Desktop/Server/Cloud) Linux, a very popular distribution
- Debian GNU Linux, a very pure distribution of open source software
If you want to add support for more Linux distributions, please submit an issue on GitHub or submit a PR directly.
System Software
Some basic software needs to be installed before installing Drycc Workflow.
OS Configuration
Kubernetes requires a large number of ports. If you are not sure what they are, please disable the local firewall or open these ports. At the same time, because Kubernetes needs system time synchronization, you need to ensure that the system time is correct.
Installing NFSv4 Client
The command used to install an NFSv4 client differs depending on the Linux distribution.
For Debian and Ubuntu, use this command:
$ apt-get install nfs-common
For RHEL, CentOS, and EKS with EKS Kubernetes Worker AMI with AmazonLinux2 image, use this command:
$ yum install nfs-utils
Installing curl
For Debian and Ubuntu, use this command:
$ apt-get install curl
For RHEL, CentOS, and EKS with EKS Kubernetes Worker AMI with AmazonLinux2 image, use this command:
$ yum install curl
Hardware
Hardware requirements scale based on the size of your deployments. Minimum recommendations are outlined here.
- RAM: 1GB Minimum (we recommend at least 2GB)
- CPU: 1 Minimum
This configuration only contains the minimum requirements that can meet the operation.
Disk
Drycc performance depends on the performance of the database. To ensure optimal speed, we recommend using an SSD when possible. Disk performance will vary on ARM devices utilizing an SD card or eMMC.
Domain Name
Drycc needs a root domain name under your full control and points this domain name to the server to be installed. Suppose there is a wildcard domain pointing to the current server to install Drycc, which is the name *.dryccdoman.com. We need to set the PLATFORM_DOMAIN environment variables before installation.
$ export PLATFORM_DOMAIN=dryccdoman.com
Of course, if it is a test environment, we can also use nip.io, an IP to domain name service. For example, your host IP is 59.46.3.190, we will get the following domain name 59.46.3.190.nip.io:
$ export PLATFORM_DOMAIN=59.46.3.190.nip.io
Install
Before installation, please make sure whether your installation environment is on the public network. If it is an intranet environment and there is no public IP, you need to disable the automatic certificate.
$ export CERT_MANAGER_ENABLED=false
Then you can use the installation script available at https://www.drycc.cc/install.sh to install Drycc as a service on systemd and openrc based systems.
$ curl -sfL https://www.drycc.cc/install.sh | bash -
To install the beta version, please use the following script for installation.
$ export CHANNEL=testing
$ curl -sfL https://drycc-mirrors.drycc.cc/drycc/workflow/raw/refs/heads/main/install.sh | bash -
Note
If you are in China, you need to use mirror acceleration:
$ curl -sfL https://www.drycc.cc/install.sh | INSTALL_DRYCC_MIRROR=cn bash -
Install Node
A node can be a simple agent or a server; a server has the function of an agent. Multiple servers provide high availability, but the number of servers should not exceed 7 at most. There is no limit to the number of agents.
- First, check the cluster token of the master:
$ cat /var/lib/rancher/k3s/server/node-token
K1078e7213ca32bdaabb44536f14b9ce7926bb201f41c3f3edd39975c16ff4901ea::server:33bde27f-ac49-4483-b6ac-f4eec2c6dbfa
We assume that the IP address of the cluster master is 192.168.6.240.
- Then, set the environment variables:
$ export K3S_URL=https://192.168.6.240:6443
$ export K3S_TOKEN="K1078e7213ca32bdaabb44536f14b9ce7926bb201f41c3f3edd39975c16ff4901ea::server:33bde27f-ac49-4483-b6ac-f4eec2c6dbfa"
Note
If you are in China, you need to use mirror acceleration:
$ export INSTALL_DRYCC_MIRROR=cn
- Join the cluster as server:
$ curl -sfL https://www.drycc.cc/install.sh | bash -s - install_k3s_server
- Join the cluster as agent:
$ curl -sfL https://www.drycc.cc/install.sh | bash -s - install_k3s_agent
Install Options
When using this method to install Drycc, the following environment variables can be used to configure the installation:
| ENVIRONMENT VARIABLE |
DESCRIPTION |
| PLATFORM_DOMAIN |
Required item, specify Drycc’s domain name |
| DRYCC_ADMIN_USERNAME |
Required item, specify Drycc’s admin username |
| DRYCC_ADMIN_PASSWORD |
Required item, specify Drycc’s admin password |
| CERT_MANAGER_ENABLED |
Whether to use automatic certificate. It is false by default |
| CHANNEL |
By default, stable channel will be installed. You can also specify testing |
| KUBERNETES_SERVICE_HOST |
Set with the HOST of the loadbalancer that was in front of kube-apiserver |
| KUBERNETES_SERVICE_PORT |
Set with the PORT of the loadbalancer that was in front of kube-apiserver |
| METALLB_CONFIG_FILE |
The metallb config file path, layer 2 network is used by default |
| LONGHORN_CONFIG_FILE |
The Longhorn config file path |
| INSTALL_DRYCC_MIRROR |
Specify the accelerated mirror location. Currently, only cn is supported |
| BUILDER_REPLICAS |
Number of builder replicas to deploy |
| CONTROLLER_API_REPLICAS |
Number of controller api replicas to deploy |
| CONTROLLER_CELERY_REPLICAS |
Number of controller celery replicas to deploy |
| CONTROLLER_METRIC_REPLICAS |
Number of controller metric replicas to deploy |
| CONTROLLER_MUTATE_REPLICAS |
Number of controller mutate replicas to deploy |
| CONTROLLER_WEBHOOK_REPLICAS |
Number of controller webhook replicas to deploy |
| CONTROLLER_APP_RUNTIME_CLASS |
RuntimeClass is a feature for selecting the container runtime configuration |
| CONTROLLER_APP_GATEWAY_CLASS |
GatewayClass allocated by drycc gateways; default GatewayClass is used by default |
| CONTROLLER_APP_STORAGE_CLASS |
StorageClass allocated by drycc volumes; default storageClass is used by default |
| VALKEY_PERSISTENCE_SIZE |
The size of the persistence space allocated to valkey, which is 5Gi by default |
| VALKEY_PERSISTENCE_STORAGE_CLASS |
StorageClass of valkey; default storageClass is used by default |
| STORAGE_PERSISTENCE_SIZE |
The size of the persistence space allocated to storage, which is 5Gi by default |
| STORAGE_PERSISTENCE_STORAGE_CLASS |
StorageClass of storage; default storageClass is used by default |
| MONITOR_GRAFANA_PERSISTENCE_SIZE |
The size of the persistence space allocated to monitor.grafana, which is 5Gi by default |
| MONITOR_GRAFANA_PERSISTENCE_STORAGE_CLASS |
StorageClass of monitor grafana; default storageClass is used by default |
| DATABASE_PERSISTENCE_SIZE |
The size of the persistence space allocated to database, which is 5Gi by default |
| DATABASE_PERSISTENCE_STORAGE_CLASS |
StorageClass of database; default storageClass is used by default |
| TIMESERIES_REPLICAS |
Number of timeseries replicas to deploy |
| TIMESERIES_PERSISTENCE_SIZE |
The size of the persistence space allocated to timeseries, which is 5Gi by default |
| TIMESERIES_PERSISTENCE_STORAGE_CLASS |
StorageClass of timeseries; default storageClass is used by default |
| PASSPORT_REPLICAS |
Number of passport replicas to deploy |
| REGISTRY_REPLICAS |
Number of registry replicas to deploy |
| HELMBROKER_API_REPLICAS |
Number of helmbroker api replicas to deploy |
| HELMBROKER_CELERY_REPLICAS |
Number of helmbroker celery replicas to deploy |
| HELMBROKER_PERSISTENCE_SIZE |
The size of the persistence space allocated to helmbroker, which is 5Gi by default |
| HELMBROKER_PERSISTENCE_STORAGE_CLASS |
StorageClass of helmbroker; default storageClass is used by default |
| VICTORIAMETRICS_CONFIG_FILE |
The path of the victoriametrics configuration file, turn on this, the two below won’t work |
| VICTORIAMETRICS_VMAGENT_PERSISTENCE_SIZE |
The size of the persistence space allocated to victoriametrics vmagent, which is 10Gi by default |
| VICTORIAMETRICS_VMAGENT_PERSISTENCE_STORAGE_CLASS |
StorageClass of victoriametrics vmagent; default storageClass is used by default |
| VICTORIAMETRICS_VMSTORAGE_PERSISTENCE_SIZE |
The size of the persistence space allocated to victoriametrics vmstorage, which is 10Gi by default |
| VICTORIAMETRICS_VMSTORAGE_PERSISTENCE_STORAGE_CLASS |
StorageClass of victoriametrics vmstorage; default storageClass is used by default |
| K3S_DATA_DIR |
The config of k3s data dir; If not set, the default path is used |
| ACME_SERVER |
ACME Server url, default use letsencrypt |
| ACME_EAB_KEY_ID |
The key ID of which your external account binding is indexed by the external account |
| ACME_EAB_KEY_SECRET |
The key Secret of which your external account symmetric MAC key |
Since the installation script will install k3s, other environment variables can refer to k3s installation environment variables.
Uninstall
If you installed Drycc using an installation script, you can uninstall the entire Drycc using this script:
$ curl -sfL https://www.drycc.cc/uninstall.sh | bash -
1.3 - Install CLI Tools
How to download and install the Drycc CLI tools.
Drycc Workflow Client CLI
The Drycc command-line interface (CLI) lets you interact with Drycc Workflow. Use the CLI to create, configure, and manage applications.
Install the drycc client for Linux or macOS with:
$ curl -sfL https://www.drycc.cc/install-cli.sh | bash -
Note
Users in mainland China can use the following method to speed up installation:
$ curl -sfL https://www.drycc.cc/install-cli.sh | INSTALL_DRYCC_MIRROR=cn bash -
For other platforms, please visit: https://github.com/drycc/workflow-cli/releases
The installer places the drycc binary in your current directory, but you should move it somewhere in your $PATH:
$ sudo ln -fs $PWD/drycc /usr/local/bin/drycc
or:
$ sudo mv $PWD/drycc /usr/local/bin/drycc
Check your work by running drycc version:
$ drycc version
v1.1.0
Update the workflow CLI to the latest release:
$ drycc update
Note
Note that version numbers may vary as new releases become available.
1.4 - Deploy Your First App
Deploy an application using the Drycc CLI.
Determine Your Host and Hostname Values
Drycc Workflow requires a wildcard DNS record to dynamically map application names to the router.
You should already have DNS set up pointing to your known host. The $hostname value can be calculated by prepending drycc. to the value set in global.platformDomain.
Login to Workflow
Workflow uses the passport component to create and authorize users. If you already have an account, use drycc login to authenticate against the Drycc Workflow API.
$ drycc login http://drycc.example.com
Opening browser to http://drycc.example.com/v2/login/drycc/?key=4ccc81ee2dce4349ad5261ceffe72c71
Waiting for login... .o.Logged in as admin
Configuration file written to /root/.drycc/client.json
Or you can login with username and password:
$ drycc login http://drycc.example.com --username=demo --password=demo
Configuration file written to /root/.drycc/client.json
Deploy an Application
Drycc Workflow supports three different types of applications: Buildpacks, Dockerfiles, and Container Images. Our first application will be a simple container image-based application, so you don’t have to wrestle with checking out code.
Run drycc create to create a new application on Drycc Workflow. If you do not specify a name for your application, Workflow automatically generates a friendly (and sometimes funny) name.
$ drycc create --no-remote
Creating Application... done, created proper-barbecue
If you want to add a git remote for this app later, use `drycc git remote -a proper-barbecue`
Our application has been created and named proper-barbecue. As with the drycc hostname, any HTTP traffic to proper-barbecue will be automatically routed to your application pods by the edge router.
Let’s use the CLI to tell the platform to deploy an application and then use curl to send a request to the app:
$ drycc pull drycc/example-go -a proper-barbecue
Creating build... done
$ curl http://proper-barbecue.$hostname
Powered by Drycc
Note
If you see a 404 error, make sure you specified your application name with -a <appname>!
Workflow’s edge router knows all about application names and automatically sends traffic to the right application. The router sends traffic for proper-barbecue.104.197.125.75.nip.io to your app, just like drycc.104.197.125.75.nip.io was sent to the Workflow API service.
Change Application Configuration
Next, let’s change some configuration using the CLI. Our example app is built to read configuration from the environment. By using drycc config set we can change how the application behaves:
$ drycc config set POWERED_BY="Container Images + Kubernetes" -a proper-barbecue
Creating config... done
Behind the scenes, Workflow creates a new release for your application and uses Kubernetes to provide a zero-downtime rolling deploy to the new release!
Validate that our configuration change has worked:
$ curl http://proper-barbecue.104.197.125.75.nip.io
Powered by Container Images + Kubernetes
Scale Your Application
Last, let’s scale our application by adding more application processes. Using the CLI you can easily add and remove additional processes to service requests:
$ drycc scale web=2 -a proper-barbecue
Scaling processes... but first, coffee!
done in 36s

NAME                                RELEASE    STATE    PTYPE       STARTED
proper-barbecue-v18-web-rk644       v18        up       web         2023-12-08T03:09:25UTC
proper-barbecue-v18-web-0ag04       v18        up       web         2023-12-08T03:09:25UTC
Congratulations! You have deployed, configured, and scaled your first application using Drycc Workflow.
Going Further
There is a lot more you can do with Drycc Workflow. Play around with the CLI:
- Roll back to a previous release with
drycc rollback -a proper-barbecue
- See application logs with
drycc grafana
- Try one of our other example applications like:
- Read about using application Buildpacks or Dockerfiles
- Join our #community slack channel and meet the team!
2 - Understanding Workflow
Learn about Drycc Workflow architecture, components, and core concepts.
2.1 - Concepts
Drycc Workflow is a lightweight application platform that deploys and scales Twelve-Factor apps as containers across a Kubernetes cluster.
Twelve-Factor Applications
The Twelve-Factor App is a methodology for building modern applications that can be scaled across a distributed system.
Twelve-factor is a valuable synthesis of years of experience with software-as-a-service apps in the wild, particularly on the Heroku platform.
Workflow is designed to run applications that adhere to the Twelve-Factor App methodology and best practices.
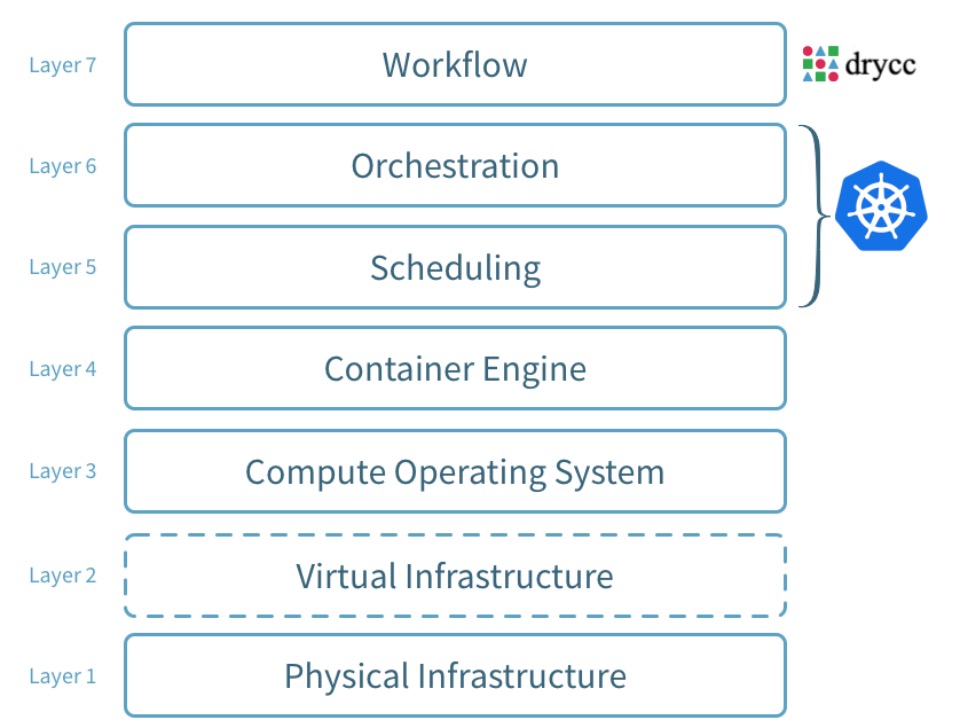
Kubernetes
Kubernetes is an open-source cluster manager developed by Google and donated to the Cloud Native Compute Foundation. Kubernetes manages all activity on your cluster, including desired state convergence, stable service addresses, health monitoring, service discovery, and DNS resolution.
Workflow builds upon Kubernetes abstractions like Services, Deployments, and Pods to provide a developer-friendly experience. Building containers directly from application source code, aggregating logs, and managing deployment configurations and app releases are just some of the features Workflow adds.
Drycc Workflow is a set of Kubernetes-native components, installable via Helm. Systems engineers familiar with Kubernetes will feel right at home running Workflow.
See the components overview for more detail.
Container
[Container][] is an open source project to build, ship, and run any application as a lightweight, portable, self-sufficient container.
If you have not yet converted your application to containers, Workflow provides a simple and straightforward “source to Container image” capability. Supporting multiple language runtimes via community buildpacks, building your application in a container can be as easy as git push drycc master.
Applications that use either a Dockerfile or reference external Container images are launched unmodified.
Applications
Workflow is designed around the concept of an application, or app.
Applications come in one of three forms:
- A collection of source files stored in a
git repository
- A Dockerfile and associated source files stored in a
git repository
- A reference to an existing image at a Container repository
Applications are identified by a unique name for easy reference. If you do not specify a name when creating your application, Workflow generates one for you. Workflow also manages related information, including domain names, SSL certificates, and developer-provided configuration.
Build, Release, Run
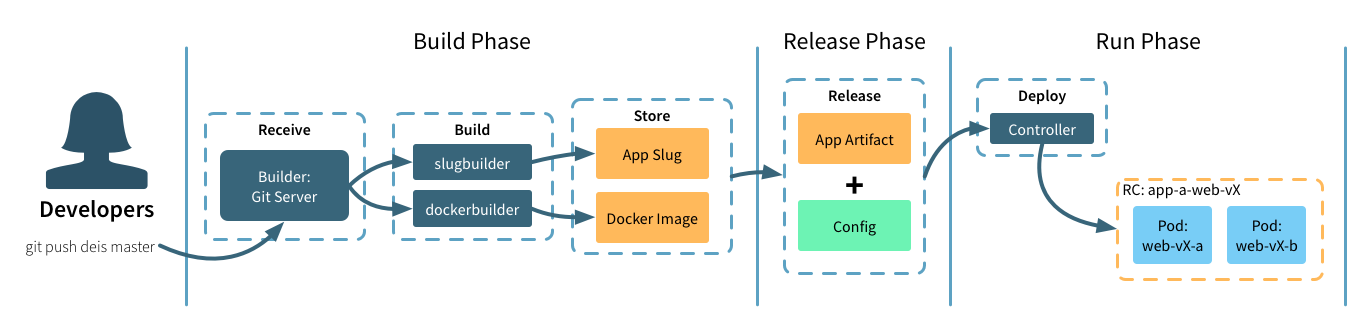
Build Stage
The builder component processes incoming git push drycc master requests and manages your application packaging.
If your application is using a buildpack, builder will launch an ephemeral job to extract and execute the packaging instructions. The resulting application artifact is stored by the platform for execution during the run stage.
If builder finds a Dockerfile, it follows those instructions to create a Container image. The resulting artifact is stored in a Drycc-managed registry which will be referenced during the run stage.
If another system already builds and packages your application, that container artifact can be used directly. When referencing an external Container image, the builder component doesn’t attempt to repackage your app.
Release Stage
During the release stage, a build is combined with application configuration to create a new, numbered release. New releases are created any time a new build is created or application configuration is changed. Tracking releases as a “write-only ledger” this way makes it easy to rollback to any previous release.
Run Stage
The run stage deploys the new release to the underlying Kubernetes cluster by changing the Deployment object which references the new release. By managing the desired replica count, Workflow orchestrates a zero-downtime, rolling update of your application. Once successfully updated, Workflow removes the last reference to the old release. Note that during the deploy, your application will be running in a mixed mode.
Backing Services
Workflow treats all persistent services such as databases, caches, storage,
messaging systems, and other backing services as resources managed
separately from your application. This philosophy aligns with Twelve-Factor
best practices.
Applications attach to backing services using environment variables.
Because apps are decoupled from backing services, they are free to
scale up independently, to use services provided by other apps, or to switch
to external or third-party vendor services.
See Also
2.2 - Architecture
Drycc Workflow is built using a service oriented architecture.
All components are published as a set of container images which can be deployed to any
compliant Kubernetes cluster.
Overview
Operators use Helm to configure and install the Workflow components which
interface directly with the underlying Kubernetes cluster. Service discovery,
container availability and networking are all delegated to Kubernetes, while
Workflow provides a clean and simple developer experience.
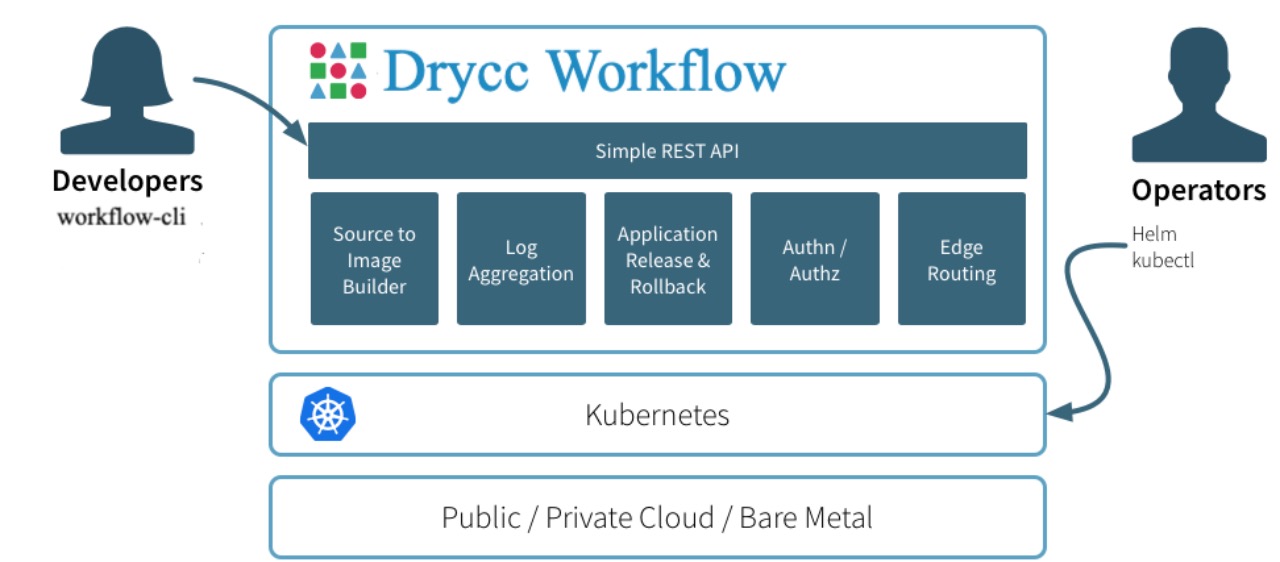
Drycc Workflow provides additional functionality to your Kubernetes cluster, including:
- Source to Image Builder which compiles your Application code via Buildpacks or Dockerfiles
- Simple REST API which powers the CLI and any external integrations
- Application release and rollback
- Authentication and Authorization to Application resources
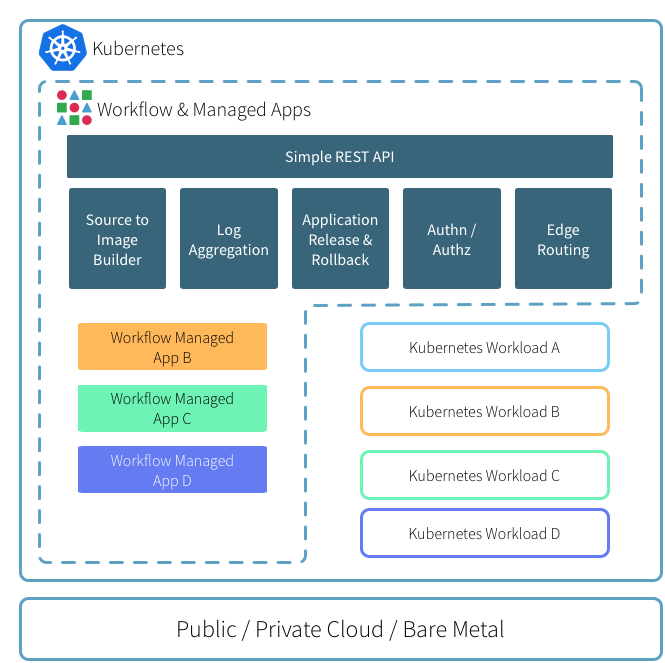
Kubernetes-Native
All platform components and applications deployed via Workflow expect to be
running on an existing Kubernetes cluster. This means that you can happily run
your Kubernetes-native workloads next to applications that are managed through
Drycc Workflow.
Application Layout and Edge Routing
By default Workflow creates per-application Namespaces and Services so you can
easily connect your applications to other on-cluster services through standard
Kubernetes mechanisms.
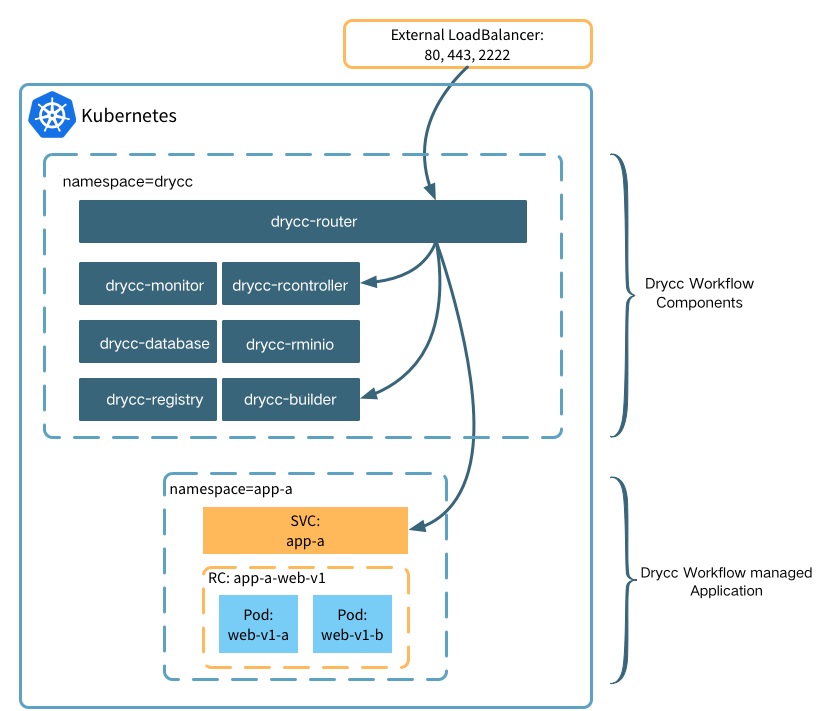
The router component is responsible for routing HTTP/s traffic to your
Applications as well as proxying git push and platform API traffic.
By default, the router component is deployed as a Kubernetes service with type
LoadBalancer; which, depending on your configuration, will provision a
cloud-native load balancer automatically.
The router automatically discovers routable Applications, SSL/TLS certificates
and application-specific configurations through the use of Kubernetes
annotations. Any changes to router configuration or certificates are applied
within seconds.
Topologies
Drycc Workflow no longer dictates a specific topology or server count for your
deployment. The platform components will happily run on single-server
configurations as well as multi-server production clusters.
2.3 - Components
Workflow is comprised of a number of small, independent services that combine to create a distributed CaaS.
All Workflow components are deployed as services (and associated controllers) in your Kubernetes cluster.
If you are interested we have a more detailed exploration of the Workflow architecture.
All of the componentry for Workflow is built with composability in mind. If you
need to customize one of the components for your specific deployment or need
the functionality in your own project we invite you to give it a shot!
Controller
Project Location: drycc/controller
The controller component is an HTTP API server which serves as the endpoint for
the drycc CLI. The controller provides all of the platform functionality as
well as interfacing with your Kubernetes cluster. The controller persists all
of its data to the database component.
Passport
Project Location: drycc/passport
The passport component exposes a web API and provide OAuth2 authentication.
Database
Project Location: drycc/postgres
The database component is a managed instance of PostgreSQL which holds a
majority of the platforms state. Backups and WAL files are pushed to object
storage via WAL-E. When the database is restarted, backups are fetched and
replayed from object storage so no data is lost.
Builder
Project Location: drycc/builder
The builder component is responsible for accepting code pushes via Git and
managing the build process of your Application. The builder process is:
- Receives incoming
git push requests over SSH
- Authenticates the user via SSH key fingerprint
- Authorizes the user’s access to push code to the Application
- Starts the Application Build phase (see below)
- Triggers a new Release via the Controller
Builder currently supports both buildpack and Dockerfile based builds.
Project Location: drycc/imagebuilder
For Buildpack-based deploys, the builder component will launch a one-shot Job
in the drycc namespace. This job runs imagebuilder component which handles
default and custom buildpacks (specified by .packbuilder). The completed image
is pushed to the managed Container registry on cluster. For more information
about buildpacks see using buildpacks.
Unlike buildpack-based, For Applications which contain a Dockerfile in the root
of the repository, it generates a Container image (using the underlying Container engine).
For more information see using Dockerfiles.
Object Storage
Project Location: drycc/storage
All of the Workflow components that need to persist data will ship them to the
object storage that was configured for the cluster.For example, database ships
its WAL files, registry stores Container images, and slugbuilder stores slugs.
Workflow supports either on or off-cluster storage. For production deployments
we highly recommend that you configure off-cluster object storage.
To facilitate experimentation, development and test environments, the default charts for
Workflow include on-cluster storage via storage.
If you also feel comfortable using Kubernetes persistent volumes you may
configure storage to use persistent storage available in your environment.
Registry
Project Location: drycc/registry
The registry component is a managed container registry which holds application
images generated from the builder component. Registry persists the Container image
images to either local storage (in development mode) or to object storage
configured for the cluster.
Quickwit
Project Location: drycc/quickwit
Quickwit is the first engine to execute complex search and analytics queries directly on cloud storage with
sub-second latency. Powered by Rust and its decoupled compute and storage architecture, it is designed to
be resource-efficient, easy to operate, and scale to petabytes of data.
Quickwit is a great fit for log management, distributed tracing, and generally immutable data such as
conversational data (emails, texts, messaging platforms) and event-based analytics.
Fluentbit
Project Location: drycc/fluentbit
Fluent Bit is a fast and lightweight telemetry agent for logs, metrics, and traces for Linux, macOS, Windows,
and BSD family operating systems. Fluent Bit has been made with a strong focus on performance to allow the
collection and processing of telemetry data from different sources without complexity.
Victoriametrics
Project Location: drycc/victoriametrics
Victoriametrics is a system monitoring and alerting system. It was opensourced by SoundCloud in 2012 and is
the second project both to join and to graduate within Cloud Native Computing Foundation after Kubernetes.
Victoriametrics stores all metrics data as time series, i.e metrics information is stored along with the
timestamp at which it was recorded, optional key-value pairs called as labels can also be stored along
with metrics.
HelmBroker
Project Location: drycc-addons/helmbroker
Helm Broker is a Service Broker that exposes Helm charts as Service Classes in Service Catalog.
To do so, Helm Broker uses the concept of addons. An addon is an abstraction layer over a Helm chart
which provides all information required to convert the chart into a Service Class.
Victoriametrics
Project Location: drycc/victoriametrics
Victoriametrics is an open-source systemsmonitoring and alerting toolkit originally built atSoundCloud.
See Also
3 - Installing to Kubernetes
Deploying Drycc on a Kubernetes Cluster.
3.1 - Requirements
To run Drycc Workflow on a Kubernetes cluster, there are a few requirements to keep in mind.
Kubernetes Versions
Drycc Workflow requires Kubernetes v1.16.15 or later.
Components Requirements
Drycc uses gateway as a routing implementation, so you have to choose a gateway. We recommend using istio or kong.
Workflow supports the use of ACME to manage automatic certificates. cert-manager is also one of the necessary components. If you use cert-manager EAB, you need to set the clusterResourceNamespace to the namespace of drycc.
Workflow supports stateful apps. You can create and use them through the ‘drycc volumes’ command. If you want to use this feature, you must have a StorageClass that supports ReadWriteMany.
Workflow also supports the OSB API through the ‘drycc resources’ command. If you want to use this function, you need to install service-catalog.
Storage Requirements
A variety of Drycc Workflow components rely on an object storage system to do their work, including storing application slugs, container images, and database logs.
Drycc Workflow ships with drycc storage by default, which provides in-cluster storage.
Workflow supports Amazon Simple Storage Service (S3), Google Cloud Storage (GCS), OpenShift Swift, and Azure Blob Storage. See configuring object storage for setup instructions.
Resource Requirements
When deploying Drycc Workflow, it’s important to provision machines with adequate resources. Drycc is a highly-available distributed system, which means that Drycc components and your deployed applications will move around the cluster onto healthy hosts as hosts leave the cluster for various reasons (failures, reboots, autoscalers, etc.). Because of this, you should have ample spare resources on any machine in your cluster to withstand the additional load of running services for failed machines.
Drycc Workflow components use about 2.5GB of memory across the cluster, and require approximately 30GB of hard disk space. Because it may need to handle additional load if another one fails, each machine has minimum requirements of:
- At least 4GB of RAM (more is better)
- At least 40GB of hard disk space
Note that these estimates are for Drycc Workflow and Kubernetes only. Be sure to leave enough spare capacity for your application footprint as well.
Running smaller machines will likely result in increased system load and has been known to result in component failures and instability.
3.2 - Specify Gateway
Choose the gateway provider that best suits your needs and platform.
Install Drycc Workflow (Specify gateway)
Now that Helm is installed and the repository has been added, install Workflow with a native gateway by running:
$ helm install drycc oci://registry.drycc.cc/charts/workflow \
    --namespace drycc \
    --set gateway.gatewayClass=istio \
    --set controller.appGatewayClass=istio \
    --set global.platformDomain=drycc.cc \
    --set builder.service.type=LoadBalancer
Of course, if you deploy it on a bare machine, you probably do not have a load balancer. You need to use NodePort:
$ helm install drycc oci://registry.drycc.cc/charts/workflow \
    --namespace drycc \
    --set gateway.gatewayClass=istio \
    --set controller.appGatewayClass=istio \
    --set global.platformDomain=drycc.cc \
    --set builder.service.type=NodePort \
    --set builder.service.nodePort=32222
If you want to use a load balancer on a bare machine, you can look at metallb
Where global.platformDomain is a required parameter that is traditionally not required for Workflow, as explained in the next section. In this example we are using drycc.cc for $hostname.
Helm will install a variety of Kubernetes resources in the drycc namespace.
Wait for the pods that Helm launched to be ready. Monitor their status by running:
$ kubectl --namespace=drycc get pods
You should also notice that several Kubernetes GatewayClasses have been installed on your cluster. You can view them by running:
$ kubectl get gatewayclass
Depending on the order in which the Workflow components initialize, some pods may restart. This is common during the
installation: if a component’s dependencies are not yet available, that component will exit and Kubernetes will
automatically restart it.
Here, it can be seen that the controller, builder and registry all took a few loops waiting for storage before they were able to start:
$ kubectl --namespace=drycc get pods
NAME                          READY     STATUS    RESTARTS   AGE
drycc-builder-hy3xv            1/1       Running   5          5m
drycc-controller-g3cu8         1/1       Running   5          5m
drycc-controller-celery-cmxxn  3/3       Running   0          5m
drycc-database-rad1o           1/1       Running   0          5m
drycc-fluentbit-1v8uk          1/1       Running   0          5m
drycc-fluentbit-esm60          1/1       Running   0          5m
drycc-storage-4ww3t            1/1       Running   0          5m
drycc-registry-asozo           1/1       Running   1          5m
Install a Kubernetes Gateway
Now that Workflow has been deployed with the gatewayClass, we will need a Kubernetes gateway in place to begin routing traffic.
Here is an example of how to use istio as a gateway for Workflow. Of course, you are welcome to use any controller you wish.
$ helm repo add istio https://istio-release.storage.googleapis.com/charts
$ helm repo update
$ kubectl create namespace istio-system
$ helm install istio-base istio/base -n istio-system
$ helm install istiod istio/istiod -n istio-system --wait
$ kubectl create namespace istio-ingress
$ helm install istio-ingress istio/gateway -n istio-ingress --wait
Users must install drycc and then set up a hostname, and assume the *.$host convention.
We need to point the *.$host record to the public IP address of your gateway. You can get the public IP using the following command. A wildcard entry is necessary here as apps will use the same rule after they are deployed.
$ kubectl get gateway --namespace drycc
NAME      CLASS   ADDRESS         PROGRAMMED   AGE
gateway   istio   138.91.243.152  True         36d
If we were using drycc.cc as a hostname, we would need to create the following A DNS records.
| Name |
Type |
Value |
| *.drycc.cc |
A |
138.91.243.152 |
Once all of the pods are in the READY state, and *.$host resolves to the external IP found above, the preparation of gateway has been completed!
After installing Workflow, register a user and deploy an application.
If your k8s does not provide public network loadblance, you need to install TCP proxy services such as haproxy on machines that can
access both internal and external networks, and then expose 80 and 443.
3.3 - Installing Drycc Workflow
This document is aimed at those who have already provisioned a Kubernetes cluster and want to install Drycc Workflow.
If help is required getting started with Kubernetes and
Drycc Workflow, follow the quickstart guide for assistance.
Prerequisites
- Verify the Kubernetes system requirements
- Install Helm and Drycc Workflow CLI tools
Check Your Setup
Check that the helm command is available and the version is v2.5.0 or newer.
$ helm version
Client: &version.Version{SemVer:"v2.5.0", GitCommit:"012cb0ac1a1b2f888144ef5a67b8dab6c2d45be6", GitTreeState:"clean"}
Server: &version.Version{SemVer:"v2.5.0", GitCommit:"012cb0ac1a1b2f888144ef5a67b8dab6c2d45be6", GitTreeState:"clean"}
Choose Your Deployment Strategy
Drycc Workflow includes everything it needs to run out of the box. However, these defaults are aimed at simplicity rather than
production readiness. Production and staging deployments of Workflow should, at a minimum, use off-cluster storage
which is used by Workflow components to store and backup critical data. Should an operator need to completely reinstall
Workflow, the required components can recover from off-cluster storage. See the documentation for configuring object
storage for more details.
More rigorous installations would benefit from using outside sources for the following things:
Gateway
Now, workflow requires that gateway and cert-manager must be installed. Any compatible Kubernetes ingress controller can be used.
Install Drycc Workflow
If the version of helm is 3.0 and above, you need to create the namespace in advance:
kubectl create ns drycc
If you want to change it, set the variable when using helm.
$ helm install drycc oci://registry.drycc.cc/charts/workflow \
    --namespace drycc \
    --set builder.imageRegistry=quay.io \
    --set imagebuilder.imageRegistry=quay.io \
    --set controller.imageRegistry=quay.io \
    --set database.imageRegistry=quay.io \
    --set fluentbit.imageRegistry=quay.io \
    --set valkey.imageRegistry=quay.io \
    --set storage.imageRegistry=quay.io \
    --set grafana.imageRegistry=quay.io \
    --set registry.imageRegistry=quay.io \
    --set global.platformDomain=drycc.cc
Helm will install a variety of Kubernetes resources in the drycc namespace.
Wait for the pods that Helm launched to be ready. Monitor their status by running:
$ kubectl --namespace=drycc get pods
If it’s preferred to have kubectl automatically update as the pod states change, run (type Ctrl-C to stop the watch):
$ kubectl --namespace=drycc get pods -w
Depending on the order in which the Workflow components initialize, some pods may restart. This is common during the
installation: if a component’s dependencies are not yet available, that component will exit and Kubernetes will
automatically restart it.
Here, it can be seen that the controller, builder and registry all took a few loops before they were able to start:
$ kubectl --namespace=drycc get pods
NAME                                     READY     STATUS    RESTARTS   AGE
drycc-builder-574483744-l15zj             1/1       Running   0          4m
drycc-controller-3953262871-pncgq         1/1       Running   2          4m
drycc-controller-celery-cmxxn             3/3       Running   0          4m
drycc-database-83844344-47ld6             1/1       Running   0          4m
drycc-fluentbit-zxnqb                     1/1       Running   0          4m
drycc-valkey-304849759-1f35p              1/1       Running   0          4m
drycc-storage-676004970-nxqgt             1/1       Running   0          4m
drycc-monitor-grafana-432627134-lnl2h     1/1       Running   0          4m
drycc-monitor-telegraf-wmcmn              1/1       Running   1          4m
drycc-registry-756475849-lwc6b            1/1       Running   1          4m
drycc-registry-proxy-96c4p                1/1       Running   0          4m
Once all of the pods are in the READY state, Drycc Workflow is up and running!
For more installation parameters, please check the values.yaml file of workflow.
After installing Workflow, register a user and deploy an application.
Users must set up a hostname, and assume the drycc-builder.$host convention.
We need to point the drycc-builder.$host record to the public IP address of your builder. You can get the public IP using the following command. A wildcard entry is necessary here as apps will use the same rule after they are deployed.
$ kubectl get svc drycc-builder --namespace drycc
NAME              CLUSTER-IP   EXTERNAL-IP      PORT(S)                      AGE
drycc-builder     10.0.25.3    138.91.243.152   2222:31625/TCP               33m
If we were using drycc.cc as a hostname, we would need to create the following A DNS records.
| Name |
Type |
Value |
| drycc-builder.drycc.cc |
A |
138.91.243.152 |
Once all of the pods are in the READY state, and drycc-builder.$host resolves to the external IP found above, Workflow is up and running!
After installing Workflow, register a user and deploy an application.
If your Kubernetes does not provide a public network load balancer, you need to install TCP proxy services such as haproxy on machines that can access both internal and external networks, and then expose 80 and 443.
3.4 - Configuring Object Storage
A variety of Drycc Workflow components rely on an object storage system to do their work including storing application slugs, Container images and database logs.
Drycc Workflow ships with Storage by default, which provides in-cluster storage.
Configuring off-cluster Object Storage
Every component that relies on object storage uses two inputs for configuration:
- Access credentials stored as a Kubernetes secret.
- You must use object storage services that are compatible with the S3 API.
The Helm chart for Drycc Workflow can be easily configured to connect Workflow components to off-cluster object storage. Drycc Workflow currently supports Google Cloud Storage, Amazon S3, Azure Blob Storage, and OpenStack Swift Storage.
Step 1: Create storage buckets
Create storage buckets for each of the Workflow subsystems: builder and registry.
Depending on your chosen object storage, you may need to provide globally unique bucket names. If you are using S3, use hyphens instead of periods in the bucket names. Using periods in the bucket name will cause an SSL certificate validation issue with S3.
If you provide credentials with sufficient access to the underlying storage, Workflow components will create the buckets if they do not exist.
Step 2: Generate storage credentials
If applicable, generate credentials that have create and write access to the storage buckets created in Step 1.
If you are using AWS S3 and your Kubernetes nodes are configured with appropriate IAM API keys via Instance Roles, you do not need to create API credentials. However, validate that the Instance Role has appropriate permissions to the configured buckets!
Operators should configure object storage by editing the Helm values file before running helm install. To do so:
- Fetch the Helm values by running
helm inspect values oci://registry.drycc.cc/charts/workflow > values.yaml
- Update the
builder/storage and registry/storage parameters to reference the platform you are using.
- Find the corresponding section for your storage type and provide appropriate values including region, bucket names, and access credentials.
- Save your changes.
Note
Assume we are using MinIO’s play for storage, noting that it is only a test server and should not be used in production environments:
$ helm install drycc oci://registry.drycc.cc/charts/workflow \
	--namespace drycc \
	--set global.platformDomain=youdomain.com \
	--set builder.storageBucket=registry \
	--set builder.storageEndpoint=https://play.min.io \
	--set builder.storageAccesskey=Q3AM3UQ867SPQQA43P2F \
	--set builder.storageSecretkey=zuf+tfteSlswRu7BJ86wekitnifILbZam1KYY3TG \
	--set builder.storagePathStyle=auto \
	--set registry.storageBucket=registry \
	--set registry.storageEndpoint=https://play.min.io \
	--set registry.storageAccesskey=Q3AM3UQ867SPQQA43P2F \
	--set registry.storageSecretkey=zuf+tfteSlswRu7BJ86wekitnifILbZam1KYY3TG \
	--set registry.storagePathStyle=auto
You are now ready to run helm install drycc oci://registry.drycc.cc/charts/workflow --namespace drycc -f values.yaml using your desired object storage.
3.5 - Configuring Postgres
Drycc Workflow’s controller and passport component rely on a PostgreSQL database to store platform state.
Configuring Postgres
By default, Drycc Workflow ships with the database component, which provides an in-cluster PostgreSQL database backed up to in-cluster or off-cluster object storage. Currently, for object storage, which is utilized by several Workflow components, only off-cluster solutions such as S3 or GCS are recommended in production environments. Experience has shown that many operators who already opt for off-cluster object storage similarly prefer to host Postgres off-cluster as well, using Amazon RDS or similar. When exercising both options, a Workflow installation becomes entirely stateless, and is thus restored or rebuilt with greater ease should the need ever arise.
Provisioning off-cluster Postgres
First, provision a PostgreSQL RDBMS using the cloud provider or other infrastructure of your choice. Take care to ensure that security groups or other firewall rules permit connectivity from your Kubernetes worker nodes, any of which may host the Workflow controller component.
Take note of the following:
- The hostname or public IP of your PostgreSQL RDBMS
- The port on which your PostgreSQL RDBMS runs– typically 5432
Within the off-cluster RDBMS, manually provision the following:
- A database user (take note of the username and password)
- A database owned by that user (take note of its name)
If you can log into the RDBMS as a superuser or a user with appropriate permissions, this process typically looks like this:
$ psql -h <host> -p <port> -d postgres -U <"postgres" or your own username>
> create user <drycc username; typically "drycc"> with password '<password>';
> create database <database name; typically "drycc"> with owner <drycc username>;
> \q
Configuring Workflow
The Helm chart for Drycc Workflow can be easily configured to connect the Workflow controller component to an off-cluster PostgreSQL database.
- Step 1: If you haven’t already fetched the values, do so with
helm inspect values drycc/workflow > values.yaml
- Step 2: Update database connection details by modifying
values.yaml:
- Update the
database.enabled parameter to false.
- Update the values in the
database configuration section to properly reflect all connection details.
- Update the values in the
controller configuration section to properly reflect platformDomain details.
- Save your changes.
- Note: you do not need to (and must not) base64 encode any values, as the Helm chart will automatically handle encoding as necessary.
You are now ready to helm install drycc oci://registry.drycc.cc/charts/workflow --namespace drycc -f values.yaml as usual.
3.6 - Configuring Registry
Drycc Workflow’s builder component relies on a registry for storing application container images.
Drycc Workflow ships with a registry component by default, which provides an in-cluster container registry backed by the platform-configured object storage. Operators might want to use an off-cluster registry for performance or security reasons.
Configuring Off-Cluster Private Registry
Every component that relies on a registry uses two inputs for configuration:
- Registry Location environment variable named
DRYCC_REGISTRY_LOCATION
- Access credentials stored as a Kubernetes secret named
registry-secret
The Helm chart for Drycc Workflow can be easily configured to connect Workflow components to an off-cluster registry. Drycc Workflow supports external registries that provide either short-lived tokens, which are valid only for a specified amount of time, or long-lived tokens (basic username/password), which are valid indefinitely for authentication. For registries that provide short-lived tokens for authentication, Drycc Workflow will generate and refresh them such that deployed apps will only have access to the short-lived tokens and not to the actual credentials for the registries.
When using a private registry, container images are no longer pulled by the Drycc Workflow Controller but rather are managed by Kubernetes. This will increase security and overall speed; however, the port information can no longer be discovered. Instead, the port information can be set via drycc config set PORT=<port> prior to deploying the application.
Drycc Workflow currently supports:
- off-cluster: Any provider that supports long-lived username/password authentication, such as Azure Container Registry, Docker Hub, quay.io, or a self-hosted container registry.
Configuration
- If you haven’t already fetched the values file, do so with
helm inspect values drycc/workflow > values.yaml
- Update registry location details by modifying the values file:
* Update the
registry.enabled parameter to reference the registry location you are using: true, false
* Update the values in the section which corresponds to your registry location type.
You are now ready to helm install drycc oci://registry.drycc.cc/charts/workflow --namespace drycc -f values.yaml using your desired registry.
Examples
Here we show how the relevant parts of the fetched values.yaml file might look after configuring for a particular off-cluster registry:
After following the docs and creating a registry, e.g. myregistry, with its corresponding login server of myregistry.azurecr.io, the following values should be supplied:
builder:
  registryHost: "myregistry.azurecr.io"
  registryUsername: "xxxx"
  registryPassword: "xxxx"
  registryOrganization: "xxxx"
registry:
  enabled: false
Note: The mandatory organization field (here xxxx) will be created as an ACR repository if it does not already exist.
Quay.io
builder:
  registryHost: "quay.io"
  registryUsername: "xxxx"
  registryPassword: "xxxx"
  registryOrganization: "xxxx"
registry:
  enabled: false
4 - Users
Learn how to manage users, registration, and authentication in Drycc Workflow.
4.1 - Drycc Workflow CLI
How to download, install, and start using the Drycc CLI. The Drycc CLI used to be part of the Drycc Toolbelt.
The Drycc Workflow command-line interface (CLI), or client, allows you to interact
with Drycc Workflow.
Installation
Install the latest drycc client for Linux or Mac OS X with:
$ curl -sfL https://www.drycc.cc/install-cli.sh | bash -
The installer puts drycc in your current directory, but you should move it
somewhere in your $PATH:
$ ln -fs $PWD/drycc /usr/local/bin/drycc
Getting Help
The Drycc client comes with comprehensive documentation for every command.
Use drycc help to explore the commands available to you:
$ drycc help
The Drycc command-line client issues API calls to a Drycc controller.

Usage: drycc <command> [<args>...]

Auth commands::

  login         login to a controller
  logout        logout from the current controller

Subcommands, use `drycc help [subcommand]` to learn more::
...
To get help on subcommands, use drycc help [subcommand]:
$ drycc help apps
Valid commands for apps:

apps:create        create a new application
apps:list          list accessible applications
apps:info          view info about an application
apps:open          open the application in a browser
apps:logs          view aggregated application logs
apps:run           run a command in an ephemeral app container
apps:destroy       destroy an application
apps:transfer      transfer app ownership to another user

Use `drycc help [command]` to learn more
Support for Multiple Profiles
The CLI reads from the default client profile, which is located on your
workstation at $HOME/.drycc/client.json.
Easily switch between multiple Drycc Workflow installations or users by setting
the $DRYCC_PROFILE environment variable or by using the -c flag.
There are two ways to set the $DRYCC_PROFILE option.
- Path to a json configuration file.
- Profile name. If you set profile to just a name, it will be saved alongside the default profile,
in
$HOME/.drycc/<name>.json.
Examples:
$ DRYCC_PROFILE=production drycc login drycc.production.com
...
Opening browser to http://drycc.example.com/v2/login/drycc/?key=4ccc81ee2dce4349ad5261ceffe72c71
Waiting for login... .o.Logged in as drycc
Configuration saved to /home/testuser/.drycc/production.json
$ DRYCC_PROFILE=~/config.json drycc login drycc.example.com
...
Opening browser to http://drycc.example.com/v2/login/drycc/?key=4ccc81ee2dce4349ad5261ceffe72c71
Waiting for login... .o.Logged in as drycc
Configuration saved to /home/testuser/config.json
The configuration flag works identically to and overrides $DRYCC_PROFILE:
$ drycc whoami -c ~/config.json
You are drycc at drycc.example.com
Proxy Support
If your workstation uses a proxy to reach the network where the cluster lies,
set the http_proxy or https_proxy environment variable to enable proxy support:
$ export http_proxy="http://proxyip:port"
$ export https_proxy="http://proxyip:port"
Note
Configuring a proxy is generally not necessary for local Minikube clusters.
CLI Plugins
Plugins allow developers to extend the functionality of the Drycc Client, adding new commands or features.
If an unknown command is specified, the client will attempt to execute the command as a dash-separated command. In this case, drycc resource:command will execute drycc-resource with the argument list command. In full form:
$ # these two are identical
$ drycc accounts list
$ drycc-accounts list
Any flags after the command will also be sent to the plugin as an argument:
$ # these two are identical
$ drycc accounts list --debug
$ drycc-accounts list --debug
But flags preceding the command will not:
$ # these two are identical
$ drycc --debug accounts list
$ drycc-accounts list
4.2 - Users and Registration
Learn how to register users and authenticate with Drycc Workflow
Workflow uses the passport component to create and authorize users. It can be configured for LDAP authentication or you can browse the passport website to register users.
Login to Workflow
If you already have an account, use drycc login to authenticate against the Drycc Workflow API.
$ drycc login http://drycc.example.com
Opening browser to http://drycc.example.com/v2/login/drycc/?key=4ccc81ee2dce4349ad5261ceffe72c71
Waiting for login... .o.Logged in as drycc
Configuration file written to /root/.drycc/client.json
You can also login with username and password:
$ drycc login http://drycc.example.com --username=demo --password=demo
Configuration file written to /root/.drycc/client.json
Logout from Workflow
Logout of an existing controller session using drycc logout.
$ drycc logout
Logged out as drycc
Verify Your Session
You can verify your client configuration by running drycc whoami.
$ drycc whoami
You are drycc at http://drycc.example.com
Note
Session and client configuration is stored in the ~/.drycc/client.json file.
4.3 - Users and SSH Keys
Create, manage, and upload SSH keys to Drycc for use in deploying and connecting to applications.
For Dockerfile and Buildpack based application deploys via git push, Drycc Workflow identifies users via SSH
keys. SSH keys are pushed to the platform and must be unique to each user. Users may have multiple SSH keys as needed.
Generate an SSH Key
If you do not already have an SSH key or would like to create a new key for Drycc Workflow, generate a new key using
ssh-keygen:
$ ssh-keygen -f ~/.ssh/id_drycc -t rsa
Generating public/private rsa key pair.
Enter passphrase (empty for no passphrase):
Enter same passphrase again:
Your identification has been saved in /Users/admin/.ssh/id_drycc.
Your public key has been saved in /Users/admin/.ssh/id_drycc.pub.
The key fingerprint is:
3d:ac:1f:f4:83:f7:64:51:c1:7e:7f:80:b6:70:36:c9 admin@plinth-23437.local
The key's randomart image is:
+--[ RSA 2048]----+
|              .. |
|               ..|
|           . o. .|
|         o. E .o.|
|        S == o..o|
|         o +.  .o|
|        . o + o .|
|         . o =   |
|          .   .  |
+-----------------+
$ ssh-add ~/.ssh/id_drycc
Identity added: /Users/admin/.ssh/id_drycc (/Users/admin/.ssh/id_drycc)
Adding and Removing SSH Keys
By publishing the public half of your SSH key to Drycc Workflow the component responsible for receiving git push
will be able to authenticate the user and ensure that they have access to the destination application.
$ drycc keys add ~/.ssh/id_drycc.pub
Uploading id_drycc.pub to drycc... done
You can always view the keys associated with your user as well:
$ drycc keys list
ID                              OWNER    KEY
admin@plinth-23437.local        admin    ssh-rsa abc AAAAB3Nz...3437.local
admin@subgenius.local           admin    ssh-rsa 123 AAAAB3Nz...nius.local
Remove keys by their name:
$ drycc keys remove admin@plinth-23437.local
Removing admin@plinth-23437.local SSH Key... don
5 - Applications
Learn how to deploy, configure, and manage applications on Drycc Workflow.
5.1 - Deploying an Application
Learn how to deploy applications to Drycc using git push or the drycc client.
Deploy applications to Drycc using git push or the drycc client. An Application runs inside containers and can scale horizontally if it follows the Twelve-Factor App methodology.
Supported Applications
Drycc Workflow deploys any application or service that runs in a container. To scale horizontally, applications must store state in external backing services rather than the local filesystem.
For example, content management systems like WordPress and Drupal that persist data to the local filesystem cannot scale horizontally using drycc scale. However, most modern applications feature stateless application tiers that scale well on Drycc.
Login to the Controller
Note
Install the client and register before deploying applications. See [client installation][install client] and
user registration.
Authenticate against the Drycc Controller using the URL provided by your administrator:
$ drycc login http://drycc.example.com
Opening browser to http://drycc.example.com/v2/login/drycc/?key=4ccc81ee2dce4349ad5261ceffe72c71
Waiting for login... .o.Logged in as admin
Configuration file written to /root/.drycc/client.json
Alternatively, log in with username and password:
$ drycc login http://drycc.example.com --username=demo --password=demo
Configuration file written to /root/.drycc/client.json
Select a Build Process
Drycc Workflow supports three build methods:
Buildpacks
Use Cloud Native Buildpacks to build applications following CNB documentation.
Learn more: Deploying with Buildpacks
Dockerfiles
Define portable execution environments using Dockerfiles built on your chosen base OS.
Learn more: Deploying with Dockerfiles
Container Images
Deploy container images from public or private registries, ensuring identical images across development, CI, and production.
Learn more: Deploying with Container Images
Tune Application Settings
Configure application-specific settings using drycc config:set. These override global defaults:
| Setting |
Description |
DRYCC_DISABLE_CACHE |
Disable the [imagebuilder cache][] (default: not set) |
DRYCC_DEPLOY_BATCHES |
Number of pods to bring up/down sequentially during scaling (default: number of available nodes) |
DRYCC_DEPLOY_TIMEOUT |
Deploy timeout in seconds per batch (default: 120) |
IMAGE_PULL_POLICY |
Kubernetes [image pull policy][pull-policy] (default: “IfNotPresent”; allowed: “Always”, “IfNotPresent”) |
KUBERNETES_DEPLOYMENTS_REVISION_HISTORY_LIMIT |
Number of deployment revisions Kubernetes retains (default: all) |
KUBERNETES_POD_TERMINATION_GRACE_PERIOD_SECONDS |
Seconds Kubernetes waits for pod termination after SIGTERM (default: 30) |
Deploy Timeout
The deploy timeout setting behaves differently depending on the deployment method.
Deployments (Current Method)
Kubernetes handles rolling updates server-side. The base timeout multiplies with DRYCC_DEPLOY_BATCHES for the total timeout. For example: 240 seconds × 4 batches = 960 seconds total.
ReplicationController Deploy (Legacy)
This timeout defines how long to wait for each batch to complete within DRYCC_DEPLOY_BATCHES.
Timeout Extensions
The base timeout extends for:
- Health checks using
initialDelaySeconds on liveness/readiness probes (uses the larger value)
- Slow image pulls (adds 10 minutes when pulls exceed 1 minute)
Deployments
Drycc Workflow uses [Kubernetes Deployments][] for deployments. Previous versions used ReplicationControllers (enable with DRYCC_KUBERNETES_DEPLOYMENTS=1).
Benefits of Deployments include:
- Server-side rolling updates in Kubernetes
- Continued deployments even if CLI connection interrupts
- Better pod management
Each deployment creates:
- One Deployment object per process type
- Multiple ReplicaSets (one per release)
- ReplicaSets manage running pods
The CLI behavior remains the same. The only visible difference is in drycc ps output showing different pod names.
5.2 - Using Buildpacks
Deploy applications using Cloud Native Buildpacks, which transform code into executable containers.
Drycc supports deploying applications using Cloud Native Buildpacks. Buildpacks transform deployed code into executable containers following CNB documentation.
Add SSH Key
For buildpack-based deployments via git push, Drycc Workflow authenticates users using SSH keys. Each user must upload a unique SSH key.
- Generate an SSH key by following these instructions.
- Upload your SSH key using
drycc keys add:
$ drycc keys add ~/.ssh/id_drycc.pub
Uploading id_drycc.pub to drycc... done
For more information about managing SSH keys, see this guide.
Prepare an Application
Clone this example application to explore the buildpack workflow if you don’t have an existing application:
$ git clone https://github.com/drycc/example-go.git
$ cd example-go
Create an Application
Create an application on the Controller:
$ drycc create
Creating application... done, created skiing-keypunch
Git remote drycc added
Push to Deploy
Deploy your application using git push drycc master:
$ git push drycc master
Counting objects: 75, done.
Delta compression using up to 8 threads.
Compressing objects: 100% (48/48), done.
Writing objects: 100% (75/75), 18.28 KiB | 0 bytes/s, done.
Total 75 (delta 30), reused 58 (delta 22)
remote: --->
Starting build... but first, coffee!
---> Waiting podman running.
---> Process podman started.
---> Waiting caddy running.
---> Process caddy started.
---> Building pack
---> Using builder registry.drycc.cc/drycc/buildpacks:bookworm
Builder 'registry.drycc.cc/drycc/buildpacks:bookworm' is trusted
Pulling image 'registry.drycc.cc/drycc/buildpacks:bookworm'
Resolving "drycc/buildpacks" using unqualified-search registries (/etc/containers/registries.conf)
Trying to pull registry.drycc.cc/drycc/buildpacks:bookworm...
Getting image source signatures
...
---> Skip generate base layer
---> Python Buildpack
---> Downloading and extracting Python 3.10.0
---> Installing requirements with pip
Collecting Django==3.2.8
Downloading Django-3.2.8-py3-none-any.whl (7.9 MB)
Collecting gunicorn==20.1.0
Downloading gunicorn-20.1.0-py3-none-any.whl (79 kB)
Collecting sqlparse>=0.2.2
Downloading sqlparse-0.4.2-py3-none-any.whl (42 kB)
Collecting pytz
Downloading pytz-2021.3-py2.py3-none-any.whl (503 kB)
Collecting asgiref<4,>=3.3.2
Downloading asgiref-3.4.1-py3-none-any.whl (25 kB)
Requirement already satisfied: setuptools>=3.0 in /layers/drycc_python/python/lib/python3.10/site-packages (from gunicorn==20.1.0->-r requirements.txt (line 2)) (57.5.0)
Installing collected packages: sqlparse, pytz, asgiref, gunicorn, Django
Successfully installed Django-3.2.8 asgiref-3.4.1 gunicorn-20.1.0 pytz-2021.3 sqlparse-0.4.2
---> Generate Launcher
...
Build complete.
Launching App...
...
Done, skiing-keypunch:v2 deployed to Workflow

Use 'drycc open' to view this application in your browser

To learn more, use 'drycc help' or visit https://www.drycc.cc

To ssh://git@drycc.staging-2.drycc.cc:2222/skiing-keypunch.git
 * [new branch]      master -> master

$ curl -s http://skiing-keypunch.example.com
Powered by Drycc
Release v2 on skiing-keypunch-v2-web-02zb9
Drycc automatically detects buildpack applications and scales the web process type to 1 on first deployment.
Scale your application by adjusting the number of containers. For example, use drycc scale web=3 to run 3 web containers.
Included Buildpacks
Drycc includes these buildpacks for convenience:
Drycc runs the bin/detect script from each buildpack to match your code.
Note
The [Scala Buildpack][] requires at least 512MB of free memory for the Scala Build Tool.
Using a Custom Buildpack
Use a custom buildpack by creating a .pack-builder file in your project root:
$ tee .pack-builder << EOF
registry.drycc.cc/drycc/buildpacks:bookworm
EOF
The custom buildpack will be used on your next git push.
Using Private Repositories
Pull code from private repositories by setting the SSH_KEY environment variable to a private key with access. Use either a file path or raw key material:
$ drycc config set SSH_KEY=/home/user/.ssh/id_rsa
$ drycc config set SSH_KEY="""-----BEGIN RSA PRIVATE KEY-----
(...)
-----END RSA PRIVATE KEY-----"""
For example, use a custom buildpack from a private GitHub URL by adding an SSH public key to your GitHub settings, then set SSH_KEY to the corresponding private key and configure .pack-builder:
$ tee .pack-builder << EOF
registry.drycc.cc/drycc/buildpacks:bookworm
EOF
$ git add .pack-builder
$ git commit -m "chore(buildpack): modify the pack_builder"
$ git push drycc master
Builder Selection
Drycc selects the build method following these rules:
- Uses
container if Dockerfile exists
- Uses
buildpack if Procfile exists
- Defaults to
container if both exist
- Override with
DRYCC_STACK=container or DRYCC_STACK=buildpack
5.3 - Using Dockerfiles
Deploy Docker-based applications to Drycc using Dockerfiles. Supports both Common Runtime and Private Spaces.
Drycc supports deploying applications using Dockerfiles. A Dockerfile automates the process of building a [Container Image][] that defines your application’s runtime environment. While Dockerfiles offer powerful customization, they require careful configuration to work with Drycc.
Add SSH Key
For Dockerfile-based deployments via git push, Drycc Workflow authenticates users using SSH keys. Each user must upload a unique SSH key to the platform.
- Generate an SSH key by following these instructions.
- Upload your SSH key using
drycc keys add:
$ drycc keys add ~/.ssh/id_drycc.pub
Uploading id_drycc.pub to drycc... done
For more information about managing SSH keys, see this guide.
Prepare an Application
If you don’t have an existing application, clone this example application to explore the Dockerfile workflow:
$ git clone https://github.com/drycc/helloworld.git
$ cd helloworld
Dockerfile Requirements
Your Dockerfile must meet these requirements for successful deployment:
- Use the
EXPOSE directive to expose exactly one port for HTTP traffic.
- Ensure your application listens for HTTP connections on that port.
- Define the default process using the
CMD directive.
- Include bash in your container image.
Note
If you use a private registry (such as GCR or others), set a
$PORT environment variable that matches your
EXPOSEd port. For example:
drycc config set PORT=5000. See
Configuring Registry for details.
Create an Application
Create an application on the Controller:
$ drycc create
Creating application... done, created folksy-offshoot
Git remote drycc added
Push to Deploy
Deploy your application using git push drycc master:
$ git push drycc master
Counting objects: 13, done.
Delta compression using up to 8 threads.
Compressing objects: 100% (13/13), done.
Writing objects: 100% (13/13), 1.99 KiB | 0 bytes/s, done.
Total 13 (delta 2), reused 0 (delta 0)
-----> Building Docker image
Uploading context 4.096 kB
Uploading context
Step 0 : FROM drycc/base:latest
 ---> 60024338bc63
Step 1 : RUN wget -O /tmp/go1.2.1.linux-amd64.tar.gz -q https://go.googlecode.com/files/go1.2.1.linux-amd64.tar.gz
 ---> Using cache
 ---> cf9ef8c5caa7
Step 2 : RUN tar -C /usr/local -xzf /tmp/go1.2.1.linux-amd64.tar.gz
 ---> Using cache
 ---> 515b1faf3bd8
Step 3 : RUN mkdir -p /go
 ---> Using cache
 ---> ebf4927a00e9
Step 4 : ENV GOPATH /go
 ---> Using cache
 ---> c6a276eded37
Step 5 : ENV PATH /usr/local/go/bin:/go/bin:$PATH
 ---> Using cache
 ---> 2ba6f6c9f108
Step 6 : ADD . /go/src/github.com/drycc/helloworld
 ---> 94ab7f4b977b
Removing intermediate container 171b7d9fdb34
Step 7 : RUN cd /go/src/github.com/drycc/helloworld && go install -v .
 ---> Running in 0c8fbb2d2812
github.com/drycc/helloworld
 ---> 13b5af931393
Removing intermediate container 0c8fbb2d2812
Step 8 : ENV PORT 80
 ---> Running in 9b07da36a272
 ---> 2dce83167874
Removing intermediate container 9b07da36a272
Step 9 : CMD ["/go/bin/helloworld"]
 ---> Running in f7b215199940
 ---> b1e55ce5195a
Removing intermediate container f7b215199940
Step 10 : EXPOSE 80
 ---> Running in 7eb8ec45dcb0
 ---> ea1a8cc93ca3
Removing intermediate container 7eb8ec45dcb0
Successfully built ea1a8cc93ca3
-----> Pushing image to private registry

       Launching... done, v2

-----> folksy-offshoot deployed to Drycc
       http://folksy-offshoot.local3.dryccapp.com

       To learn more, use `drycc help` or visit https://www.drycc.cc

To ssh://git@local3.dryccapp.com:2222/folksy-offshoot.git
 * [new branch]      master -> master

$ curl -s http://folksy-offshoot.local3.dryccapp.com
Welcome to Drycc!
See the documentation at http://docs.drycc.cc/ for more information.
Drycc automatically detects Dockerfile applications and scales the web process type to 1 on first deployment.
Scale your application by adjusting the number of containers. For example, use drycc scale web=3 to run 3 web containers.
Container Build Arguments
Starting with Workflow v2.13.0, you can inject application configuration into your container image using Docker build arguments. Enable this feature by setting an environment variable:
$ drycc config set DRYCC_DOCKER_BUILD_ARGS_ENABLED=1
Once enabled, all environment variables set with drycc config set become available in your Dockerfile. For example, after running drycc config set POWERED_BY=Workflow, you can use this build argument in your Dockerfile:
ARG POWERED_BY
RUN echo "Powered by $POWERED_BY" > /etc/motd
5.4 - Using Docker Images
Deploy applications using container images from Drycc Container Registry or external registries.
Drycc supports deploying applications using existing [Docker Images][]. This approach integrates well with Docker-based CI/CD pipelines.
Prepare an Application
Clone this example application to get started:
$ git clone https://github.com/drycc/example-dockerfile-http.git
$ cd example-dockerfile-http
Build the image and push it to DockerHub using your local Docker client:
$ docker build -t <username>/example-dockerfile-http .
$ docker push <username>/example-dockerfile-http
Docker Image Requirements
Container images must meet these requirements for successful deployment:
- Use the
EXPOSE directive to expose exactly one port for HTTP traffic.
- Ensure your application listens for HTTP connections on that port.
- Define the default process using the
CMD directive.
- Include bash in the container image.
Note
For private registries (such as GCR), set a
$PORT environment variable that matches your
EXPOSEd port. For example:
drycc config set PORT=5000. See
Configuring Registry for details.
Create an Application
Create an application on the controller:
$ mkdir -p /tmp/example-dockerfile-http && cd /tmp/example-dockerfile-http
$ drycc create example-dockerfile-http --no-remote
Creating application... done, created example-dockerfile-http
Note
For commands other than drycc create, the client uses the current directory name as the app name if not specified with --app.
Deploy the Application
Deploy from DockerHub or a public registry using drycc pull:
$ drycc pull <username>/example-dockerfile-http:latest
Creating build...  done, v2

$ curl -s http://example-dockerfile-http.local3.dryccapp.com
Powered by Drycc
Drycc automatically detects container images and scales the web process type to 1 on first deployment.
Scale your application by adjusting the number of containers. For example, use drycc scale web=3 to run 3 web containers.
Private Registry
Deploy images from private registries by attaching credentials using drycc registry. Use the same credentials as docker login.
Follow these steps for private Docker images:
- Obtain registry credentials (such as Quay.io Robot Account or GCR.io Long Lived Token)
- Run
drycc registry set <username> <password> -a <application-name>
- Use
drycc pull normally against private registry images
For GCR.io Long Lived Token, compact the JSON blob using jq and use _json_key as the username:
drycc registry set _json_key "$(cat google_cloud_cred.json | jq -c .)"
When using private registries, Kubernetes manages image pulls directly. This improves security and speed, but requires setting the application port manually with drycc config set PORT=80 before configuring registry credentials.
Note
[GCR.io][] and [ECR][] with short-lived authentication tokens are not currently supported.
5.5 - Managing App Processes
Learn how to manage application processes using Procfiles, scale process types, configure autoscaling, and troubleshoot running containers.
Drycc Workflow manages your application as a set of processes that can be named, scaled, and configured according to their role. This gives you the flexibility to easily manage different facets of your application. For example, you may have web-facing processes that handle HTTP traffic, background worker processes that do async work, and a helper process that streams from an API.
By using a Procfile, either checked into your application or provided via the CLI, you can specify the name of the process type and the application command that should run. To spawn other process types, use drycc scale <ptype>=<n> to scale those types accordingly.
Default Process Types
In the absence of a Procfile, a single, default process type is assumed for each application.
Applications built using Buildpacks via git push implicitly receive a web process type, which starts
the application server. Rails 4, for example, has the following process type:
web: bundle exec rails server -p $PORT
All applications utilizing Dockerfiles have an implied web process type, which runs the
Dockerfile’s CMD directive unmodified:
$ cat Dockerfile
FROM centos:latest
COPY . /app
WORKDIR /app
CMD python -m SimpleHTTPServer 5000
EXPOSE 5000
For the above Dockerfile-based application, the web process type would run the Container CMD of python -m SimpleHTTPServer 5000.
Applications utilizing remote container images, a web process type is also implied, and runs the CMD specified in the container image.
Note
The web process type is special as it is the default process type that will receive HTTP traffic from Workflow’s routers. Other process types can be named arbitrarily.
Declaring Process Types
If you use buildpack or Dockerfile builds and want to override or specify additional process types, simply include a file named Procfile in the root of your application’s source tree.
The format of a Procfile is one process type per line, with each line containing the command to invoke:
<process type>: <command>
The syntax is defined as:
<process type> – a lowercase alphanumeric string, is a name for your command, such as web, worker, urgentworker, clock, etc.<command> – a command line to launch the process, such as rake jobs:work.
This example Procfile specifies two types, web and sleeper. The web process launches a web server on port 5000 and a simple process which sleeps for 900 seconds and exits.
$ cat Procfile
web: bundle exec ruby web.rb -p ${PORT:-5000}
sleeper: sleep 900
If you are using remote container images, you may define process types by either running drycc pull with a Procfile in your working directory, or by passing a stringified Procfile to the --procfile CLI option.
For example, passing process types inline:
$ drycc pull drycc/example-go:latest --procfile="web: /app/bin/boot"
Read a Procfile in another directory:
$ drycc pull drycc/example-go:latest --procfile="$(cat deploy/Procfile)"
Or via a Procfile located in your current, working directory:
$ cat Procfile
web: /bin/boot
sleeper: echo "sleeping"; sleep 900

$ drycc pull -a steely-mainsail drycc/example-go
Creating build... done

$ drycc scale sleeper=1 -a steely-mainsail
Scaling processes... but first, coffee!
done in 0s

NAME                                        RELEASE    STATE    PTYPE      READY    RESTARTS     STARTED
steely-mainsail-sleeper-76c45b967c-4qm6w    v3         up       sleeper    1/1      0            2023-12-08T02:25:00UTC
steely-mainsail-web-c4f44c4b4-7p7dh         v3         up       web        1/1      0            2023-12-08T02:25:00UTC
Note
Only process types of web will be scaled to 1 automatically. If you have additional process types, remember to scale the process counts after creation.
To remove a process type simply scale it to 0:
$ drycc scale sleeper=0 -a steely-mainsail
Scaling processes... but first, coffee!
done in 3s

NAME                                        RELEASE    STATE    PTYPE      READY    RESTARTS     STARTED
steely-mainsail-web-c4f44c4b4-7p7dh         v3         up       web        1/1      0            2023-12-08T02:25:00UTC
Scaling Processes
Applications deployed on Drycc Workflow scale out via the process model. Use drycc scale to control the number of containers that power your app.
$ drycc scale web=5 -a iciest-waggoner
Scaling processes... but first, coffee!
done in 3s

NAME                                        RELEASE    STATE    PTYPE      READY    RESTARTS     STARTED
iciest-waggoner-web-c4f44c4b4-7p7dh         v3         up       web        1/1      0            2023-12-08T02:25:00UTC
iciest-waggoner-web-c4f44c4b4-8p7dh         v3         up       web        1/1      0            2023-12-08T02:25:00UTC
iciest-waggoner-web-c4f44c4b4-9p7dh         v3         up       web        1/1      0            2023-12-08T02:25:00UTC
iciest-waggoner-web-c4f44c4b4-1p7dh         v3         up       web        1/1      0            2023-12-08T02:25:00UTC
iciest-waggoner-web-c4f44c4b4-2p7dh         v3         up       web        1/1      0            2023-12-08T02:25:00UTC
If you have multiple process types for your application you may scale the process count for each type separately. For example, this allows you to manage web processes independently from background workers. For more information on process types see our documentation for Managing App Processes.
In this example, we are scaling the process type web to 5 but leaving the process type background with one worker.
$ drycc scale web=5
Scaling processes... but first, coffee!
done in 4s

NAME                                                RELEASE    STATE    PTYPE      READY    RESTARTS     STARTED
scenic-icehouse-web-3291896318-7lord                v3         up       web        1/1      0            2023-12-08T02:25:00UTC
scenic-icehouse-web-3291896318-jn957                v3         up       web        1/1      0            2023-12-08T02:25:00UTC
scenic-icehouse-web-3291896318-rsekj                v3         up       web        1/1      0            2023-12-08T02:25:00UTC
scenic-icehouse-web-3291896318-vwhnh                v3         up       web        1/1      0            2023-12-08T02:25:00UTC
scenic-icehouse-web-3291896318-vokg7                v3         up       web        1/1      0            2023-12-08T02:25:00UTC
scenic-icehouse-web-3291896318-vokg7                v3         up       web        1/1      0            2023-12-08T02:25:00UTC
scenic-icehouse-background-3291896318-yf8kh         v3         up       background 1/1      0            2023-12-08T02:25:00UTC
Scaling a process down, by reducing the process count, sends a TERM signal to the processes, followed by a SIGKILL if they have not exited within 30 seconds. Depending on your application, scaling down may interrupt long-running HTTP client connections.
For example, scaling from 5 processes to 3:
$ drycc scale web=3
Scaling processes... but first, coffee!
done in 1s

NAME                                                RELEASE    STATE    PTYPE     READY    RESTARTS     STARTED
scenic-icehouse-web-3291896318-vwhnh                v2         up       web       1/1      0            2023-12-08T02:25:00UTC
scenic-icehouse-web-3291896318-vokg7                v2         up       web       1/1      0            2023-12-08T02:25:00UTC
scenic-icehouse-web-3291896318-vokg9                v2         up       web       1/1      0            2023-12-08T02:25:00UTC
scenic-icehouse-background-3291896318-yf8kh         v2         up       background 1/1      0            2023-12-08T02:25:00UTC
Autoscale
Autoscale allows adding a minimum and maximum number of pods on a per process type basis. This is accomplished by specifying a target CPU usage across all available pods.
This feature is built on top of Horizontal Pod Autoscaling in Kubernetes or HPA for short.
Note
This is an alpha feature. It is recommended to be on the latest Kubernetes when using this feature.
$ drycc autoscale set web --min=3 --max=8 --cpu-percent=75
Applying autoscale settings for process type web on scenic-icehouse... done
And then review the scaling rule that was created for web:
$ drycc autoscale list
PTYPE    PERCENT    MIN    MAX
web      75         3      8
Remove scaling rule:
$ drycc autoscale unset web
Removing autoscale for process type web on scenic-icehouse... done
For autoscaling to work CPU requests have to be specified on each application pod (can be done via drycc limits --cpu). This allows the autoscale policies to do the appropriate calculations and make decisions on when to scale up and down.
Scale up can only happen if there was no rescaling within the last 3 minutes. Scale down will wait for 5 minutes from the last rescaling. That information and more can be found at HPA algorithm page.
Fetch Container Logs
List the containers:
$ drycc ps
NAME                                                RELEASE    STATE    PTYPE     READY    RESTARTS     STARTED
python-getting-started-web-69b7d4bfdc-kl4xf         v2         up       web       1/1      0            2023-12-08T02:25:00UTC

=== python-getting-started Processes
--- web:
python-getting-started-web-69b7d4bfdc-kl4xf up (v2)
Fetch the container logs:
$ drycc ps logs -f python-getting-started-web-69b7d4bfdc-kl4xf
[2024-05-24 07:14:39 +0000] [1] [INFO] Starting gunicorn 20.1.0
[2024-05-24 07:14:39 +0000] [1] [INFO] Listening at: http://0.0.0.0:8000 (1)
[2024-05-24 07:14:39 +0000] [1] [INFO] Using worker: gevent
[2024-05-24 07:14:39 +0000] [8] [INFO] Booting worker with pid: 8
[2024-05-24 07:14:39 +0000] [9] [INFO] Booting worker with pid: 9
[2024-05-24 07:14:39 +0000] [10] [INFO] Booting worker with pid: 10
[2024-05-24 07:14:39 +0000] [11] [INFO] Booting worker with pid: 11
List the containers:
$ drycc ps describe python-getting-started-web-69b7d4bfdc-kl4xf
Container:        python-getting-started-web
Image:            drycc/python-getting-started:latest
Command:
Args:
                  - gunicorn
                  - -c
                  - gunicorn_config.py
                  - helloworld.wsgi:application
State:            running
  startedAt:      "2024-05-24T07:14:39Z"
Ready:            true
Restart Count:    0
Delete a Container
Delete the containers. Due to the set number of replicas, a new container will be launched to meet the quantity requirement.
$ drycc ps delete python-getting-started-web-69b7d4bfdc-kl4xf
Deleting python-getting-started-web-69b7d4bfdc-kl4xf from python-getting-started... done
Get a Shell to a Running Container
Verify that the container is running:
$ drycc ps
NAME                                                RELEASE    STATE    PTYPE     READY    RESTARTS     STARTED
python-getting-started-web-69b7d4bfdc-kl4xf         v2         up       web       1/1      0            2023-12-08T02:25:00UTC

=== python-getting-started Processes
--- web:
python-getting-started-web-69b7d4bfdc-kl4xf up (v2)
Get a shell to the running container:
$ drycc ps exec python-getting-started-web-69b7d4bfdc-kl4xf -it -- bash
In your shell, list the root directory:
# Run this inside the container
ls /
Running individual commands in a container:
$ drycc ps exec python-getting-started-web-69b7d4bfdc-kl4xf -- date
Use “drycc ps –help” for a list of global command-line options (applies to all commands).
Restarting Application Processes
If you need to restart an application process, you may use drycc ps restart. Behind the scenes, Drycc Workflow instructs Kubernetes to terminate the old process and launch a new one in its place.
$ drycc ps
NAME                                               RELEASE    STATE       PTYPE      READY    RESTARTS     STARTED
scenic-icehouse-web-3291896318-vokg7               v2         up          web        1/1      0            2023-12-08T02:25:00UTC
scenic-icehouse-web-3291896318-rsekj               v2         up          web        1/1      0            2023-12-08T02:50:21UTC
scenic-icehouse-web-3291896318-vokg7               v2         up          web        1/1      0            2023-12-08T02:25:00UTC
scenic-icehouse-background-3291896318-yf8kh        v2         up          background 1/1      0            2023-12-08T02:25:00UTC

$ drycc ps restart scenic-icehouse-background
NAME                                               RELEASE    STATE       PTYPE      READY    RESTARTS    STARTED
scenic-icehouse-web-3291896318-vokg7               v2         up          web        1/1      0           2023-12-08T02:25:00UTC
scenic-icehouse-web-3291896318-rsekj               v2         up          web        1/1      0           2023-12-08T02:50:21UTC
scenic-icehouse-web-3291896318-vokg7               v2         up          web        1/1      0           2023-12-08T02:25:00UTC
scenic-icehouse-background-3291896318-yf8kh        v2         starting    background 1/1      0           2023-12-08T02:25:00UTC
Notice that the process name has changed from scenic-icehouse-background-3291896318-yf8kh to scenic-icehouse-background-3291896318-yd87g. In a multi-node Kubernetes cluster, this may also have the effect of scheduling the pod to a new node.
Use “drycc ps –help” for a list of ps command-line options (process info).
List Application Process Types
$ drycc pts
NAME          RELEASE    READY    UP-TO-DATE    AVAILABLE    GARBAGE    STARTED
web           v2         3/3      1             1            true       2023-12-08T02:25:00UTC
background    v2         1/1      1             1            false      2023-12-08T02:25:00UTC
Clean Process Types
Clean up non-existent process types; it is usually executed automatically when autodeploy is set to true.
$ drycc pts clean background
Get Deployment Info of Application Process Type
$ drycc pts describe web
Container:    python-getting-started-web
Image:        drycc/python-getting-started:latest
Command:
Args:
              - gunicorn
              - -c
              - gunicorn_config.py
              - helloworld.wsgi:application
Limits:
              cpu 1
              ephemeral-storage 2Gi
              memory 1Gi
Liveness:     http-get headers=[] path=/geo/ port=8000 delay=120s timeout=10s period=20s #success=1 #failure=3
Readiness:    http-get headers=[] path=/geo/ port=8000 delay=120s timeout=10s period=20s #success=1 #failure=3
5.6 - Configuring an Application
Store application configuration in environment variables to keep config separate from code.
Configuring an Application
Drycc applications [store configuration in environment variables][] to separate config from code and simplify environment-specific settings.
Setting Environment Variables
Use drycc config to manage environment variables for deployed applications.
$ drycc help config
Manage environment variables that define app config

Usage:
drycc config [flags]
drycc config [command]

Available Commands:
info        An app config info
set         Set environment variables for an app
unset       Unset environment variables for an app
pull        Pull environment variables to the path
push        Push environment variables from the path
attach      Selects environment groups to attach an app ptype
detach      Selects environment groups to detach an app ptype

Flags:
-a, --app string     The uniquely identifiable name for the application
-g, --group string   The group for which the config needs to be listed
-p, --ptype string   The ptype for which the config needs to be listed
-v, --version int    The version for which the config needs to be listed

Global Flags:
-c, --config string   Path to configuration file. (default "~/.drycc/client.json")
-h, --help            Display help information

Use "drycc config [command] --help" for more information about a command.
Configuration changes trigger automatic deployment of a new release.
Set multiple environment variables in one command or use drycc config push with a local .env file:
$ drycc config set FOO=1 BAR=baz && drycc config pull
$ cat .env
FOO=1
BAR=baz
$ echo "TIDE=high" >> .env
$ drycc config push
Creating config... done, v4

=== yuppie-earthman
DRYCC_APP: yuppie-earthman
FOO: 1
BAR: baz
TIDE: high
Set environment variables for specific process types:
$ drycc config set FOO=1 BAR=baz --ptype=web
Or manage environment variable groups:
$ drycc config set FOO1=1 BAR1=baz --group=web.env
Attach the group to the web process type:
$ drycc config attach web web.env
Detach the group:
$ drycc config detach web web.env
Attach to Backing Services
Drycc treats backing services like databases, caches, and queues as attached resources. Configure connections using environment variables.
For example, attach an application to an external PostgreSQL database:
$ drycc config set DATABASE_URL=postgres://user:pass@example.com:5432/db
=== peachy-waxworks
DATABASE_URL: postgres://user:pass@example.com:5432/db
Remove attachments using drycc config unset.
Buildpacks Cache
Applications using [Imagebuilder][] reuse the latest image data by default. This speeds up deployments for applications that fetch third-party libraries. Buildpacks must implement caching by writing to the cache directory.
Disable and Re-enable Cache
Disable caching by setting DRYCC_DISABLE_CACHE=1. Drycc clears cache files when disabled. Re-enable by unsetting the variable.
Clear Cache
Clear the cache using this procedure:
$ drycc config set DRYCC_DISABLE_CACHE=1
$ git commit --allow-empty -m "Clearing Drycc cache"
$ git push drycc # (use your remote name if different)
$ drycc config unset DRYCC_DISABLE_CACHE
Custom Health Checks
By default, Workflow verifies that applications start in their containers. Add health checks by configuring probes for the application. Health checks use Kubernetes Container Probes with three types: startupProbe, livenessProbe, and readinessProbe. Each probe supports httpGet, exec, or tcpSocket checks.
Probe Types
-
startupProbe: Indicates whether the application has started. Disables other probes until successful. Failure triggers restart policy.
-
livenessProbe: Useful for long-running applications that may break and need restarting.
-
readinessProbe: Useful when containers temporarily cannot serve requests but will recover. Failed containers stop receiving traffic but don’t restart.
Check Types
-
httpGet: Performs HTTP GET on the container. Response codes 200-399 pass. Specify port number.
-
exec: Runs a command in the container. Exit code 0 passes, non-zero fails. Provide command arguments.
-
tcpSocket: Attempts to open a socket connection. Container is healthy if connection succeeds. Specify port number.
Configure health checks per process type using drycc healthchecks set. Defaults to web process type if not specified.
Configure an HTTP GET liveness probe:
$ drycc healthchecks set livenessProbe httpGet 80 --ptype web
Applying livenessProbe healthcheck... done

App:             peachy-waxworks
UUID:            afd84067-29e9-4a5f-9f3a-60d91e938812
Owner:           dev
Created:         2023-12-08T10:25:00Z
Updated:         2023-12-08T10:25:00Z
Healthchecks:
                 livenessProbe web http-get headers=[] path=/ port=80 delay=50s timeout=50s period=10s #success=1 #failure=3
Include specific headers or paths:
$ drycc healthchecks set livenessProbe httpGet 80 \
    --path /welcome/index.html \
    --headers "X-Client-Version:v1.0,X-Foo:bar"
Applying livenessProbe healthcheck... done

App:             peachy-waxworks
UUID:            afd84067-29e9-4a5f-9f3a-60d91e938812
Owner:           dev
Created:         2023-12-08T10:25:00Z
Updated:         2023-12-08T10:25:00Z
Healthchecks:
                 livenessProbe web http-get headers=[X-Client-Version=v1.0] path=/welcome/index.html port=80 delay=50s timeout=50s period=10s #success=1 #failure=3
Configure an exec readiness probe:
$ drycc healthchecks set readinessProbe exec -- /bin/echo -n hello --ptype web
Applying readinessProbe healthcheck... done

App:             peachy-waxworks
UUID:            afd84067-29e9-4a5f-9f3a-60d91e938812
Owner:           dev
Created:         2023-12-08T10:25:00Z
Updated:         2023-12-08T10:25:00Z
Healthchecks:
                 readinessProbe web exec /bin/echo -n hello delay=50s timeout=50s period=10s #success=1 #failure=3
Overwrite probes by running drycc healthchecks set again. Health checks modify deployment behavior - Workflow waits for checks to pass before proceeding to the next pod.
Autodeploy
By default, configuration, limits, and health check changes trigger automatic deployment. Disable autodeploy to prevent automatic deployments:
$ drycc autodeploy disable
Re-enable autodeploy:
$ drycc autodeploy enable
Manually deploy all process types:
$ drycc releases deploy
Deploy specific process types with optional force flag:
$ drycc releases deploy web --force
Autorollback
By default, deployment failures automatically rollback to the previous successful version. Disable autorollback:
$ drycc autorollback disable
Re-enable autorollback:
$ drycc autorollback enable
Isolate Applications
Isolate applications to specific nodes using drycc tags.
Note
Configure your cluster with proper node labels before using tags. Commands will fail without labels. Learn more: [“Assigning Pods to Nodes”][pods-to-nodes].
Once nodes have appropriate labels, restrict application process types to those nodes:
$ drycc tags set web environ=prod
Applying tags...  done, v4

environ  prod
5.7 - Managing App Metrics
Learn how to monitor Drycc applications using metrics collection with Prometheus, including CPU, memory, disk, and network monitoring.
Metrics provide basic monitoring capabilities for pods, offering various monitoring indicators such as CPU, memory, disk, and network usage to meet basic monitoring requirements for pod resources.
Create an Authentication Token
Create an authentication token using the Drycc client:
$ drycc tokens add prometheus --password admin --username admin
 !    WARNING: Make sure to copy your token now.
 !    You won't be able to see it again, please confirm whether to continue.
 !    To proceed, type "yes" !

> yes
UUID                                  USERNAME    TOKEN
58176cf1-37a8-4c52-9b27-4c7a47269dfb  admin       1F2c7A802aF640fd9F31dD846AdDf56BcMsay
Add Scrape Configurations for Prometheus
A valid example configuration file can be found in the Drycc documentation.
The global configuration specifies parameters that are valid in all other configuration contexts. They also serve as defaults for other configuration sections:
global:
  scrape_interval:   60s
  evaluation_interval: 60s
scrape_configs:
- job_name: 'drycc'
  scheme: https
  metrics_path: /v2/apps/<appname>/metrics
  authorization:
    type: Token
    credentials: 1F2c7A802aF640fd9F31dD846AdDf56BcMsay
  static_configs:
  - targets: ['drycc.domain.com']
5.8 - Managing App Lifecycle
Learn how to track changes, rollback releases, run administrative tasks, and troubleshoot Drycc applications throughout their lifecycle.
Track Application Changes
Drycc Workflow tracks all changes to your application. Application changes result from either new application code pushed to the platform (via git push drycc master), or updates to application configuration (via drycc config:set KEY=VAL).
Each time a build or configuration change is made to your application, a new release is created. These release numbers increase monotonically.
You can see a record of changes to your application using drycc releases:
$ drycc releases
OWNER    STATE      VERSION    CREATED                 SUMMARY
dev      succeed    v3         2023-12-04T10:17:46Z    dev deleted PIP_INDEX_URL, DISABLE_COLLECTSTATIC
dev      succeed    v2         2023-12-01T10:20:22Z    dev added IMAGE_PULL_POLICY, PIP_INDEX_URL, PORT, DISABLE_COLLEC[...]
dev      succeed    v1         2023-11-30T17:54:57Z    dev created initial release
Rollback a Release
Drycc Workflow supports rolling back to previous releases. If buggy code or an errant configuration change is pushed to your application, you may rollback to a previously known good release.
Note
All rollbacks create a new, numbered release but reference the build/code and configuration from the desired rollback point.
In this example, the application is currently running release v4. Using drycc rollback v2 tells Workflow to deploy the build and configuration that was used for release v2. This creates a new release named v5 whose contents are the source and configuration from release v2:
$ drycc releases
OWNER    STATE      VERSION    CREATED                 SUMMARY
dev      succeed    v3         2023-12-04T10:17:46Z    dev deleted PIP_INDEX_URL, DISABLE_COLLECTSTATIC
dev      succeed    v2         2023-12-01T10:20:22Z    dev added IMAGE_PULL_POLICY, PIP_INDEX_URL, PORT, DISABLE_COLLEC[...]
dev      succeed    v1         2023-11-30T17:54:57Z    dev created initial release

$ drycc rollback v2
Rolled back to v2

$ drycc releases
OWNER    STATE      VERSION    CREATED                 SUMMARY
dev      succeed    v4         2023-12-04T10:20:46Z    dev rolled back to v2
dev      succeed    v3         2023-12-04T10:17:46Z    dev deleted PIP_INDEX_URL, DISABLE_COLLECTSTATIC
dev      succeed    v2         2023-12-01T10:20:22Z    dev added IMAGE_PULL_POLICY, PIP_INDEX_URL, PORT, DISABLE_COLLEC[...]
dev      succeed    v1         2023-11-30T17:54:57Z    dev created initial release
To rollback only the web process type:
$ drycc rollback v3 web
Rolled back to v3

$ drycc releases
OWNER    STATE      VERSION    CREATED                 SUMMARY
dev      succeed    v5         2023-12-04T10:23:49Z    dev rolled back to v3
dev      succeed    v4         2023-12-04T10:20:46Z    dev rolled back to v2
dev      succeed    v3         2023-12-04T10:17:46Z    dev deleted PIP_INDEX_URL, DISABLE_COLLECTSTATIC
dev      succeed    v2         2023-12-01T10:20:22Z    dev added IMAGE_PULL_POLICY, PIP_INDEX_URL, PORT, DISABLE_COLLEC[...]
dev      succeed    v1         2023-11-30T17:54:57Z    dev created initial release
Run One-off Administration Tasks
Drycc applications use one-off processes for admin tasks like database migrations and other commands that must run against the live application.
Use drycc run to execute commands on the deployed application:
$ drycc run -- 'ls -l'
Running `ls -l`...

total 28
-rw-r--r-- 1 root root  553 Dec  2 23:59 LICENSE
-rw-r--r-- 1 root root   60 Dec  2 23:59 Procfile
-rw-r--r-- 1 root root   33 Dec  2 23:59 README.md
-rw-r--r-- 1 root root 1622 Dec  2 23:59 pom.xml
-rw-r--r-- 1 root root   25 Dec  2 23:59 system.properties
drwxr-xr-x 3 root root 4096 Dec  2 23:59 src
-rw-r--r-- 1 root root   25 Dec  2 23:59 system.properties
drwxr-xr-x 6 root root 4096 Dec  3 00:00 target
Share an Application
Use drycc perms add to allow another Drycc user to collaborate on your application:
$ drycc perms add otheruser view,change,delete
Adding user otheruser as a collaborator for view,change,delete peachy-waxwork... done
Use drycc perms to see who an application is currently shared with, and drycc perms remove to remove a collaborator.
Note
Collaborators can do anything with an application that its owner can do, except delete the application.
When working with an application that has been shared with you, clone the original repository and add Drycc’s git remote entry before attempting to git push any changes to Drycc:
$ git clone https://github.com/drycc/example-java-jetty.git
Cloning into 'example-java-jetty'... done
$ cd example-java-jetty
$ git remote add -f drycc ssh://git@local3.dryccapp.com:2222/peachy-waxworks.git
Updating drycc
From drycc-controller.local:peachy-waxworks
 * [new branch]      master     -> drycc/master
Application Troubleshooting
Applications deployed on Drycc Workflow treat logs as event streams. Drycc Workflow aggregates stdout and stderr from every Container making it easy to troubleshoot problems with your application.
Use drycc grafana to view the log output from your deployed application:
Dec  3 00:30:31 ip-10-250-15-201 peachy-waxworks[web.5]: INFO:oejsh.ContextHandler:started o.e.j.s.ServletContextHandler{/,null}
Dec  3 00:30:31 ip-10-250-15-201 peachy-waxworks[web.8]: INFO:oejs.Server:jetty-7.6.0.v20120127
Dec  3 00:30:31 ip-10-250-15-201 peachy-waxworks[web.5]: INFO:oejs.AbstractConnector:Started SelectChannelConnector@0.0.0.0:10005
Dec  3 00:30:31 ip-10-250-15-201 peachy-waxworks[web.6]: INFO:oejsh.ContextHandler:started o.e.j.s.ServletContextHandler{/,null}
Dec  3 00:30:31 ip-10-250-15-201 peachy-waxworks[web.7]: INFO:oejsh.ContextHandler:started o.e.j.s.ServletContextHandler{/,null}
Dec  3 00:30:31 ip-10-250-15-201 peachy-waxworks[web.6]: INFO:oejs.AbstractConnector:Started SelectChannelConnector@0.0.0.0:10006
Dec  3 00:30:31 ip-10-250-15-201 peachy-waxworks[web.7]: INFO:oejs.AbstractConnector:Started SelectChannelConnector@0.0.0.0:10007
Dec  3 00:30:31 ip-10-250-15-201 peachy-waxworks[web.8]: INFO:oejs.AbstractConnector:Started SelectChannelConnector@0.0.0.0:10008
Rollback a Release
Drycc Workflow also supports rolling back go previous releases. If buggy code or an errant configuration change is pushed
to your application, you may rollback to a previously known, good release.
Note
All rollbacks create a new, numbered release. But will reference the build/code and configuration from the desired rollback point.
In this example, the application is currently running release v4. Using drycc rollback v2 tells Workflow to deploy the
build and configuration that was used for release v2. This creates a new release named v5 whose contents are the source
and configuration from release v2:
$ drycc releases
OWNER    STATE      VERSION    CREATED                 SUMMARY
dev      succeed    v3         2023-12-04T10:17:46Z    dev deleted PIP_INDEX_URL, DISABLE_COLLECTSTATIC
dev      succeed    v2         2023-12-01T10:20:22Z    dev added IMAGE_PULL_POLICY, PIP_INDEX_URL, PORT, DISABLE_COLLEC[...]
dev      succeed    v1         2023-11-30T17:54:57Z    dev created initial release

$ drycc rollback v2
Rolled back to v2

$ drycc releases
OWNER    STATE      VERSION    CREATED                 SUMMARY
dev      succeed    v4         2023-12-04T10:20:46Z    dev rolled back to v2
dev      succeed    v3         2023-12-04T10:17:46Z    dev deleted PIP_INDEX_URL, DISABLE_COLLECTSTATIC
dev      succeed    v2         2023-12-01T10:20:22Z    dev added IMAGE_PULL_POLICY, PIP_INDEX_URL, PORT, DISABLE_COLLEC[...]
dev      succeed    v1         2023-11-30T17:54:57Z    dev created initial release
Only rollback web process type:
$ drycc rollback v3 web
Rolled back to v3

$ drycc releases
OWNER    STATE      VERSION    CREATED                 SUMMARY
dev      succeed    v5         2023-12-04T10:23:49Z    dev rolled back to v3
dev      succeed    v4         2023-12-04T10:20:46Z    dev rolled back to v2
dev      succeed    v3         2023-12-04T10:17:46Z    dev deleted PIP_INDEX_URL, DISABLE_COLLECTSTATIC
dev      succeed    v2         2023-12-01T10:20:22Z    dev added IMAGE_PULL_POLICY, PIP_INDEX_URL, PORT, DISABLE_COLLEC[...]
dev      succeed    v1         2023-11-30T17:54:57Z    dev created initial release
Run One-off Administration Tasks
Drycc applications use one-off processes for admin tasks like database migrations and other commands that must run against the live application.
Use drycc run to execute commands on the deployed application.
$ drycc run -- 'ls -l'
Running `ls -l`...

total 28
-rw-r--r-- 1 root root  553 Dec  2 23:59 LICENSE
-rw-r--r-- 1 root root   60 Dec  2 23:59 Procfile
-rw-r--r-- 1 root root   33 Dec  2 23:59 README.md
-rw-r--r-- 1 root root 1622 Dec  2 23:59 pom.xml
drwxr-xr-x 3 root root 4096 Dec  2 23:59 src
-rw-r--r-- 1 root root   25 Dec  2 23:59 system.properties
drwxr-xr-x 6 root root 4096 Dec  3 00:00 target
Share an Application
Use drycc perms add to allow another Drycc user to collaborate on your application.
$ drycc perms add otheruser view,change,delete
Adding user otheruser as a collaborator for view,change,delete peachy-waxwork... done
Use drycc perms to see who an application is currently shared with, and drycc perms remove to remove a collaborator.
Note
Collaborators can do anything with an application that its owner can do, except delete the application.
When working with an application that has been shared with you, clone the original repository and add Drycc’ git remote
entry before attempting to git push any changes to Drycc.
$ git clone https://github.com/drycc/example-java-jetty.git
Cloning into 'example-java-jetty'... done
$ cd example-java-jetty
$ git remote add -f drycc ssh://git@local3.dryccapp.com:2222/peachy-waxworks.git
Updating drycc
From drycc-controller.local:peachy-waxworks
 * [new branch]      master     -> drycc/master
Application Troubleshooting
Applications deployed on Drycc Workflow treat logs as event streams. Drycc Workflow aggregates stdout and stderr
from every Container making it easy to troubleshoot problems with your application.
Use drycc grafana to view the log output from your deployed application.
Dec  3 00:30:31 ip-10-250-15-201 peachy-waxworks[web.5]: INFO:oejsh.ContextHandler:started o.e.j.s.ServletContextHandler{/,null}
Dec  3 00:30:31 ip-10-250-15-201 peachy-waxworks[web.8]: INFO:oejs.Server:jetty-7.6.0.v20120127
Dec  3 00:30:31 ip-10-250-15-201 peachy-waxworks[web.5]: INFO:oejs.AbstractConnector:Started SelectChannelConnector@0.0.0.0:10005
Dec  3 00:30:31 ip-10-250-15-201 peachy-waxworks[web.6]: INFO:oejsh.ContextHandler:started o.e.j.s.ServletContextHandler{/,null}
Dec  3 00:30:31 ip-10-250-15-201 peachy-waxworks[web.7]: INFO:oejsh.ContextHandler:started o.e.j.s.ServletContextHandler{/,null}
Dec  3 00:30:31 ip-10-250-15-201 peachy-waxworks[web.6]: INFO:oejs.AbstractConnector:Started SelectChannelConnector@0.0.0.0:10006
Dec  3 00:30:31 ip-10-250-15-201 peachy-waxworks[web.8]: INFO:oejsh.ContextHandler:started o.e.j.s.ServletContextHandler{/,null}
Dec  3 00:30:31 ip-10-250-15-201 peachy-waxworks[web.7]: INFO:oejs.AbstractConnector:Started SelectChannelConnector@0.0.0.0:10007
Dec  3 00:30:31 ip-10-250-15-201 peachy-waxworks[web.8]: INFO:oejs.AbstractConnector:Started SelectChannelConnector@0.0.0.0:10008
5.9 - Managing App Volumes
Learn how to create, mount, and manage persistent volumes for Drycc applications, including CSI, NFS, and OSS volume types.
You can use the commands below to create volumes and mount them to applications. Drycc supports ReadWriteMany access mode, so before deploying Drycc, you need to have a StorageClass ready that can support ReadWriteMany. When deploying Drycc, set controller.appStorageClass to this StorageClass.
Use drycc volumes to mount a volume for a deployed application’s processes.
$ drycc help volumes
Valid commands for volumes:

add              create a volume for the application
expand           expand a volume for the application
list             list volumes in the application
info             print information about a volume
remove           delete a volume from the application
client           the client used to manage volume files
mount            mount a volume to process of the application
unmount          unmount a volume from process of the application

Use 'drycc help [command]' to learn more.
Create a Volume for the Application
You can create a CSI volume with the drycc volumes add command:
$ drycc volumes add myvolume 200M
Creating myvolume to scenic-icehouse... done
Or use an existing NFS server:
$ drycc volumes add mynfsvolume 200M -t nfs --nfs-server=nfs.drycc.com --nfs-path=/
Creating mynfsvolume to scenic-icehouse... done
Or use an existing OSS:
$ drycc volumes add myossvolume 200M -t oss --oss-server=oss.drycc.com --oss-bucket=vbucket --oss-access-key=ak --oss-secret-key=sk
Creating myossvolume to scenic-icehouse... done
List Volumes in the Application
After a volume is created, you can list the volumes in this application:
$ drycc volumes list
NAME          OWNER    TYPE    PTYPE    PATH     SIZE
myvolume      admin    csi                       200M
mynfsvolume   admin    nfs                       200M
myossvolume   admin    oss                       200M
Mount a Volume
The volume named “myvolume” is created. You can mount the volume to a process of the application using the drycc volumes mount command. When a volume is mounted, a new release will be created and deployed automatically.
$ drycc volumes mount myvolume web=/data/web
Mounting volume... done
Use drycc volumes list to show mount details:
$ drycc volumes list
NAME       OWNER    TYPE    PTYPE    PATH         SIZE
myvolume   admin    nfs     web      /data/web    200M
If you no longer need the volume, use drycc volumes unmount to unmount the volume and then use drycc volumes remove to delete the volume from the application. The volume must be unmounted before it can be deleted.
$ drycc volumes unmount myvolume web
Unmounting volume... done

$ drycc volumes remove myvolume
Deleting myvolume from scenic-icehouse... done
Use Volume Client to Manage Volume Files
Assuming the volume named “myvolume” is created and mounted.
Prepare a file named testfile:
$ echo "testtext" > testfile
Upload the file:
$ drycc volumes client cp testfile vol://myvolume/
[↑] testfile                       100% [==================================================] (5/ 5 B, 355 B/s)
List files in myvolume:
$ drycc volumes client ls vol://myvolume/
[2024-07-22T15:32:28+08:00]    5    testfile
Delete testfile in myvolume:
$ drycc volumes client rm vol://myvolume/testfile
5.10 - Managing App Gateway
Learn how to manage gateways, services, and routes for Drycc applications to control traffic flow and service exposure.
A Gateway describes how traffic can be translated to services within the cluster. It defines a request for a way to translate traffic from outside the cluster to Kubernetes services. For example, traffic sent to a Kubernetes service by a cloud load balancer, an in-cluster proxy, or an external hardware load balancer. While many use cases have client traffic originating “outside” the cluster, this is not a requirement.
Create a Gateway for an Application
A gateway is a way of exposing services externally, which generates an external IP address to connect routes and services. After deployment, the gateway is automatically created.
List the gateways:
$ drycc gateways
NAME                      LISTENER       PORT     PROTOCOL    ADDRESSES
python-getting-started    tcp-80-0       80       HTTP        101.65.132.51
You can also add a port to this gateway or create a new one:
$ drycc gateways add python-getting-started --port=443 --protocol=HTTPS
Adding gateway python-getting-started to python-getting-started... done
Create a Service for an Application
A service is a way of exposing services internally, creating a service generates an internal DNS that can access process types. The web process type is created automatically; for other types, you should add them as needed.
List the services:
$ drycc services
PTYPE      PORT    PROTOCOL    TARGET-PORT    DOMAIN
web        80      TCP         8000           python-getting-started.python-getting-started.svc
Add a new service for a process type:
$ drycc services add sleep 8001:8001
Create a Route for an Application
A gateway may be attached to one or more route references which serve to direct traffic for a subset of traffic to a specific service. The web process type is already bound to the gateway and service.
List the routes:
$ drycc routes
NAME                           OWNER        KIND           GATEWAYS                              SERVICES
python-getting-started         demo         HTTPRoute      ["python-getting-started:80"]         ["python-getting-started:80"]
Create a new route and attach a gateway:
$ drycc routes add sleep HTTPRoute --ptype=sleep sleep:8001,100
$ drycc routes attach sleep --gateway=python-getting-started --port=80
5.11 - Managing App Resources
Learn how to create, bind, and manage external resources and services for Drycc applications using the service catalog.
You can use the commands below to create resources and bind them to applications. These commands depend on the service-catalog.
Use drycc resources to create and bind a resource for a deployed application.
$ drycc help resources
Manage resources for your applications

Usage:
drycc resources [flags]
drycc resources [command]

Available Commands:
services    List all available resource services
plans       List all available plans for a resource service
create      Create a resource for the application
list        List resources in the application
describe    Get a resource's detail in the application
update      Update a resource from the application
bind        Bind a resource for an application
unbind      Unbind a resource for an application
destroy     Delete a resource from the application

Flags:
-a, --app string   The uniquely identifiable name for the application
-l, --limit int    The maximum number of results to display

Global Flags:
-c, --config string   Path to configuration file. (default "~/.drycc/client.json")
-h, --help            Display help information
-v, --version         Display client version

Use "drycc resources [command] --help" for more information about a command.
List All Available Resource Services
You can list available resource services with the drycc resources services command:
$ drycc resources services
ID                                      NAME                  UPDATEABLE
15032a52-33c2-4b40-97aa-ceb972f51509    airflow               true
b7cb26a4-b258-445c-860b-a664239a67f8    cloudbeaver           true
9ce3c3ba-33b5-4e4e-a5e9-a338a83d5070    flink                 true
b80c51a1-957c-4d93-b3d5-efde84cd8031    fluentbit             true
fff5b6c7-ed85-429b-8265-493e40cc53c7    grafana               true
412e368f-bf78-4798-92cc-43343119a57d    kafka                 true
ea2a9b87-fbc4-4e2a-adee-161c1f91d98d    minio                 true
383f7316-84f3-4955-8491-1d4b02b749c8    mongodb               true
fbee746b-f3a7-4bef-8b55-cbecfd4c8ac3    mysql-cluster         true
5975094d-45cc-4e85-8573-f93937d026c7    opensearch            true
1db95161-7193-4544-8c76-e5ad5f6c03f6    pmm                   true
5cfb0abf-276c-445b-9060-9aa964ede87d    postgresql-cluster    true
b8f70264-eafc-4b2f-848e-2ec0d059032b    prometheus            true
e1fd0d37-9046-4152-a29b-d155c5657c8b    redis                 true
7d2b64c6-0b59-4f08-a2f5-7b17cea6e5ee    redis-cluster         true
2e6877df-86e7-4bcc-a869-2a9b6847a465    seaweedfs             true
4aea5c0f-9495-420d-896a-ffc61a3eced5    spark                 true
b50db3b5-8d5f-4be9-b8bd-467ecd6cc11d    zookeeper             true
List All Available Plans for a Resource Service
You can list all available plans for a resource service with the drycc resources plans command:
$ drycc resources plans redis
ID                                      NAME              DESCRIPTION
8d659058-a3b4-4058-b039-cc03a31b9442    standard-128      Redis standard-128 plan which limit resources memory size 128Mi.
36e3dbec-fc51-4f6b-9baa-e31e316858be    standard-256      Redis standard-256 plan which limit resources memory size 256Mi.
560817c2-5aa1-41c4-9ee6-a77e3ee552d5    standard-512      Redis standard-512 plan which limit resources memory size 512Mi.
d544d989-9fb8-43e9-a74e-0840ce1b8f0f    standard-1024     Redis standard-1024 plan which limit resources memory size 1Gi.
ad51b7bb-9b12-4ffd-8e49-010c0141b263    standard-2048     Redis standard-2048 plan which limit resources memory size 2Gi.
5097d76e-557c-453f-bdb1-54009e0df78d    standard-4096     Redis standard-4096 plan which limit resources memory size 4Gi.
be3fa2d0-36d2-47c5-9561-9deffe5ba373    standard-8192     Redis standard-8192 plan which limit resources memory size 8Gi.
4ca812a8-d7c3-439f-96cd-26523e88400e    standard-16384    Redis standard-16384 plan which limit resources memory size 16Gi.
b7f2a71f-0d97-48fd-8eed-aab24a7822f3    standard-32768    Redis standard-32768 plan which limit resources memory size 32Gi.
25c6b5d5-7505-47c8-95b1-dc9bdc698063    standard-65536    Redis standard-65536 plan which limit resources memory size 64Gi.
Create a Resource in an Application
You can create a resource with the drycc resources create command:
$ drycc resources create redis redis standard-128
Creating redis to scenic-icehouse... done
After resources are created, you can list the resources in this application:
$ drycc resources list
UUID                                    NAME     OWNER    PLAN                  UPDATED
07220e9e-d54d-4d74-a88c-f464aa374386    redis    admin    redis:standard-128    2024-05-08T01:01:00Z
Bind Resources
The resource named “redis” is created. You can bind the redis resource to the application using the drycc resources bind redis command:
$ drycc resources bind redis
Binding resource... done
Describe Resources
Use drycc resources describe to show the binding details. If the binding is successful, this command will show the connection information for the resource:
$ drycc resources describe redis
=== scenic-icehouse resource redis
plan:               redis:1000
status:             Ready
binding:            Ready

REDISPORT:          6379
REDIS_PASSWORD:     RzG87SJWG1
SENTINELHOST:       172.16.0.2
SENTINELPORT:       26379
Update Resources
You can use the drycc resources update command to upgrade to a new plan. An example of how to upgrade the plan’s capacity to 128MB:
$ drycc resources update redis redis standard-128
Updating redis to scenic-icehouse... done
Remove a Resource
If you no longer need a resource, use drycc resources unbind to unbind the resource and then use drycc resources destroy to delete the resource from the application. The resource must be unbound before it can be deleted.
$ drycc resources unbind redis
Unbinding resource... done

$ drycc resources destroy redis
Deleting redis from scenic-icehouse... done
5.12 - Inter-app Communication
Enable communication between Drycc applications using DNS service discovery.
Multi-process applications often feature one public-facing process supported by background processes that handle scheduled tasks or queue processing. Implement this architecture on Drycc Workflow by enabling DNS-based communication between applications and hiding supporting processes from public access.
DNS Service Discovery
Drycc Workflow supports single applications composed of multiple processes. Each application communicates on a single port, so inter-app communication requires discovering the target application’s address and port.
All Workflow applications map to port 80 externally. The challenge lies in discovering IP addresses. Workflow creates a Kubernetes Service for each application, assigning a name and cluster-internal IP address.
The cluster’s DNS service automatically manages DNS records, mapping application names to IP addresses as services start and stop. Applications communicate by sending requests to the service domain name: app-name.app-namespace.
5.13 - Managing Resource Limits
Learn how to set CPU and memory limits for Drycc application processes to ensure proper resource allocation and prevent resource exhaustion.
Managing Application Resource Limits
Drycc Workflow supports restricting memory and CPU shares for each process. Requests/limits set on a per-process type are given to Kubernetes as resource requests and limits. This means you guarantee a minimum amount of resources (requests) for a process while limiting the process from using more than the specified maximum (limits).
By default, Kubernetes will set requests equal to limits if you don’t explicitly set the requests value. Please keep in mind that 0 <= requests <= limits.
Setting Limits
If you set requests/limits that are out of range for your cluster, Kubernetes will be unable to schedule your application processes into the cluster!
$ drycc limits plans

ID                    SPEC    CPU              VCPUS    MEMORY     FEATURES
std1.large.c1m1       std1    Universal CPU    1        1 GiB      Integrated GPU shared
std1.large.c1m2       std1    Universal CPU    1        2 GiB      Integrated GPU shared
std1.large.c1m4       std1    Universal CPU    1        4 GiB      Integrated GPU shared
std1.large.c1m8       std1    Universal CPU    1        8 GiB      Integrated GPU shared
std1.large.c2m2       std1    Universal CPU    2        2 GiB      Integrated GPU shared
std1.large.c2m4       std1    Universal CPU    2        4 GiB      Integrated GPU shared
std1.large.c2m8       std1    Universal CPU    2        8 GiB      Integrated GPU shared
std1.large.c2m16      std1    Universal CPU    2        16 GiB     Integrated GPU shared

$ drycc limits set web=std1.large.c1m1
Applying limits... done
5.14 - Domains and Routing
Make applications accessible via custom domain names and manage routing.
Add or remove custom domains for your application using drycc domains:
$ drycc domains add hello.bacongobbler.com --ptype=web
Adding hello.bacongobbler.com to finest-woodshed... done
After adding the domain, configure DNS by setting up a CNAME record from your custom domain to the Drycc domain:
$ dig hello.dryccapp.com
[...]
;; ANSWER SECTION:
hello.bacongobbler.com.         1759    IN    CNAME    finest-woodshed.dryccapp.com.
finest-woodshed.dryccapp.com.    270     IN    A        172.17.8.100
Note
Setting a CNAME for a root domain can cause issues. An @ record as a CNAME redirects all traffic to another domain, including mail and SOA records. We recommend using subdomains, but you can work around this by pointing the @ record to the load balancer’s IP address.
Manage Routing
Control application accessibility through the routing mesh using drycc routing:
Disable routing to make the application unreachable externally (but still accessible internally via Kubernetes Service):
$ drycc routing disable
Disabling routing for finest-woodshed... done
Re-enable routing to restore external access:
$ drycc routing enable
Enabling routing for finest-woodshed... done
5.15 - SSL Certificates
Configure SSL certificates for secure HTTPS connections on custom domains in Drycc applications.
SSL is a cryptographic protocol that provides end-to-end encryption and integrity for all web requests. Applications that transmit sensitive data should enable SSL to ensure all information is transmitted securely.
To enable SSL on a custom domain, such as www.example.com, use the SSL certificate endpoint.
Note
The drycc certs command is only useful for custom domains. Default application domains are SSL-enabled by default and can be accessed using HTTPS, for example https://foo.dryccapp.com (provided that you have [installed your wildcard certificate][platform-ssl] on the routers or load balancer).
Overview
Due to the unique nature of SSL validation, provisioning SSL for your domain is a multi-step process that involves several third parties. You will need to:
- Purchase an SSL certificate from your SSL provider
- Upload the certificate to Drycc
Acquire an SSL Certificate
Purchasing an SSL certificate varies in cost and process depending on the vendor. RapidSSL offers a simple way to purchase a certificate and is a recommended solution. If you can use this provider, see buy an SSL certificate with RapidSSL for instructions.
DNS and Domain Configuration
Once the SSL certificate is provisioned and confirmed, you must route requests for your domain through Drycc. Unless you’ve already done so, add the domain specified when generating the CSR to your application with:
$ drycc domains add www.example.com --ptype=web -a foo
Adding www.example.com to foo... done
Add a Certificate
Add your certificate, any intermediate certificates, and private key to the endpoint using the certs:add command.
$ drycc certs add example-com server.crt server.key -a foo
Adding SSL endpoint... done
www.example.com
Note
The certificate name can only contain lowercase letters (a-z), numbers (0-9), and hyphens.
The Drycc platform will examine the certificate and extract relevant information such as the Common Name, Subject Alternative Names (SAN), fingerprint, and more.
This allows for wildcard certificates and multiple domains in the SAN without uploading duplicates.
Add a Certificate Chain
Sometimes certificates (such as self-signed or inexpensive certificates) require additional certificates to establish the chain of trust. Bundle all certificates into one file with your site’s certificate first:
$ cat server.crt server.ca > server.bundle
Then add them to Drycc using the certs add command:
$ drycc certs add example-com server.bundle server.key -a foo
Adding SSL endpoint... done
www.example.com
Attach SSL Certificate to a Domain
Certificates are not automatically connected to domains. You must manually attach a certificate to a domain:
$ drycc certs attach example-com example.com -a foo
Each certificate can be connected to multiple domains. There is no need to upload duplicates.
To remove an association:
$ drycc certs detach example-com example.com -a foo
Certificate Overview
You can verify the details of your domain’s SSL configuration with drycc certs:
$ drycc certs
NAME           COMMON-NAME    EXPIRES        SAN                 DOMAINS
example-com    example.com    14 Jan 2017    blog.example.com    example.com
Or view detailed information for each certificate:
$ drycc certs info example-com -a foo

=== bar-com Certificate
Common Name(s):     example.com
Expires At:         2017-01-14 23:57:57 +0000 UTC
Starts At:          2016-01-15 23:57:57 +0000 UTC
Fingerprint:        7A:CA:B8:50:FF:8D:EB:03:3D:AC:AD:13:4F:EE:03:D5:5D:EB:5E:37:51:8C:E0:98:F8:1B:36:2B:20:83:0D:C0
Subject Alt Name:   blog.example.com
Issuer:             /C=US/ST=CA/L=San Francisco/O=Drycc/OU=Engineering/CN=example.com/emailAddress=engineering@drycc.cc
Subject:            /C=US/ST=CA/L=San Francisco/O=Drycc/OU=Engineering/CN=example.com/emailAddress=engineering@drycc.cc

Connected Domains:  example.com
Owner:              admin-user
Created:            2016-01-28 19:07:41 +0000 UTC
Updated:            2016-01-30 00:10:02 +0000 UTC
Testing SSL
Use a command-line utility like curl to test that everything is configured correctly for your secure domain.
Note
The -k option tells curl to ignore untrusted certificates.
Pay attention to the output. It should print SSL certificate verify ok. If it prints something like common name: www.example.com (does not match 'www.somedomain.com'), then something is not configured correctly.
Enforce SSL at the Router
To enforce that all HTTP requests are redirected to HTTPS, enable TLS enforcement at the router level:
$ drycc tls force enable -a foo
Enabling https-only requests for foo... done
Users hitting the HTTP endpoint for the application will now receive a 301 redirect to the HTTPS endpoint.
To disable enforced TLS:
$ drycc tls force disable -a foo
Disabling https-only requests for foo... done
Automated Certificate Management
With Automated Certificate Management (ACM), Drycc automatically manages TLS certificates for applications with Hobby and Professional dynos on the Common Runtime, and for applications in Private Spaces that enable the feature.
Certificates handled by ACM automatically renew one month before they expire, and new certificates are created automatically whenever you add or remove a custom domain. All applications with paid dynos include ACM for free.
Automated Certificate Management uses Let’s Encrypt, the free, automated, and open certificate authority for managing your application’s TLS certificates. Let’s Encrypt is run for the public benefit by the Internet Security Research Group (ISRG).
To enable ACM:
$ drycc tls auto enable -a foo
To disable ACM:
$ drycc tls auto disable -a foo
Remove a Certificate
You can remove a certificate using the certs:remove command:
$ drycc certs remove my-cert -a foo
Removing www.example.com... Done.
Swapping Certificates
Over the lifetime of an application, you will need to acquire certificates with new expiration dates and apply them to all relevant applications. The recommended way to swap certificates is:
Be intentional with certificate names, such as example-com-2017, where the year signifies the expiry year. This allows for example-com-2018 when a new certificate is purchased.
Assuming all applications are already using example-com-2017, run the following commands (they can be chained together):
$ drycc certs detach example-com-2017 example.com -a foo
$ drycc certs attach example-com-2018 example.com -a foo
This handles a single domain, allowing you to verify everything worked as planned and slowly roll it out to other applications using the same method.
Troubleshooting
Here are some steps you can follow if your SSL endpoint is not working as expected.
Untrusted Certificate
In some cases when accessing the SSL endpoint, it may list your certificate as untrusted.
If this occurs, it may be because it is not trusted by Mozilla’s list of root CAs. If this is the case, your certificate may be considered untrusted for many browsers.
If you have uploaded a certificate that was signed by a root authority but you get the message that it is not trusted, then something is wrong with the certificate. For example, it may be missing intermediate certificates. If so, download the intermediate certificates from your SSL provider, remove the certificate from Drycc, and re-run the certs add command.
5.16 - Using drycc path
Deploy applications using Drycc path configuration for advanced Docker-based deployments.
The Drycc stack supports advanced use cases with custom Docker images. For most applications, we recommend using Drycc’s default buildpack system, which provides automatic security updates, language-specific optimizations, and eliminates the need to maintain Dockerfiles.
Drycc Config Path Overview
A Drycc repository supports two configurations:
- A
.drycc directory at the root of the working tree
- A root directory as a ‘bare’ repository (without working tree), typically used for
drycc pull
Repository contents include:
config/[a-z0-9]+(\.[a-z0-9]+)*::
        Configuration files named by group.
        Format follows environment variable syntax.

[a-z0-9]+(\-[a-z0-9]+)*.(yaml|yml)::
        Pipeline configuration files.
Environment variables use <NAME>=<VALUE> format. By convention, variable names are capitalized:
DEBUG=true
JVM_OPTIONS=-XX:+UseG1GC
A manifest contains these top-level sections:
build – Specifies Dockerfile for buildingenv – Defines container environment variablesrun – Specifies release phase tasksconfig – References config groups (global groups referenced automatically)deploy – Defines deployment commands and arguments
Example manifest for building Docker images:
kind: pipeline
ptype: web
build:
  docker: Dockerfile
  arg:
    CODENAME: bookworm
env:
  VERSION: 1.2.1
run:
  command:
  - ./deployment-tasks.sh
  image: task
  timeout: 100
config:
- jvm-config
deploy:
  command:
  - bash
  - -ec
  args:
  - bundle exec puma -C config/puma.rb
For more deployment examples, see the Drycc samples.
6 - Managing Workflow
Learn how to manage and maintain your Drycc Workflow deployment.
6.1 - Tuning Component Settings
Helm Charts are a set of Kubernetes manifests that reflect best practices for deploying an application or service on Kubernetes.
After you add the Drycc Chart Repository, you can customize the chart using
helm inspect values drycc/workflow > values.yaml before using helm install to complete the
installation.
There are a few ways to customize the respective component:
-
If the value is exposed in the values.yaml file as derived above, one may modify the section of the component to tune these settings. The modified value(s) will then take effect at chart installation or release upgrade time via either of the two respective commands:
 $ helm install drycc oci://registry.drycc.cc/charts/workflow \
     -n drycc \
     --namespace drycc \
     -f values.yaml
 $ helm upgrade drycc oci://registry.drycc.cc/charts/workflow \
     -n drycc \
     --namespace drycc \
     -f values.yaml
-
If the value hasn’t yet been exposed in the values.yaml file, one may edit the component deployment with the tuned setting. Here we edit the drycc-controller deployment:
$ kubectl --namespace drycc edit deployment drycc-controller
Add/edit the setting via the appropriate environment variable and value under the env section and save. The updated deployment will recreate the component pod with the new/modified setting.
-
Lastly, one may also fetch and edit the chart as served by version control/the chart repository itself:
 $ helm fetch oci://registry.drycc.cc/charts/workflow --untar
 $ $EDITOR workflow/charts/controller/templates/controller-deployment.yaml
Then run helm install ./workflow --namespace drycc --name drycc to apply the changes, or helm upgrade drycc ./workflow if the cluster is already running.
Setting Resource limits
You can set resource limits to Workflow components by modifying the values.yaml file fetched
earlier. This file has a section for each Workflow component. To set a limit to any Workflow
component just add resources in the section and set them to the appropriate values.
Below is an example of how the builder section of values.yaml might look with CPU and memory
limits set:
builder:
  imageOrg: "drycc"
  imagePullPolicy: "Always"
  imageTag: "canary"
  resources:
    limits:
      cpu: 1000m
      memory: 2048Mi
    requests:
      cpu: 500m
      memory: 1024Mi
Customizing the Builder
The following environment variables are tunable for the Builder component:
| Setting |
Description |
| DEBUG |
Enable debug log output (default: false) |
| BUILDER_POD_NODE_SELECTOR |
A node selector setting for builder job. As it may sometimes consume a lot of node resources, one may want a given builder job to run in a specific node only, so it won’t affect critical nodes. for example pool:testing,disk:magnetic |
Customizing the Controller
The following environment variables are tunable for the Controller component:
| Setting |
Description |
| REGISTRATION_MODE |
set registration to “enabled”, “disabled”, or “admin_only” (default: “admin_only”) |
| GUNICORN_WORKERS |
number of gunicorn workers spawned to process requests (default: CPU cores * 4 + 1) |
| RESERVED_NAMES |
a comma-separated list of names which applications cannot reserve for routing (default: “drycc, drycc-builder”) |
| DRYCC_DEPLOY_HOOK_URLS |
a comma-separated list of URLs to send deploy hooks to. |
| DRYCC_DEPLOY_HOOK_SECRET_KEY |
a private key used to compute the HMAC signature for deploy hooks. |
| DRYCC_DEPLOY_REJECT_IF_PROCFILE_MISSING |
rejects a deploy if the previous build had a Procfile but the current deploy is missing it. A 409 is thrown in the API. Prevents accidental process types removal. (default: “false”, allowed values: “true”, “false”) |
| DRYCC_DEPLOY_PROCFILE_MISSING_REMOVE |
when turned on (default) any missing process type in a Procfile compared to the previous deploy is removed. When set to false will allow an empty Procfile to go through without removing missing process types, note that new images, configs and so on will get updated on all proc types. (default: “true”, allowed values: “true”, “false”) |
| DRYCC_DEFAULT_CONFIG_TAGS |
set tags for all applications by default, for example: ‘{“role”: “worker”}’. (default: ‘’) |
| KUBERNETES_NAMESPACE_DEFAULT_QUOTA_SPEC |
set resource quota to application namespace by setting ResourceQuota spec, for example: {"spec":{"hard":{"pods":"10"}}}, restrict app owner to spawn more then 10 pods (default: “”, no quota will be applied to namespace) |
LDAP authentication settings
Configuration options for LDAP authentication are detailed here.
The following environment variables are available for enabling LDAP
authentication of user accounts in the Passport component:
| Setting |
Description |
| LDAP_ENDPOINT |
The URI of the LDAP server. If not specified, LDAP authentication is not enabled (default: “”, example: ldap://hostname). |
| LDAP_BIND_DN |
The distinguished name to use when binding to the LDAP server (default: “”) |
| LDAP_BIND_PASSWORD |
The password to use with LDAP_BIND_DN (default: “”) |
| LDAP_USER_BASEDN |
The distinguished name of the search base for user names (default: “”) |
| LDAP_USER_FILTER |
The name of the login field in the users search base (default: “username”) |
| LDAP_GROUP_BASEDN |
The distinguished name of the search base for user’s groups names (default: “”) |
| LDAP_GROUP_FILTER |
The filter for user’s groups (default: “”, example: objectClass=person) |
Global and per application settings
| Setting |
Description |
| DRYCC_DEPLOY_BATCHES |
the number of pods to bring up and take down sequentially during a scale (default: number of available nodes) |
| DRYCC_DEPLOY_TIMEOUT |
deploy timeout in seconds per deploy batch (default: 120) |
| IMAGE_PULL_POLICY |
the Kubernetes image pull policy for application images (default: “IfNotPresent”) (allowed values: “Always”, “IfNotPresent”) |
| KUBERNETES_DEPLOYMENTS_REVISION_HISTORY_LIMIT |
how many revisions Kubernetes keeps around for a given Deployment (default: all revisions) |
| KUBERNETES_POD_TERMINATION_GRACE_PERIOD_SECONDS |
how many seconds Kubernetes waits for a pod to finish work after a SIGTERM before sending SIGKILL (default: 30) |
See the Deploying Apps guide for more detailed information on those.
Customizing the Database
The following environment variables are tunable for the Database component:
| Setting |
Description |
| BACKUP_FREQUENCY |
how often the database should perform a base backup (default: “12h”) |
| BACKUPS_TO_RETAIN |
number of base backups the backing store should retain (default: 5) |
Customizing Fluentbit
The following values can be changed in the values.yaml file or by using the --values flag with the Helm CLI.
| Key |
Description |
| config.service |
The service section defines the global properties of the service. |
| config.inputs |
An input section defines a source (related to an input plugin). |
| config.filters |
A filter section defines a filter (related to a filter plugin) |
| config.outputs |
The outputs section specifies a destination that certain records should follow after a Tag match. |
For more information about the various variables that can be set please see the fluentbit.
Customizing the Monitor
We have exposed some of the more useful configuration values directly in the chart. This allows them to be set using either the values.yaml file or by using the --set flag with the Helm CLI. You can see these options below:
| Setting |
Default Value |
Description |
| user |
“admin” |
The first user created in the database (this user has admin privileges) |
| password |
“admin” |
Password for the first user. |
| allow_sign_up |
“true” |
Allows users to sign up for an account. |
For a list of other options you can set by using environment variables please see the configuration file in GitHub.
You can find a list of values that can be set using environment variables here.
Customizing the Registry
The Registry component can be tuned by following the
distribution config doc.
6.2 - Configure DNS
The Drycc Workflow controller and all applications deployed via Workflow are intended (by default) to be accessible as subdomains of the Workflow cluster’s domain.
For example, assuming example.com were a cluster’s domain:
- The controller should be accessible at
drycc.example.com
- Applications should be accessible (by default) at
<application name>.example.com
Given that this is the case, the primary objective in configuring DNS is to direct traffic for all subdomains of a cluster’s domain to the cluster node(s) hosting the platform’s router component, which can direct traffic within the cluster to the correct endpoints.
With a Load Balancer
Generally, it is recommended that a [load balancer][] be used to direct inbound traffic to one or more routers. In such a case, configuring DNS is as simple as defining a wildcard record in DNS that points to the load balancer.
For example, assuming a domain of example.com:
- An
A record enumerating each of your load balancer(s) IPs (i.e. DNS round-robining)
- A
CNAME record referencing an existing fully-qualified domain name for the load balancer
- Per AWS’ own documentation, this is the recommended strategy when using AWS Elastic Load Balancers, as ELB IPs may change over time.
DNS for any applications using a “custom domain” (a fully-qualified domain name that is not a subdomain of the cluster’s own domain) can be configured by creating a CNAME record that references the wildcard record described above.
Although it depends on your distribution of Kubernetes and your underlying infrastructure, in many cases, the IP(s) or existing fully-qualified domain name of a load balancer can be determined directly using the kubectl tool:
$ kubectl --namespace=istio-nginx describe service | grep "LoadBalancer"
LoadBalancer Ingress:	a493e4e58ea0511e5bb390686bc85da3-1558404688.us-west-2.elb.amazonaws.com
The LoadBalancer Ingress field typically describes an existing domain name or public IP(s). Note that if Kubernetes is able to automatically provision a load balancer for you, it does so asynchronously. If the command shown above is issued very soon after Workflow installation, the load balancer may not exist yet.
Without a Load Balancer
On some platforms (Minikube, for instance), a load balancer is not an easy or practical thing to provision. In these cases, one can directly identify the public IP of a Kubernetes node that is hosting a router pod and use that information to configure the local /etc/hosts file.
Because wildcard entries do not work in a local /etc/hosts file, using this strategy may result in frequent editing of that file to add fully-qualified subdomains of a cluster for each application added to that cluster. Because of this, a more viable option may be to utilize the xip.io service.
In general, for any IP, a.b.c.d, the fully-qualified domain name any-subdomain.a.b.c.d.xip.io will resolve to the IP a.b.c.d. This can be enormously useful.
To begin, find the node(s) hosting router instances using kubectl:
$ kubectl --namespace=istio-ingress describe pod | grep Node:
Node:       ip-10-0-0-199.us-west-2.compute.internal/10.0.0.199
Node:       ip-10-0-0-198.us-west-2.compute.internal/10.0.0.198
The command will display information for every router pod. For each, a node name and IP are displayed in the Node field. If the IPs appearing in these fields are public, any of these may be used to configure your local /etc/hosts file or may be used with xip.io. If the IPs shown are not public, further investigation may be needed.
You can list the IP addresses of a node using kubectl:
$ kubectl describe node ip-10-0-0-199.us-west-2.compute.internal
# ...
Addresses:	10.0.0.199,10.0.0.199,54.218.85.175
# ...
Here, the Addresses field lists all the node’s IPs. If any of them are public, again, they may be used to configure your local /etc/hosts file or may be used with xip.io.
In this section, we’ll describe how to configure Google Cloud DNS for routing your domain name to your Drycc cluster.
We’ll assume the following in this section:
- Your Ingress service has a load balancer in front of it.
- The load balancer need not be cloud based, it just needs to provide a stable IP address or a stable domain name.
- You have the
mystuff.com domain name registered with a registrar.
- Replace your domain name with
mystuff.com in the instructions to follow.
- Your registrar lets you alter the nameservers for your domain name (most registrars do).
Here are the steps for configuring cloud DNS to route to your Drycc cluster:
- Get the load balancer IP or domain name
- If you are on Google Container Engine, you can run
kubectl get svc -n istio-ingress and look for the LoadBalancer Ingress column to get the IP address
- Create a new Cloud DNS Zone (on the console:
Networking => Cloud DNS, then click on Create Zone)
- Name your zone, and set the DNS name to
mystuff.com. (note the . at the end).
- Click on the
Create button
- Click on the
Add Record Set button on the resulting page
- If your load balancer provides a stable IP address, enter the following fields in the resulting form:
DNS Name: *Resource Record Type: ATTL: the DNS TTL of your choosing. If you’re testing or you anticipate that you’ll tear down and rebuild many drycc clusters over time, we recommend a low TTLIPv4 Address: The IP that you got in the very first step- Click the
Create button
- If your load balancer provides the stable domain name
lbdomain.com, enter the following fields in the resulting form:
DNS Name: *Resource Record Type: CNAMETTL: the DNS TTL of your choosing. If you’re testing or you anticipate that you’ll tear down and rebuild many drycc clusters over time, we recommend a low TTLCanonical name: lbdomain.com. (note the . at the end)- Click on the
Create button
- In your domain registrar, set the nameservers for your
mystuff.com domain to the ones under the data column in the NS record on the same page. They’ll often be something like the below (note the trailing . characters).
ns-cloud-b1.googledomains.com.
ns-cloud-b2.googledomains.com.
ns-cloud-b3.googledomains.com.
ns-cloud-b4.googledomains.com.
Note: If you ever have to re-create your Drycc cluster, simply go back to step 6.4 or 7.4 (depending on your load balancer) and change the IP address or domain name to the new value. You may have to wait for the TTL you set to expire.
Testing
To test that traffic reaches its intended destination, a request can be
sent to the Drycc controller like so (do not forget the trailing slash!):
curl http://drycc.example.com/v2/
Or:
curl http://drycc.54.218.85.175.xip.io/v2/
Since such requests require authentication, a response such as the following should be considered an indicator of success:
{"detail":"Authentication credentials were not provided."}
6.3 - Deploy Hooks
Deploy hooks allow an external service to receive a notification whenever a new version of your app is pushed to Workflow.
It’s useful to help keep the development team informed about deploys, while
it can also be used to integrate different systems together.
After one or more hooks are set up, hook output and errors appear in your drycc grafana app logs:
2011-03-15T15:07:29-07:00 drycc[api]: Deploy hook sent to http://drycc.rocks
Deploy hooks are a generic HTTP hook. An administrator can create and configure multiple deploy
hooks by tuning the controller settings via the Helm chart.
HTTP POST Hook
The HTTP deploy hook performs an HTTP POST to a URL. The parameters included in the request are the
same as the variables available in the hook message: app, release, release_summary, sha and
user. See below for their descriptions:
app=secure-woodland&release=v4&release_summary=gabrtv%20deployed%35b3726&sha=35b3726&user=gabrtv
Optionally, if a deploy hook secret key is added to the controller through
tuning the controller settings, a new Authorization header will be
present in the POST request. The value of this header is computed as the HMAC hex digest of the
request URL, using the secret as the key.
In order to authenticate that this request came from Workflow, use the secret key, the full URL and
the HMAC-SHA1 hashing algorithm to compute the signature. In Python, that would look something like
this:
import hashlib
import hmac

hmac.new("my_secret_key", "http://drycc.rocks?app=secure-woodland&release=v4&release_summary=gabrtv%20deployed%35b3726&sha=35b3726&user=gabrtv", digestmod=hashlib.sha1).hexdigest()
If the value of the computed HMAC hex digest and the value in the Authorization header are
identical, then the request came from Workflow.
Note
When computing the signature, ensure that the URL parameters are in alphabetic order. This is
critical when computing the cryptographic signature as most web applications don’t care about
the order of the HTTP parameters, but the cryptographic signature will not be the same.
6.4 - Platform Logging
Logs are a stream of time-stamped events aggregated from the output streams of all your app’s running processes. Retrieve, filter, or use syslog drains.
We’re working with Quickwit to bring you an application log cluster and search interface.
Architecture Diagram
┌───────────┐                   ┌───────────┐
│ Container │                   │  Grafana  │
└───────────┘                   └───────────┘
      │                               ^
     log                              |
      │                               |
      ˅                               │
┌───────────┐                   ┌───────────┐
│ Fluentbit │─────otel/grpc────>│  Quickwit │
└───────────┘                   └───────────┘
Default Configuration
Fluent Bit is based on a pluggable architecture where different plugins play a major role in the data pipeline, with more than 70 built-in plugins available.
Please refer to the charts values.yaml for specific configurations.
6.5 - Platform Monitoring
Add platform monitoring to your apps to spot issues in advance and respond to incidents quickly.
Description
We now include a monitoring stack for introspection on a running Kubernetes cluster. The stack includes 4 components:
Architecture Diagram
┌────────────────┐
│ HOST           │
│  node-exporter │◀──┐                          ┌──────────────────┐
└────────────────┘   │                          │kube-state-metrics│
                     │                          └──────────────────┘
┌────────────────┐   │                                    ▲
│ HOST           │   │    ┌─────────────────┐             │
│  node-exporter │◀──┼────│ victoriametrics │─────────────┘
└────────────────┘   │    └─────────────────┘
                     │             ▲
┌───────────────┐    │             │
│ HOST          │    │             ▼
│  node-exporter│◀───┘       ┌──────────┐
└───────────────┘            │ Grafana  │
                             └──────────┘
Grafana allows users to create custom dashboards that visualize the data captured to the running VictoriaMetrics component. By default Grafana is exposed using a service annotation through the router at the following URL: http://grafana.mydomain.com. The default login is admin/admin. If you are interested in changing these values please see [Tuning Component Settings][].
Grafana will preload several dashboards to help operators get started with monitoring Kubernetes and Drycc Workflow.
These dashboards are meant as starting points and don’t include every item that might be desirable to monitor in a
production installation.
Drycc Workflow monitoring by default does not write data to the host filesystem or to long-term storage. If the Grafana instance fails, modified dashboards are lost.
Production Configuration
A production install of Grafana should have the following configuration values changed if possible:
- Change the default username and password from
admin/admin. The value for the password is passed in plain text so it is best to set this value on the command line instead of checking it into version control.
- Enable persistence
- Use a supported external database such as mysql or postgres. You can find more information here
On Cluster Persistence
Enabling persistence will allow your custom configuration to persist across pod restarts. This means that the default SQLite database (which stores things like sessions and user data) will not disappear if you upgrade the Workflow installation.
If you wish to have persistence for Grafana you can set enabled to true in the values.yaml file before running helm install.
 grafana:
   # Configure the following ONLY if you want persistence for on-cluster grafana
   # GCP PDs and EBS volumes are supported only
   persistence:
     enabled: true # Set to true to enable persistence
     size: 5Gi # PVC size
Off Cluster Grafana
If you wish to provide your own Grafana instance you can set grafana.enabled in the values.yaml file before running helm install.
VictoriaMetrics is a fast and scalable open source time series database and monitoring solution that lets users build a monitoring platform without scalability issues and minimal operational burden, it is fully compatible with the prometheus format.
On Cluster Persistence
You can set node-exporter and kube-state-metrics to true or false in the values.yaml.
- If you wish to have persistence for VictoriaMetrics you can set
enabled to true in the values.yaml file before running helm install.
victoriametrics:
  vmstorage:
    replicas: 3
    extraArgs:
    - --retentionPeriod=30d
    temporary:
      enabled: true
      size: 5Gi
      storageClass: "toplvm-ssd"
    persistence:
      enabled: true
      size: 10Gi
      storageClass: "toplvm-hdd"
  node-exporter:
    enabled: true
  kube-state-metrics:
    enabled: true
Off Cluster VictoriaMetrics
To use false VictoriaMetrics, please provide the following values in the values.yaml file before running helm install.
victoriametrics.enabled=falsegrafana.prometheusUrl="http://my.prometheus.url:9090"controller.prometheusUrl="http://my.prometheus.url:9090"
6.6 - Production Deployments
When preparing a Workflow deployment for production workloads, there are some additional recommendations.
Running Workflow without Drycc Storage
In production, persistent storage can be achieved by running an external object store. For users on AWS, GCE/GKE, or Azure, the convenience of Amazon S3, Google GCS, or Microsoft Azure Storage makes running a Storage-less Workflow cluster quite reasonable. For users who have restrictions on using external object storage, Swift object storage can be an option.
Running a Workflow cluster without Storage provides several advantages:
- Removes state from worker nodes
- Reduces resource usage
- Reduces complexity and operational burden of managing Workflow
See Configuring Object Storage for details on removing this operational complexity.
Review Security Considerations
There are some additional security-related considerations when running Workflow in production. See [Security Considerations][] for details.
Registration is Admin-Only
By default, registration with the Workflow controller is in “admin_only” mode. The first user to run a drycc register command becomes the initial “admin” user, and registrations after that are disallowed unless requested by an admin.
Please see the following documentation to learn about changing registration mode:
Disable Grafana Signups
It is also recommended to disable signups for the Grafana dashboards.
Please see the following documentation to learn about disabling Grafana signups:
6.7 - Upgrading Workflow
Drycc Workflow releases may be upgraded in-place with minimal downtime.
This upgrade process requires:
Upgrade Process
Note
If upgrading from a
Helm Classic install, you’ll need to ‘migrate’ the cluster to a
Kubernetes Helm installation. See [Workflow-Migration][] for steps.
Step 1: Apply the Workflow upgrade
Helm will remove all components from the previous release. Traffic to applications deployed through
Workflow will continue to flow during the upgrade. No service interruptions should occur.
If Workflow is not configured to use off-cluster Postgres, the Workflow API will experience a brief
period of downtime while the database recovers from backup.
First, find the name of the release helm gave to your deployment with helm ls, then run
$ helm upgrade <release-name> oci://registry.drycc.cc/charts/workflow
Note: If using off-cluster object storage on gcs and/or off-cluster registry using gcr and intending to upgrade from a pre-v2.10.0 chart to v2.10.0 or greater, the key_json values will now need to be pre-base64-encoded. Therefore, assuming the rest of the custom/off-cluster values are defined in the existing values.yaml used for previous installs, the following may be run:
$ B64_KEY_JSON="$(cat ~/path/to/key.json | base64 -w 0)"
$ helm upgrade <release_name> drycc/workflow -f values.yaml --set gcs.key_json="${B64_KEY_JSON}",registry-token-refresher.gcr.key_json="${B64_KEY_JSON}"
Alternatively, simply replace the appropriate values in values.yaml and do without the --set
parameter. Make sure to wrap it in single quotes as double quotes will give a parser error when
upgrading.
Step 2: Verify Upgrade
Verify that all components have started and passed their readiness checks:
$ kubectl --namespace=drycc get pods
NAME                                     READY     STATUS    RESTARTS   AGE
drycc-builder-2448122224-3cibz            1/1       Running   0          5m
drycc-controller-1410285775-ipc34         1/1       Running   3          5m
drycc-controller-celery-694f75749b-cmxxn  3/3       Running   0          5m
drycc-database-e7c5z                      1/1       Running   0          5m
drycc-fluentbit-45h7j                     1/1       Running   0          5m
drycc-fluentbit-4z7lw                     1/1       Running   0          5m
drycc-fluentbit-k2wsw                     1/1       Running   0          5m
drycc-fluentbit-skdw4                     1/1       Running   0          5m
drycc-valkey-8nazu                        1/1       Running   0          5m
drycc-grafana-tm266                       1/1       Running   0          5m
drycc-registry-1814324048-yomz5           1/1       Running   0          5m
drycc-registry-proxy-4m3o4                1/1       Running   0          5m
drycc-registry-proxy-no3r1                1/1       Running   0          5m
drycc-registry-proxy-ou8is                1/1       Running   0          5m
drycc-registry-proxy-zyajl                1/1       Running   0          5m
Step 3: Upgrade the Drycc Client
Users of Drycc Workflow should now upgrade their drycc client to avoid getting WARNING: Client and server API versions do not match. Please consider upgrading. warnings.
curl -sfL https://www.drycc.cc/install-cli.sh | bash - && sudo mv drycc $(which drycc)
7 - Troubleshooting
Find solutions to common issues and problems with Drycc Workflow.
7.1 - Troubleshooting Workflow
Common issues that users have run into when provisioning Workflow are detailed below.
A Component Fails to Start
For information on troubleshooting a failing component, see
Troubleshooting with Kubectl.
An Application Fails to Start
For information on troubleshooting application deployment issues, see
Troubleshooting Applications.
Permission denied (publickey)
The most common problem for this issue is the user forgetting to run drycc keys:add or add their
private key to their SSH agent. To do so, run ssh-add ~/.ssh/id_rsa and try running
git push drycc master again.
If you happen get a Could not open a connection to your authentication agent
error after trying to run ssh-add command above, you may need to load the SSH
agent environment variables issuing the eval "$(ssh-agent)" command before.
Other Issues
Running into something not detailed here? Please open an issue or hop into
#community on Slack for help!
7.2 - Troubleshooting using Kubectl
Kubernetes provides a command line tool for communicating with a Kubernetes cluster’s control plane, using the Kubernetes API.
This document describes how one can use kubectl to debug any issues with the cluster.
Diving into the Components
Using kubectl, one can inspect the cluster’s current state. When Workflow is installed
with helm, Workflow is installed into the drycc namespace. To inspect if Workflow is
running, run:
$ kubectl --namespace=drycc get pods
NAME                          READY     STATUS              RESTARTS   AGE
drycc-builder-gqum7            0/1       ContainerCreating   0          4s
drycc-controller-h6lk6         0/1       ContainerCreating   0          4s
drycc-controller-celery-cmxxn  0/3       ContainerCreating   0          4s
drycc-database-56v39           0/1       ContainerCreating   0          4s
drycc-fluentbit-xihr1          0/1       Pending             0          2s
drycc-storage-c2exb            0/1       Pending             0          3s
drycc-grafana-9ccur            0/1       Pending             0          3s
drycc-registry-5bor6           0/1       Pending             0          3s
Note
tip
To save precious keystrokes, alias kubectl --namespace=drycc to kd so it is easier to type
in the future.
To fetch the logs of a specific component, use kubectl logs:
$ kubectl --namespace=drycc logs drycc-controller-h6lk6
system information:
Django Version: 1.9.6
Python 3.5.1
addgroup: gid '0' in use
Django checks:
System check identified no issues (2 silenced).
[...]
To dive into a running container to inspect its environment, use kubectl exec:
$ kubectl --namespace=drycc exec -it drycc-database-56v39 gosu postgres psql
psql (13.4 (Debian 13.4-1.pgdg100+1))
Type "help" for help.

postgres=# \l
                                                List of databases
     Name          |  Owner   | Encoding |  Collate   |   Ctype    |   Access privileges
-------------------+----------+----------+------------+------------+-----------------------
 drycc_controller  | postgres | UTF8     | en_US.utf8 | en_US.utf8 |
 drycc_passport    | postgres | UTF8     | en_US.utf8 | en_US.utf8 |
 postgres          | postgres | UTF8     | en_US.utf8 | en_US.utf8 |
 template0         | postgres | UTF8     | en_US.utf8 | en_US.utf8 | =c/postgres          +
                   |          |          |            |            | postgres=CTc/postgres
 template1         | postgres | UTF8     | en_US.utf8 | en_US.utf8 | =c/postgres          +
                   |          |          |            |            | postgres=CTc/postgres
(4 rows)
postgres=# \connect drycc_controller
You are now connected to database "drycc_controller" as user "postgres".
drycc_controller=# \dt
                                 List of relations
 Schema |              Name              | Type  |      Owner
--------+--------------------------------+-------+-------------------
 public | api_app                        | table | drycc_controller
 public | api_build                      | table | drycc_controller
 public | api_certificate                | table | drycc_controller
 public | api_config                     | table | drycc_controller
 public | api_domain                     | table | drycc_controller
 public | api_key                        | table | drycc_controller
 public | api_push                       | table | drycc_controller
 public | api_release                    | table | drycc_controller
 public | auth_group                     | table | drycc_controller
 --More--
 drycc_controller=# SELECT COUNT(*) from api_app;
 count
-------
     0
(1 row)
7.3 - Troubleshooting Applications
This document describes how one can troubleshoot common issues when deploying or debugging an application that fails to start or deploy.
Application has a Dockerfile, but a Buildpack Deployment Occurs
When you deploy an application to Workflow using git push drycc master and the Builder
attempts to deploy using the Buildpack workflow, check the following steps:
- Are you deploying the correct project?
- Are you pushing the correct git branch (
git push drycc <branch>)?
- Is the
Dockerfile in the project’s root directory?
- Have you committed the
Dockerfile to the project?
Application was Deployed, but is Failing to Start
If you deployed your application but it is failing to start, you can use Drycc Grafana to check
why the application fails to boot. Sometimes, the application container may fail to boot without
logging any information about the error. This typically occurs when the healthcheck configured for
the application fails. In this case, you can start by
troubleshooting using kubectl. You can inspect the application’s current
state by examining the pod deployed in the application’s namespace. To do that, run
$ kubectl --namespace=myapp get pods
NAME                          READY     STATUS                RESTARTS   AGE
myapp-web-1585713350-3brbo    0/1       CrashLoopBackOff      2          43s
We can then describe the pod and determine why it is failing to boot:
Events:
  FirstSeen     LastSeen        Count   From                            SubobjectPath                           Type            Reason          Message
  ---------     --------        -----   ----                            -------------                           --------        ------          -------
  43s           43s             1       {default-scheduler }                                                    Normal          Scheduled       Successfully assigned myapp-web-1585713350-3brbo to kubernetes-node-1
  41s           41s             1       {kubelet kubernetes-node-1}     spec.containers{myapp-web}              Normal          Created         Created container with container id b86bd851a61f
  41s           41s             1       {kubelet kubernetes-node-1}     spec.containers{myapp-web}              Normal          Started         Started container with container id b86bd851a61f
  37s           35s             1       {kubelet kubernetes-node-1}     spec.containers{myapp-web}              Warning         Unhealthy       Liveness probe failed: Get http://10.246.39.13:8000/healthz: dial tcp 10.246.39.13:8000: getsockopt: connection refused
In this instance, we set the healthcheck initial delay timeout for the application at 1 second,
which is too aggressive. The application needs some time to set up the API server after the
container has booted. By increasing the healthcheck initial delay timeout to 10 seconds, the
application is able to boot and is responding correctly.
See Custom Health Checks for more information on how to customize the application’s
health checks to better suit the application’s needs.
8 - Roadmap
Browse the ever-growing list of up-to-date, community driven roadmaps.
8.1 - Planning Process
Drycc features a lightweight process that emphasizes openness and ensures every community member can be an integral part of planning for the future.
The Role of Maintainers
Maintainers lead the Drycc projects. Their duties include proposing the Roadmap, reviewing and integrating contributions and maintaining the vision of the project.
Open Roadmap
The Drycc Roadmap is a community document. While Maintainers propose the Roadmap, it gets discussed and refined in Release Planning Meetings.
Contributing to the Roadmap
Proposals and issues can be opened by anyone. Every member of the community is welcome to participate in the discussion by providing feedback and/or offering counter-proposals.
Release Milestones
The Roadmap gets delivered progressively via the Release Schedule. Releases are defined during Release Planning Meetings and managed using GitHub Milestones which track specific deliverables and work-in-progress.
Release Planning Meetings
Major decisions affecting the Roadmap are discussed during Release Planning Meetings on the first Thursday of each month, aligned with the Release Schedule.
Release Planning Meetings are open to the public with access coordinated via the Drycc #community Slack channel.
Notes from past meetings are below, along with links to a recording of the entire meeting on YouTube.
Credits
Thanks to Amy Lindburg and our friends at Podman for their inspiration.
8.2 - Drycc Workflow Roadmap
Drycc roadmap is community driven and managed through GitHub.
Drycc Workflow Roadmap
The Drycc Workflow Roadmap is a community document created as part of the open
Planning Process. Each roadmap item describes a high-level capability or
grouping of features that are deemed important to the future of Drycc.
Given the project’s rapid Release Schedule, roadmap
items are designed to provide a sense of direction over many releases.
Interactive drycc run /bin/bash
Provide the ability for developers to launch an interactive terminal session in
their application environment.
Related issues:
Log Streaming
View streaming application logs via Drycc Grafana.
Teams and Permissions
Teams and Permissions represents a more flexible permissions model to allow
more nuanced control to applications, capabilities and resources on the
platform. There have been a number of proposals in this area which need to be
reconciled for Drycc Workflow before we begin implementation.
Related issues:
Monitoring
Workflow Addons/Services
Developers should be able to quickly and easily provision application
dependencies using a services or addon abstraction.
https://github.com/drycc/drycc/issues/231
Inbound/Outbound Webhooks
Drycc Workflow should be able to send and receive webhooks from external
systems. Facilitating integration with third party services like GitHub,
Gitlab, Slack, Hipchat.
8.3 - Releases
Drycc’s release model allows applications to record and roll back to previous versions.
Drycc uses a continuous delivery approach for creating releases. Every merged commit that passes
testing results in a deliverable that can be given a semantic version tag and shipped.
The master git branch of a project should always work. Only changes considered ready to be
released publicly are merged.
Components Release as Needed
Drycc components release new versions as often as needed. Fixing a high priority bug requires the
project maintainer to create a new patch release. Merging a backward-compatible feature implies
a minor release.
By releasing often, each component release becomes a safe and routine event. This makes it faster
and easier for users to obtain specific fixes. Continuous delivery also reduces the work
necessary to release a product such as Drycc Workflow, which integrates several components.
“Components” applies not just to Drycc Workflow projects, but also to development and release
tools, to Container base images, and to other Drycc projects that do semantic version releases.
See “How to Release a Component” for more detail.
Workflow Releases Each Month
Drycc Workflow has a regular, public release cadence. From v2.8.0 onward, new Workflow feature
releases arrive on the first Thursday of each month. Patch releases are created at any time,
as needed. GitHub milestones are used to communicate the content and timing of major and minor
releases, and longer-term planning is visible at the Roadmap.
Workflow release timing is not linked to specific features. If a feature is merged before the
release date, it is included in the next release.
See “How to Release Workflow” for more detail.
Semantic Versioning
Drycc releases comply with semantic versioning, with the “public API” broadly
defined as:
- REST, gRPC, or other API that is network-accessible
- Library or framework API intended for public use
- “Pluggable” socket-level protocols users can redirect
- CLI commands and output formats
In general, changes to anything a user might reasonably link to, customize, or integrate with
should be backward-compatible, or else require a major release. Drycc users can be confident that
upgrading to a patch or to a minor release will not break anything.
How to Release a Component
Most Drycc projects are “components” which produce a Container image or binary executable as a
deliverable. This section leads a maintainer through creating a component release.
Major or minor releases should happen on the master branch. Patch releases
should check out the previous release tag and cherry-pick specific commits from master.
Note: if a patch release, the release artifact will have to be manually promoted by triggering
the component-promote job with the following values:
COMPONENT_NAME=<component name>
COMPONENT_SHA=<patch commit sha>
Make sure you have the dryccrel release tool in your search $PATH.
Run dryccrel release once with a fake semver tag to proofread the changelog content. (If HEAD
of master is not what is intended for the release, add the --sha flag as described
in dryccrel release --help.)
$ dryccrel release controller v0.0.0
Doing a dry run of the component release...
skipping commit 943a49267eeb28546819a266654806cfcbae0e38

Creating changelog for controller with tag v2.8.1 through commit 943a49267eeb28546819a266654806cfcbae0e38

### v2.8.1 -> v0.0.0

#### Fixes

- [`615b834`](https://github.com/drycc/controller/commit/615b834f39cb68a854cc1f1e2f0f82d862ea2731) boot: Ensure DRYCC_DEBUG==true for debug output
Based on the changelog content, determine whether the component deserves a minor or patch
release. Run the command again with that semver tag and --dry-run=false. You will still be
asked for confirmation before the release is created:
$ dryccrel release controller v2.8.2 --dry-run=false
skipping commit 943a49267eeb28546819a266654806cfcbae0e38

Creating changelog for controller with tag v2.8.1 through commit 943a49267eeb28546819a266654806cfcbae0e38

### v2.8.1 -> v2.8.2


#### Fixes

- [`615b834`](https://github.com/drycc/controller/commit/615b834f39cb68a854cc1f1e2f0f82d862ea2731) boot: Ensure DRYCC_DEBUG==true for debug output


Please review the above changelog contents and ensure:
  1. All intended commits are mentioned
  2. The changes agree with the semver release tag (major, minor, or patch)

Create release for Drycc Controller v2.8.2? [y/n]: y
New release is available at https://github.com/drycc/controller/releases/tag/v2.8.2
Step 2: Verify the Component is Available
Tagging the component (see Step 1)
starts a CI job that eventually results in an artifact being made available for public download.
Please see the CI flow diagrams for details.
Double-check that the artifact is available, either by a podman pull command or by running the
appropriate installer script.
If the artifact can’t be downloaded, ensure that its CI release jobs are still in progress, or
fix whatever issue arose in the pipeline. For example, the
master merge pipeline
may have failed to promote the :git-abc1d23 candidate image and needs to be restarted with
that component and commit.
If the component has a correlating Kubernetes Helm chart,
this chart will also be packaged, signed and uploaded to its production chart repo. Please
verify it can be fetched (and verified):
$ helm fetch oci://registry.drycc.cc/charts/controller --version 1.0.0
Verification: &{0xc4207ec870 sha256:026e766e918ff28d2a7041bc3d560d149ee7eb0cb84165c9d9d00a3045ff45c3 controller-v1.0.1.tgz}
How to Release Workflow
Drycc Workflow integrates multiple component releases together with a Kubernetes Helm chart
deliverable. This section leads a maintainer through creating a Workflow release.
Step 1: Set Environment Variables
Export two environment variables that will be used in later steps:
export WORKFLOW_RELEASE=v2.17.0 WORKFLOW_PREV_RELEASE=v2.16.0 # for example
Step 2: Tag Supporting Repositories
Some Workflow components not in the Helm chart must also be tagged in sync with the release.
Follow the component release process above and ensure that
these components are tagged:
The version number for drycc/workflow-cli should always match the overall Workflow version
number.
Step 3: Create Helm Chart
To create and stage a release candidate chart for Workflow, we will build the workflow-chart-stage job with the following parameters:
RELEASE_TAG=$WORKFLOW_RELEASE
This job will gather all of the latest component release tags and use these to specify the versions of all component charts.
It will then package the Workflow chart, upload it to the staging chart repo and kick off an e2e run against said chart.
Step 4: Manual Testing
Now it’s time to go above and beyond current CI tests. Create a testing matrix spreadsheet (copying
from the previous document is a good start) and sign up testers to cover all permutations.
Testers should pay special attention to the overall user experience, make sure upgrading from
earlier versions is smooth, and cover various storage configurations and Kubernetes versions and
infrastructure providers.
When showstopper-level bugs are found, the process is as follows:
- Create a component PR that fixes the bug.
- Once the PR passes and is reviewed, merge it and do a new
component release
- Trigger the same
workflow-chart-stage job as mentioned in Step 3 to upload the newly-generated Workflow release candidate chart to staging.
Step 5: Release the Chart
When testing has completed without uncovering any new showstopper bugs, kick off the workflow-chart-release job with the following parameter:
RELEASE_TAG=$WORKFLOW_RELEASE
This job will copy the release candidate chart (now approved by CI and manual testing) from the staging repo to the production repo, signing
it if it has not done so already.
Step 6: Assemble Master Changelog
Each component already updated its release notes on GitHub with CHANGELOG content. We’ll now
generate the master changelog for the Workflow chart, consisting of all component and auxilliary repo changes.
We’ll employ the requirements.lock file from the WORKFLOW_PREV_RELEASE chart, as well as a repo-to-chart-name mapping file, this time invoking dryccrel changelog global to get all component changes between
the chart versions existing in the WORKFLOW_PREV_RELEASE chart and the most recent releases existing in GitHub.
(Therefore, if there are any unreleased commits in a component repo, they will not appear here):
helm fetch --untar oci://registry.drycc.cc/charts/workflow --version $WORKFLOW_PREV_RELEASE
dryccrel changelog global workflow/requirements.lock map.json > changelog-$WORKFLOW_RELEASE.md
This master changelog should then be placed into a single gist. The file will also be added to the documentation
update PR created in the next step.
Step 7: Update Documentation
Create a new pull request at drycc/workflow that updates version references to the new release.
Use git grep $WORKFLOW_PREV_RELEASE to find any references, but be careful not to change
CHANGELOG.md.
Place the $WORKFLOW_RELEASE master changelog generated in Step 7 in the changelogs directory.
Make sure to add a header to the page to make it clear that this is for a Workflow release, e.g.:
## Workflow v2.16.0 -> v2.17.0
Once the PR has been reviewed and merged, do a component release of
drycc/workflow itself. The version number for drycc/workflow should always match the
overall Workflow version number.
Step 8: Close GitHub Milestones
Create a pull request at seed-repo to close the release
milestone and create the next one. When changes are merged to seed-repo, milestones on all
relevant projects will be updated. If there are open issues attached to the milestone, move them
to the next upcoming milestone before merging the pull request.
Milestones map to Drycc Workflow releases in drycc/workflow. These milestones do not correspond
to individual component release tags.
Step 9: Release Workflow CLI Stable
Now that the $WORKFLOW_RELEASE version of Workflow CLI has been vetted, we can push stable artifacts based on this version.
Kick off https://ci.drycc.info/job/workflow-cli-build-stable/ with the TAG build parameter of $WORKFLOW_RELEASE
and then verify stable artifacts are available and appropriately updated after the job completes:
$ curl -sfL https://www.drycc.cc/install-cli.sh | bash -
$ ./drycc version
# (Should show $WORKFLOW_RELEASE)
Step 10: Let Everyone Know
Let the rest of the team know they can start blogging and tweeting about the new Workflow release.
Post a message to the #company channel on Slack. Include a link to the released chart and to the
master CHANGELOG:
@here Drycc Workflow v2.17.0 is now live!
Master CHANGELOG: https://drycc.info/docs/workflow/changelogs/v2.17.0/
You’re done with the release. Nice job!
9 - Contribution Guidelines
Learn how to contribute to the Drycc Workflow project.
9.1 - Contributor Overview
Interested in contributing to a Drycc project? There are lots of ways to help.
File Bugs & Enhancements
Find a bug? Want to see a new feature? Have a request for the maintainers? Open a GitHub issue in the applicable repository and we’ll get the conversation started.
Our official support channel is the Drycc #community Slack channel.
Don’t know what the applicable repository for an issue is? Open an issue in workflow or chat with a maintainer in the Drycc #community Slack channel and we’ll make sure it gets to the right place.
Additionally, take a look at the troubleshooting documentation for common issues.
Before opening a new issue, it’s helpful to search and see if anyone else has already reported the problem. You can search through a list of issues for all Drycc projects here.
Write Documentation
We are always looking to improve and expand our documentation. Most docs reside in the drycc/workflow repository. Simply fork the project, update docs, and send us a pull request.
Contribute Code
We are always looking for help improving the core platform, other workloads, tooling, and test coverage. Interested in contributing code? Let’s chat in the Drycc #community Slack channel. Make sure to check out issues tagged easy fix or help wanted.
When you’re ready to begin writing code, review Design Documents and get your Development Environment set up.
By contributing to any Drycc project you agree to its Developer Certificate of Origin (DCO). This document was created by the Linux Kernel community and is a simple statement that you, as a contributor, have the legal right to make the contribution.
Triage Issues
If you don’t have time to code, consider helping with triage. The community will thank you for saving them time by spending some of yours. See Triaging Issues for more info.
Share your Experience
Interact with the community on our user mailing list or live in our Drycc #community Slack channel, where you can chat with other Drycc Workflow users any time of day.
9.2 - Design Documents
Before submitting a pull request which will significantly alter the behavior of any Drycc component.
Before submitting a pull request that will significantly alter the behavior of any Drycc component, such as a new feature or major refactoring, contributors should first open an issue representing a design document.
Goals
Design documents help ensure project contributors:
- Involve stakeholders as early as possible in a feature’s development
- Ensure code changes accomplish the original motivations and design goals
- Establish clear acceptance criteria for a feature or change
- Enforce test-driven design methodology and automated test coverage
Contents
Design document issues should be named Design Doc: <change description> and contain the following sections:
Goal
This section should briefly describe the proposed change and the motivations behind it. Tests will be written to ensure this design goal is met by the change.
This section should also reference a separate GitHub issue tracking the feature or change, which will typically be assigned to a release milestone.
Code Changes
This section should detail the code changes necessary to accomplish the change, as well as the proposed implementation. This should be as detailed as necessary to help reviewers understand the change.
Tests
All changes should be covered by automated tests, either unit or integration tests (ideally both). This section should detail how tests will be written to validate that the change accomplishes the design goals and doesn’t introduce any regressions.
If a change cannot be sufficiently covered by automated testing, the design should be reconsidered. If there is no test coverage whatsoever for an affected section of code, a separate issue should be filed to integrate automated testing with that section of the codebase.
The tests described here also form the acceptance criteria for the change, so that when it’s completed maintainers can merge the pull request after confirming the tests pass CI.
Approval
A design document follows the same merge approval review process as final pull requests do, and maintainers will take extra care to ensure that any stakeholders for the change are included in the discussion and review of the design document.
Once the design is accepted, the author can complete the change and submit a pull request for review. The pull request should close both the design document for the change as well as any issues that either track the issue or are closed as a result of the change.
See Submitting a Pull Request for more information on pull request and commit message formatting.
9.3 - Development Environment
This document is for developers who are interested in working directly on the Drycc codebase.
In this guide, we walk you through the process of setting up a development environment that is suitable for hacking on most Drycc components.
We try to make it simple to hack on Drycc components. However, there are necessarily several moving pieces and some setup required. We welcome any suggestions for automating or simplifying this process.
Note
The Drycc team is actively engaged in containerizing Go and Python based development environments tailored specifically for Drycc development in order to minimize the setup required. This work is ongoing. Refer to the [drycc/router][router] project for a working example of a fully containerized development environment.
If you’re just getting into the Drycc codebase, look for GitHub issues with the label easy-fix. These are more straightforward or low-risk issues and are a great way to become more familiar with Drycc.
Prerequisites
In order to successfully compile and test Drycc binaries and build Container images of Drycc components, the following are required:
- git
- Go 1.5 or later, with support for compiling to
linux/amd64
- glide
- golint
- shellcheck
- Podman (in a non-Linux environment, you will additionally want [Podman Machine][machine])
For drycc/controller, in particular, you will also need:
- Python 2.7 or later (with
pip)
- virtualenv (
sudo pip install virtualenv)
In most cases, you should simply install according to the instructions. There are a few special cases, though. We cover these below.
Configuring Go
If your local workstation does not support the linux/amd64 target environment, you will have to install Go from source with cross-compile support for that environment. This is because some of the components are built on your local machine and then injected into a container.
Homebrew users can just install with cross compiling support:
$ brew install go --with-cc-common
It is also straightforward to build Go from source:
$ sudo su
$ curl -sSL https://golang.org/dl/go1.5.src.tar.gz | tar -v -C /usr/local -xz
$ cd /usr/local/go/src
$ # compile Go for our default platform first, then add cross-compile support
$ ./make.bash --no-clean
$ GOOS=linux GOARCH=amd64 ./make.bash --no-clean
Once you can compile to linux/amd64, you should be able to compile Drycc components as normal.
Fork the Repository
Once the prerequisites have been met, we can begin to work with Drycc components.
Begin at GitHub by forking whichever Drycc project you would like to contribute to, then clone that fork locally. Since Drycc is predominantly written in Go, the best place to put it is under $GOPATH/src/github.com/drycc/.
$ mkdir -p  $GOPATH/src/github.com/drycc
$ cd $GOPATH/src/github.com/drycc
$ git clone git@github.com:<username>/<component>.git
$ cd <component>
Note
By checking out the forked copy into the namespace github.com/drycc/<component>, we are tricking the Go toolchain into seeing our fork as the “official” source tree.
If you are going to be issuing pull requests to the upstream repository from which you forked, we suggest configuring Git such that you can easily rebase your code to the upstream repository’s main branch. There are various strategies for doing this, but the most common is to add an upstream remote:
$ git remote add upstream https://github.com/drycc/<component>.git
For the sake of simplicity, you may want to point an environment variable to your Drycc code - the directory containing one or more Drycc components:
$ export DRYCC=$GOPATH/src/github.com/drycc
Throughout the rest of this document, $DRYCC refers to that location.
Alternative: Forking with a Pushurl
A number of Drycc contributors prefer to pull directly from drycc/<component>, but push to <username>/<component>. If that workflow suits you better, you can set it up this way:
$ git clone git@github.com:drycc/<component>.git
$ cd drycc
$ git config remote.origin.pushurl git@github.com:<username>/<component>.git
In this setup, fetching and pulling code will work directly with the upstream repository, while pushing code will send changes to your fork. This makes it easy to stay up to date, but also make changes and then issue pull requests.
Make Your Changes
With your development environment set up and the code you wish to work on forked and cloned, you can begin making your changes.
Test Your Changes
Drycc components each include a comprehensive suite of automated tests, mostly written in Go. See testing for instructions on running the tests.
Deploying Your Changes
Although writing and executing tests are critical to ensuring code quality, most contributors will also want to deploy their changes to a live environment, whether to make use of those changes or to test them further. The remainder of this section documents the procedure for running officially released Drycc components in a development cluster and replacing any one of those with your customizations.
Running a Kubernetes Cluster for Development
To run a Kubernetes cluster locally or elsewhere to support your development activities, refer to Drycc installation instructions here.
Using a Development Registry
To facilitate deploying Container images containing your changes to your Kubernetes cluster, you will need to make use of a Container registry. This is a location to where you can push your custom-built images and from where your Kubernetes cluster can retrieve those same images.
If your development cluster runs locally (in Minikube, for instance), the most efficient and economical means of achieving this is to run a Container registry locally as a Container container.
To facilitate this, most Drycc components provide a make target to create such a registry:
$ make dev-registry
In a Linux environment, to begin using the registry:
export DRYCC_REGISTRY=<IP of the host machine>:5000
In non-Linux environments:
export DRYCC_REGISTRY=<IP of the drycc Container Machine VM>:5000
If your development cluster runs on a cloud provider such as Google Container Engine, a local registry such as the one above will not be accessible to your Kubernetes nodes. In such cases, a public registry such as [DockerHub][dh] or quay.io will suffice.
To use DockerHub for this purpose, for instance:
$ export DRYCC_REGISTRY="registry.drycc.cc"
$ export IMAGE_PREFIX=<your DockerHub username>
To use quay.io:
$ export DRYCC_REGISTRY=quay.io
$ export IMAGE_PREFIX=<your quay.io username>
Note the importance of the trailing slash.
Dev / Deployment Workflow
With a functioning Kubernetes cluster and the officially released Drycc components installed onto it, deployment and further testing of any Drycc component you have made changes to is facilitated by replacing the officially released component with a custom built image that contains your changes. Most Drycc components include Makefiles with targets specifically intended to facilitate this workflow with minimal friction.
In the general case, this workflow looks like this:
- Update source code and commit your changes using
git
- Use
make build to build a new Container image
- Use
make dev-release to generate Kubernetes manifest(s)
- Use
make deploy to restart the component using the updated manifest
This can be shortened to a one-liner using just the deploy target:
$ make deploy
Useful Commands
Once your customized Drycc component has been deployed, here are some helpful commands that will allow you to inspect your cluster and to troubleshoot, if necessary:
See All Drycc Pods
$ kubectl --namespace=drycc get pods
Describe a Pod
This is often useful for troubleshooting pods that are in pending or crashed states:
$ kubectl --namespace=drycc describe -f <pod name>
Tail Logs
$ kubectl --namespace=drycc logs -f <pod name>
Django Shell
Specific to drycc/controller
$ kubectl --namespace=drycc exec -it <pod name> -- python manage.py shell
Have commands other Drycc contributors might find useful? Send us a PR!
Pull Requests
Satisfied with your changes? Share them!
Please read Submitting a Pull Request. It contains a checklist of
things you should do when proposing a change to any Drycc component.
9.4 - Testing Drycc
Each Drycc component is one among an ecosystem of such components - many of which integrate with one another - which makes testing each component thoroughly a matter of paramount importance.
Each Drycc component includes its own suite of style checks, unit tests, and black-box type functional tests.
Integration tests verify the behavior of the Drycc components together as a system and are provided separately by the drycc/workflow-e2e project.
GitHub pull requests for all Drycc components are tested automatically by the Travis CI continuous integration system. Contributors should run the same tests locally before proposing any changes to the Drycc codebase.
Set Up the Environment
Successfully executing the unit and functional tests for any Drycc component requires that the Development Environment is set up first.
Run the Tests
The style checks, unit tests, and functional tests for each component can all be executed via make targets:
To execute style checks:
$ make test-style
To execute unit tests:
$ make test-unit
To execute functional tests:
$ make test-functional
To execute style checks, unit tests, and functional tests all in one shot:
$ make test
To execute integration tests, refer to drycc/workflow-e2e documentation.
9.5 - Submitting a Pull Request
Proposed changes to Drycc projects are made as GitHub pull requests.
Design Document
Before opening a pull request, ensure your change also references a design document if the contribution is substantial. For more information, see Design Documents.
Single Issue
It’s hard to reach agreement on the merit of a PR when it isn’t focused. When fixing an issue or implementing a new feature, resist the temptation to refactor nearby code or to fix that potential bug you noticed. Instead, open a separate issue or pull request. Keeping concerns separated allows pull requests to be tested, reviewed, and merged more quickly.
Squash and rebase the commit or commits in your pull request into logical units of work with git. Include tests and documentation changes in the same commit, so that a revert would remove all traces of the feature or fix.
Most pull requests will reference a GitHub issue. In the PR description - not in the commit itself - include a line such as “closes #1234”. The issue referenced will automatically be closed when your PR is merged.
Include Tests
If you significantly alter or add functionality to a component that impacts the broader Drycc Workflow PaaS, you should submit a complementary PR to modify or amend end-to-end integration tests. These integration tests can be found in the drycc/workflow-e2e repository.
See testing for more information.
Include Docs
Changes to any Drycc Workflow component that could affect a user’s experience also require a change or addition to the relevant documentation. For most Drycc components, this involves updating the component’s own documentation. In some cases where a component is tightly integrated into drycc/workflow, its documentation must also be updated.
Cross-repo commits
If a pull request is part of a larger piece of work involving one or more additional commits in other Workflow repositories, these commits can be referenced in the last PR to be submitted. The downstream e2e test job will then supply every referenced commit (derived from PR issue number supplied) to the test runner so it can source the necessary Container images for inclusion in the generated Workflow chart to be tested.
For example, consider paired commits in drycc/controller and drycc/workflow-e2e. The commit body for the first PR in drycc/workflow-e2e would look like:
feat(foo_test): add e2e test for feature foo

[skip e2e] test for controller#42
Adding [skip e2e] forgoes the e2e tests on this commit. This and any other required PRs aside from the final PR should be submitted first, so that their respective build and image push jobs run.
Lastly, the final PR in drycc/controller should be created with the required PR number(s) listed, in the form of [Rr]equires <repoName>#<pullRequestNumber>, for use by the downstream e2e run.
feat(foo): add feature foo

Requires workflow-e2e#42
Code Standards
Drycc components are implemented in Go and Python. For both languages, we agree with The Zen of Python, which emphasizes simple over clever. Readability counts.
Go code should always be run through gofmt on the default settings. Lines of code may be up to 99 characters long. Documentation strings and tests are required for all exported functions. Use of third-party go packages should be minimal, but when doing so, such dependencies should be managed via the glide tool.
Python code should always adhere to PEP8, the python code style guide, with the exception that lines of code may be up to 99 characters long. Docstrings and tests are required for all public methods, although the flake8 tool used by Drycc does not enforce this.
Commit Style
We follow a convention for commit messages borrowed from CoreOS, who borrowed theirs
from AngularJS. This is an example of a commit:
feat(scripts/test-cluster): add a cluster test command

this uses tmux to setup a test cluster that you can easily kill and
start for debugging.
To make it more formal, it looks something like this:
{type}({scope}): {subject}
<BLANK LINE>
{body}
<BLANK LINE>
{footer}
The allowed {types} are as follows:
feat -> featurefix -> bug fixdocs -> documentationstyle -> formattingref -> refactoring codetest -> adding missing testschore -> maintenance
The {scope} can be anything specifying the location(s) of the commit change(s).
The {subject} needs to be an imperative, present tense verb: “change”, not “changed” nor
“changes”. The first letter should not be capitalized, and there is no dot (.) at the end.
Just like the {subject}, the message {body} needs to be in the present tense, and includes
the motivation for the change, as well as a contrast with the previous behavior. The first
letter in a paragraph must be capitalized.
All breaking changes need to be mentioned in the {footer} with the description of the
change, the justification behind the change and any migration notes required.
Any line of the commit message cannot be longer than 72 characters, with the subject line
limited to 50 characters. This allows the message to be easier to read on GitHub as well
as in various git tools.
Merge Approval
Any code change - other than a simple typo fix or one-line documentation change - requires at least two Drycc maintainers to accept it. Maintainers tag pull requests with “LGTM1” and “LGTM2” (Looks Good To Me) labels to indicate acceptance.
No pull requests can be merged until at least one core maintainer signs off with an LGTM. The other LGTM can come from either a core maintainer or contributing maintainer.
If the PR is from a Drycc maintainer, then he or she should be the one to close it. This keeps the commit stream clean and gives the maintainer the benefit of revisiting the PR before deciding whether or not to merge the changes.
An exception to this is when an errant commit needs to be reverted urgently. If necessary, a PR that only reverts a previous commit can be merged without waiting for LGTM approval.
9.6 - Community
Drycc is an open source project that anyone in the community can use, improve, and enjoy. We’d love you to join us! Here’s a few ways to find out what’s happening and get involved.
Drycc software is fully open source. As such, the “Drycc community” consists of anyone who uses the Drycc software and participates in its evolution, whether by answering questions, finding bugs, suggesting enhancements, or writing documentation or code.
Drycc development is coordinated through numerous project repositories on GitHub. Anyone can check out the source code for any Drycc component, fork it, make improvements, and create a pull request to offer those changes back to the Drycc community.
Engine Yard maintains the numerous Drycc projects, and as such, decides what ends up in the official GitHub repositories. Drycc depends on the contributions of the community; the maintainers will not ignore pull requests or issues.
Drycc uses the timeless, highly efficient, and totally unfair system known as “Benevolent Dictator for Life” (BDFL). Gabriel Monroy, the creator of Drycc, is our BDFL and has final say over all decisions related to Drycc.
Open Source Bounties
Drycc projects are bounty-friendly. We believe open source bounty sites can be constructive tools in the development of open source software. Community members are encouraged to a) offer bounties and b) receive bounties for open source contributions that benefit everyone. The Drycc maintainers, however, will not accept bounties on this project but are more than happy to help community members attempting bounties.
9.7 - Triaging Issues
Issue triage provides an important way to contribute to an open source project.
Triage helps ensure issues resolve quickly by:
- Describing the issue’s intent and purpose is conveyed precisely. This is necessary because it can be difficult for an issue to explain how an end user experiences a problem and what actions they took.
- Giving a contributor the information they need before they commit to resolving an issue.
- Lowering the issue count by preventing duplicate issues.
- Streamlining the development process by preventing duplicate discussions.
If you don’t have time to code, consider helping with triage. The community will thank you for saving them time by spending some of yours.
Before triaging an issue very far, make sure that the issue’s author provided the standard issue information. This will help you make an educated recommendation on how to categorize the issue. Standard information that should be included in most issues are things such as:
- the version(s) of Drycc this issue affects
- a reproducible case if this is a bug
- page URL if this is a docs issue or the name of a man page
Depending on the issue, you might not feel all this information is needed. Use your best judgment. If you cannot triage an issue using what its author provided, explain kindly to the author that they must provide the above information to clarify the problem.
If the author provides the recommended information but you are still unable to triage the issue, request additional information. Do this kindly and politely because you are asking for more of the author’s time.
If the author does not respond with requested information within the timespan of a week, close the issue with a kind note stating that the author can request for the issue to be reopened when the necessary information is provided.
Classifying the Issue
An issue can have multiple of the following labels:
Issue Kind
| Kind |
Description |
| bug |
Bugs are bugs. The cause may or may not be known at triage time so debugging should be taken account into the time estimate. |
| docs |
Writing documentation, man pages, articles, blogs, or other significant word-driven task. |
| enhancement |
Enhancements can drastically improve usability or performance of a component. |
| question |
Contains a user or contributor question requiring a response. |
| security |
Security-related issues such as TLS encryption, network segregation, authn/authz features, etc. |
Functional Area
- builder
- cache
- contrib and provisioning
- client
- controller
- database
- docs
- kubernetes
- registry
- router
- store (Ceph)
- tests
Easy Fix
“Easy Fix” issues are a way for a new contributor to find issues that are fit for their experience level. These issues are typically for users who are new to Drycc, and possibly Go, and are looking to help while learning the basics.
Prioritizing issues
When attached to a specific milestone, an issue can be attributed one of the following labels to indicate their degree of priority.
| Priority |
Description |
| priority 0 |
Urgent: Security, critical bugs, blocking issues. Drop everything and fix this today, then consider creating a patch release. |
| priority 1 |
Serious: Impedes user actions or is a regression. Fix this before the next planned release. |
And that’s it. That should be all the information required for a new or existing contributor to come in and resolve an issue.
9.8 - Conduct
The Drycc community welcomes and encourages participation by everyone.
Conduct
The Drycc community welcomes and encourages participation by everyone.
No matter how you identify yourself or how others perceive you: we welcome you. We welcome contributions from everyone as long as they interact constructively with our community.
The Drycc developer community continues to grow, and it is inevitable that disagreements and conflict will arise. We ask that participants conduct themselves according to these principles:
-
Be welcoming, friendly, and patient.
-
Be considerate.
Your work will be used by other people, and you in turn will depend on the work of others. Any decision you take will affect users and colleagues, and you should take those consequences into account when making decisions. Remember that we’re a world-wide community, so you might not be communicating in someone else’s primary language.
- Be respectful.
Not all of us will agree all the time, but disagreement is no excuse for poor behavior and bad manners. We might all experience some frustration now and then, but we cannot allow that frustration to turn into a personal attack. It’s important to remember that a community where people feel uncomfortable or threatened is not a productive one.
- Be careful in the words that you choose.
Be kind to others. Do not insult or put down other participants. Behave professionally. Remember that harassment and sexist, racist, or exclusionary jokes are never appropriate for the community.
(Thanks to the Debian and Django communities for their text and inspiration.)
9.9 - Drycc Maintainers
This document serves to describe the leadership structure of the Drycc project, and list the current project maintainers.
What is a maintainer?
(Unabashedly stolen from the Podman project)
There are different types of maintainers, with different responsibilities, but all maintainers have 3 things in common:
- They share responsibility in the project’s success.
- They have made a long-term, recurring time investment to improve the project.
- They spend that time doing whatever needs to be done, not necessarily what is the most interesting or fun.
Maintainers are often under-appreciated, because their work is harder to appreciate. It’s easy to appreciate a really cool and technically advanced feature. It’s harder to appreciate the absence of bugs, the slow but steady improvement in stability, or the reliability of a release process. But those things distinguish a good project from a great one.
Drycc maintainers
Drycc has two groups of maintainers in addition to our beloved Benevolent Dictator for Life.
BDFL
Drycc follows the timeless, highly efficient and totally unfair system known as Benevolent dictator for life.
Gabriel Monroy (@gabrtv), as creator of the Drycc project, serves as our project’s BDFL. While the day-to-day project management is carried out by the maintainers, Gabriel serves as the final arbiter of any disputes and has the final say on project direction.
Core maintainers
Core maintainers are exceptionally knowledgeable about all areas of Drycc. Some maintainers work on Drycc full-time, although this is not a requirement.
The duties of a core maintainer include:
- Classify and respond to GitHub issues and review pull requests
- Help to shape the Drycc roadmap and lead efforts to accomplish roadmap milestones
- Participate actively in feature development and bug fixing
- Answer questions and help users in the Drycc #community Slack channel
The current list of core maintainers can be seen here.
No pull requests can be merged until at least one core maintainer signs off with an LGTM. The other LGTM can come from either a core maintainer or contributing maintainer.
Contributing maintainers
Contributing maintainers are exceptionally knowledgeable about some but not necessarily all areas of Drycc, and are often selected due to specific domain knowledge that complements the project (but a willingness to continually contribute to the project is most important!). Often, core maintainers will ask a contributing maintainer to weigh in on issues, pull requests, or conversations where the contributing maintainer is knowledgeable.
The duties of a contributing maintainer are very similar to those of a core maintainer, but they are limited to areas of the Drycc project where the contributing maintainer is knowledgeable.
Contributing maintainers are defined in practice as those who have write access to the Drycc repository. All maintainers can review pull requests and add LGTM labels as appropriate.
Becoming a maintainer
The Drycc project wouldn’t be where it is today without its community. Many of the project’s community members embody the spirit of maintainership, and have contributed substantially to the project.
The contributing maintainers group was created in part so that exceptional members of the community who have an interest in the continued success of the project have the opportunity to join the core maintainers in guiding the future of Drycc.
Generally, potential contributing maintainers are selected by the Drycc core maintainers based in part on the following criteria:
- Sustained contributions to the project over a period of time (usually months)
- A willingness to help Drycc users on GitHub and in the Drycc #community Slack channel
- A friendly attitude :)
The Drycc core maintainers must unanimously agree before inviting a community member to join as a contributing maintainer, although in many cases the candidate has already been acting in the capacity of a contributing maintainer for some time, and has been consulted on issues, pull requests, etc.
10 - Reference Guide
Reference guide for Drycc Workflow APIs and configuration.
10.1 - Creating a Self-Signed SSL Certificate
A self-signed TLS/SSL certificate is not signed by a publicly trusted certificate authority (CA) but instead by the developer or company that is responsible for the website.
When using the app SSL feature for non-production applications or when installing SSL for the platform, you can avoid the costs associated with SSL certificates by using a self-signed SSL certificate. Although the certificate provides full encryption, visitors to your site will see a browser warning indicating that the certificate should not be trusted.
Prerequisites
The OpenSSL library is required to generate your own certificate. Run the following command in your local environment to check if OpenSSL is already installed:
$ which openssl
/usr/bin/openssl
If the which command does not return a path, you will need to install OpenSSL:
| Operating System |
Installation Command |
| Mac OS X |
Homebrew: brew install openssl |
| Windows |
Download complete package .exe installer |
| Ubuntu Linux |
apt-get install openssl |
Generate Private Key and Certificate Signing Request
A private key and certificate signing request are required to create an SSL certificate. Generate these with the following commands. When the openssl req command asks for a “challenge password”, just press return, leaving the password empty.
$ openssl genrsa -des3 -passout pass:x -out server.pass.key 2048
...
$ openssl rsa -passin pass:x -in server.pass.key -out server.key
writing RSA key
$ rm server.pass.key
$ openssl req -new -key server.key -out server.csr
...
Country Name (2 letter code) [AU]:US
State or Province Name (full name) [Some-State]:California
...
A challenge password []:
...
Generate SSL Certificate
Generate the self-signed SSL certificate from the server.key private key and server.csr files:
$ openssl x509 -req -days 365 -in server.csr -signkey server.key -out server.crt
The server.crt file is your site certificate, suitable for use with Drycc’s SSL endpoint along with the server.key private key.
10.2 - Controller API v2.0
This is the v2.0 REST API for the Controller.
What’s New
New! format of POST /v2/apps/<app id>/run has changed.
Authentication
Register a New User
Example Request:
POST /v2/auth/register/ HTTP/1.1
Host: drycc.example.com
Content-Type: application/json

{
    "username": "test",
    "password": "opensesame",
    "email": "test@example.com"
}
Optional Parameters:
{
    "first_name": "test",
    "last_name": "testerson"
}
Example Response:
HTTP/1.1 201 CREATED
DRYCC_API_VERSION: 2.0
DRYCC_PLATFORM_VERSION: 2.1.0
Content-Type: application/json

{
    "id": 1,
    "last_login": "2014-10-19T22:01:00.601Z",
    "is_superuser": true,
    "username": "test",
    "first_name": "test",
    "last_name": "testerson",
    "email": "test@example.com",
    "is_staff": true,
    "is_active": true,
    "date_joined": "2014-10-19T22:01:00.601Z",
    "groups": [],
    "user_permissions": []
}
Log in
Example Request:
POST /v2/auth/login/ HTTP/1.1
Host: drycc.example.com
Content-Type: application/json

{"username": "test", "password": "opensesame"}
Example Response:
HTTP/1.1 200 OK
DRYCC_API_VERSION: 2.0
DRYCC_PLATFORM_VERSION: 2.1.0
Content-Type: application/json

{"token": "abc123"}
Cancel Account
Example Request:
DELETE /v2/auth/cancel/ HTTP/1.1
Host: drycc.example.com
Authorization: token abc123
Example Response:
HTTP/1.1 204 NO CONTENT
DRYCC_API_VERSION: 2.0
DRYCC_PLATFORM_VERSION: 2.1.0
Regenerate Token
note
This command could require administrative privileges
Example Request:
POST /v2/auth/tokens/ HTTP/1.1
Host: drycc.example.com
Authorization: token abc123
Optional Parameters:
{
    "username" : "test",
    "all" : "true"
}
Example Response:
HTTP/1.1 200 OK
DRYCC_API_VERSION: 2.0
DRYCC_PLATFORM_VERSION: 2.1.0
Content-Type: application/json

{"token": "abc123"}
Change Password
Example Request:
POST /v2/auth/passwd/ HTTP/1.1
Host: drycc.example.com
Authorization: token abc123

{
    "password": "foo",
    "new_password": "bar"
}
Optional parameters:
{"username": "testuser"}
note
Using the username parameter requires administrative privileges and makes the password parameter optional.
Example Response:
HTTP/1.1 200 OK
DRYCC_API_VERSION: 2.0
DRYCC_PLATFORM_VERSION: 2.1.0
Applications
List all Applications
Example Request:
GET /v2/apps HTTP/1.1
Host: drycc.example.com
Authorization: token abc123
Example Response:
HTTP/1.1 200 OK
DRYCC_API_VERSION: 2.0
DRYCC_PLATFORM_VERSION: 2.1.0
Content-Type: application/json

{
    "count": 1,
    "next": null,
    "previous": null,
    "results": [
        {
            "created": "2014-01-01T00:00:00UTC",
            "id": "example-go",
            "owner": "test",
            "structure": {},
            "updated": "2014-01-01T00:00:00UTC",
            "url": "example-go.example.com",
            "uuid": "de1bf5b5-4a72-4f94-a10c-d2a3741cdf75"
        }
    ]
}
Create an Application
Example Request:
POST /v2/apps/ HTTP/1.1
Host: drycc.example.com
Content-Type: application/json
Authorization: token abc123
Optional parameters:
{"id": "example-go"}
Example Response:
HTTP/1.1 201 CREATED
DRYCC_API_VERSION: 2.0
DRYCC_PLATFORM_VERSION: 2.1.0
Content-Type: application/json

{
    "created": "2014-01-01T00:00:00UTC",
    "id": "example-go",
    "owner": "test",
    "structure": {},
    "updated": "2014-01-01T00:00:00UTC",
    "url": "example-go.example.com",
    "uuid": "de1bf5b5-4a72-4f94-a10c-d2a3741cdf75"
}
Destroy an Application
Example Request:
DELETE /v2/apps/example-go/ HTTP/1.1
Host: drycc.example.com
Authorization: token abc123
Example Response:
HTTP/1.1 204 NO CONTENT
DRYCC_API_VERSION: 2.0
DRYCC_PLATFORM_VERSION: 2.1.0
List Application Details
Example Request:
GET /v2/apps/example-go/ HTTP/1.1
Host: drycc.example.com
Authorization: token abc123
Example Response:
HTTP/1.1 200 OK
DRYCC_API_VERSION: 2.0
DRYCC_PLATFORM_VERSION: 2.1.0
Content-Type: application/json

{
    "created": "2014-01-01T00:00:00UTC",
    "id": "example-go",
    "owner": "test",
    "structure": {},
    "updated": "2014-01-01T00:00:00UTC",
    "url": "example-go.example.com",
    "uuid": "de1bf5b5-4a72-4f94-a10c-d2a3741cdf75"
}
Update Application Details
Example Request:
POST /v2/apps/example-go/ HTTP/1.1
Host: drycc.example.com
Authorization: token abc123
Optional parameters:
{
  "owner": "test"
}
Example Response:
HTTP/1.1 200 OK
DRYCC_API_VERSION: 2.0
DRYCC_PLATFORM_VERSION: 1.8.0
Content-Type: application/json
Retrieve Application Logs
Example Request:
GET /v2/apps/example-go/logs/ HTTP/1.1
Host: drycc.example.com
Authorization: token abc123
Optional URL Query Parameters:
?log_lines=
Example Response:
HTTP/1.1 200 OK
DRYCC_API_VERSION: 2.0
DRYCC_PLATFORM_VERSION: 2.1.0
Content-Type: text/plain
"16:51:14 drycc[api]: test created initial release\n"
Run one-off Commands
POST /v2/apps/example-go/run/ HTTP/1.1
Host: drycc.example.com
Content-Type: application/json
Authorization: token abc123
{"command": "echo hi"}
Example Response:
HTTP/1.1 200 OK
DRYCC_API_VERSION: 2.0
DRYCC_PLATFORM_VERSION: 2.1.0
Content-Type: application/json
{"exit_code": 0, "output": "hi\n"}
Certificates
List all Certificates
Example Request:
GET /v2/certs HTTP/1.1
Host: drycc.example.com
Authorization: token abc123
Example Response:
HTTP/1.1 200 OK
DRYCC_API_VERSION: 2.0
DRYCC_PLATFORM_VERSION: 2.1.0
Content-Type: application/json
{
"count": 1,
"next": null,
"previous": null,
"results": [
{
"id": 22,
"owner": "test",
"san": [],
"domains": [],
"created": "2016-06-22T22:24:20Z",
"updated": "2016-06-22T22:24:20Z",
"name": "foo",
"common_name": "bar.com",
"fingerprint": "7A:CA:B8:50:FF:8D:EB:03:3D:AC:AD:13:4F:EE:03:D5:5D:EB:5E:37:51:8C:E0:98:F8:1B:36:2B:20:83:0D:C0",
"expires": "2017-01-14T23:57:57Z",
"starts": "2016-01-15T23:57:57Z",
"issuer": "/C=US/ST=CA/L=San Francisco/O=Drycc/OU=Engineering/CN=bar.com/emailAddress=engineering@drycc.cc",
"subject": "/C=US/ST=CA/L=San Francisco/O=Drycc/OU=Engineering/CN=bar.com/emailAddress=engineering@drycc.cc"
}
]
}
Get Certificate Details
Example Request:
GET /v2/certs/foo HTTP/1.1
Host: drycc.example.com
Authorization: token abc123
Example Response:
HTTP/1.1 200 OK
DRYCC_API_VERSION: 2.0
DRYCC_PLATFORM_VERSION: 2.1.0
Content-Type: application/json
{
"id": 22,
"owner": "test",
"san": [],
"domains": [],
"created": "2016-06-22T22:24:20Z",
"updated": "2016-06-22T22:24:20Z",
"name": "foo",
"common_name": "bar.com",
"fingerprint": "7A:CA:B8:50:FF:8D:EB:03:3D:AC:AD:13:4F:EE:03:D5:5D:EB:5E:37:51:8C:E0:98:F8:1B:36:2B:20:83:0D:C0",
"expires": "2017-01-14T23:57:57Z",
"starts": "2016-01-15T23:57:57Z",
"issuer": "/C=US/ST=CA/L=San Francisco/O=Drycc/OU=Engineering/CN=bar.com/emailAddress=engineering@drycc.cc",
"subject": "/C=US/ST=CA/L=San Francisco/O=Drycc/OU=Engineering/CN=bar.com/emailAddress=engineering@drycc.cc"
}
Create Certificate
Example Request:
POST /v2/certs/ HTTP/1.1
Host: drycc.example.com
Content-Type: application/json
Authorization: token abc123
{
"name": "foo",
"certificate": "-----BEGIN CERTIFICATE-----",
"key": "-----BEGIN RSA PRIVATE KEY-----"
}
Example Response:
HTTP/1.1 201 CREATED
DRYCC_API_VERSION: 2.0
DRYCC_PLATFORM_VERSION: 2.1.0
Content-Type: application/json
{
"id": 22,
"owner": "test",
"san": [],
"domains": [],
"created": "2016-06-22T22:24:20Z",
"updated": "2016-06-22T22:24:20Z",
"name": "foo",
"common_name": "bar.com",
"fingerprint": "7A:CA:B8:50:FF:8D:EB:03:3D:AC:AD:13:4F:EE:03:D5:5D:EB:5E:37:51:8C:E0:98:F8:1B:36:2B:20:83:0D:C0",
"expires": "2017-01-14T23:57:57Z",
"starts": "2016-01-15T23:57:57Z",
"issuer": "/C=US/ST=CA/L=San Francisco/O=Drycc/OU=Engineering/CN=bar.com/emailAddress=engineering@drycc.cc",
"subject": "/C=US/ST=CA/L=San Francisco/O=Drycc/OU=Engineering/CN=bar.com/emailAddress=engineering@drycc.cc"
}
Destroy a Certificate
Example Request:
DELETE /v2/certs/foo HTTP/1.1
Host: drycc.example.com
Authorization: token abc123
Example Response:
HTTP/1.1 204 NO CONTENT
DRYCC_API_VERSION: 2.0
DRYCC_PLATFORM_VERSION: 2.1.0
Attach a Domain to a Certificate
Example Request:
POST /v2/certs/foo/domain/ HTTP/1.1
Host: drycc.example.com
Authorization: token abc123
{
"domain": "test.com"
}
Example Response:
HTTP/1.1 201 CREATED
DRYCC_API_VERSION: 2.0
DRYCC_PLATFORM_VERSION: 2.1.0
Remove a Domain from a Certificate
Example Request:
DELETE /v2/certs/foo/domain/test.com/ HTTP/1.1
Host: drycc.example.com
Authorization: token abc123
Example Response:
HTTP/1.1 204 NO CONTENT
DRYCC_API_VERSION: 2.0
DRYCC_PLATFORM_VERSION: 2.1.0
Pods
List all Pods
Example Request:
GET /v2/apps/example-go/pods/ HTTP/1.1
Host: drycc.example.com
Authorization: token abc123
Example Response:
HTTP/1.1 200 OK
DRYCC_API_VERSION: 2.0
DRYCC_PLATFORM_VERSION: 2.1.0
Content-Type: application/json
{
"count": 1,
"results": [
{
"name": "go-v2-web-e7dej",
"release": "v2",
"started": "2014-01-01T00:00:00Z",
"state": "up",
"type": "web"
}
]
}
List all Pods by Type
Example Request:
GET /v2/apps/example-go/pods/web/ HTTP/1.1
Host: drycc.example.com
Authorization: token abc123
Example Response:
HTTP/1.1 200 OK
DRYCC_API_VERSION: 2.0
DRYCC_PLATFORM_VERSION: 2.1.0
Content-Type: application/json
{
"count": 1,
"results": [
{
"name": "go-v2-web-e7dej",
"release": "v2",
"started": "2014-01-01T00:00:00Z",
"state": "up",
"type": "web"
}
]
}
Restart All Pods
Example Request:
POST /v2/apps/example-go/pods/restart/ HTTP/1.1
Host: drycc.example.com
Authorization: token abc123
Example Response:
HTTP/1.1 200 OK
DRYCC_API_VERSION: 2.0
DRYCC_PLATFORM_VERSION: 2.1.0
Content-Type: application/json
[
{
"name": "go-v2-web-atots",
"release": "v2",
"started": "2016-04-11T21:07:54Z",
"state": "up",
"type": "web"
}
]
Restart Pods by Type
Example Request:
POST /v2/apps/example-go/pods/web/restart/ HTTP/1.1
Host: drycc.example.com
Authorization: token abc123
Example Response:
HTTP/1.1 200 OK
DRYCC_API_VERSION: 2.0
DRYCC_PLATFORM_VERSION: 2.1.0
Content-Type: application/json
[
{
"name": "go-v2-web-atots",
"release": "v2",
"started": "2016-04-11T21:07:54Z",
"state": "up",
"type": "web"
}
]
Restart Pods by Type and Name
Example Request:
POST /v2/apps/example-go/pods/go-v2-web-atots/restart/ HTTP/1.1
Host: drycc.example.com
Authorization: token abc123
Example Response:
HTTP/1.1 200 OK
DRYCC_API_VERSION: 2.0
DRYCC_PLATFORM_VERSION: 2.1.0
Content-Type: application/json
[
{
"name": "go-v2-web-atots",
"release": "v2",
"started": "2016-04-11T21:07:54Z",
"state": "up",
"type": "web"
}
]
Scale Pods
Example Request:
POST /v2/apps/example-go/scale/ HTTP/1.1
Host: drycc.example.com
Content-Type: application/json
Authorization: token abc123
{"web": 3}
Example Response:
HTTP/1.1 204 NO CONTENT
DRYCC_API_VERSION: 2.0
DRYCC_PLATFORM_VERSION: 2.1.0
Configuration
List Application Configuration
Example Request:
GET /v2/apps/example-go/config/ HTTP/1.1
Host: drycc.example.com
Authorization: token abc123
Example Response:
HTTP/1.1 200 OK
DRYCC_API_VERSION: 2.0
DRYCC_PLATFORM_VERSION: 2.1.0
Content-Type: application/json
{
"owner": "test",
"app": "example-go",
"values": {
"PLATFORM": "drycc"
},
"memory": {},
"cpu": {},
"tags": {},
"healthcheck": {},
"created": "2014-01-01T00:00:00UTC",
"updated": "2014-01-01T00:00:00UTC",
"uuid": "de1bf5b5-4a72-4f94-a10c-d2a3741cdf75"
}
Create new Config
Example Request:
POST /v2/apps/example-go/config/ HTTP/1.1
Host: drycc.example.com
Content-Type: application/json
Authorization: token abc123
{"values": {"HELLO": "world", "PLATFORM": "drycc"}}
Example Response:
HTTP/1.1 201 CREATED
DRYCC_API_VERSION: 2.0
DRYCC_PLATFORM_VERSION: 2.1.0
Content-Type: application/json
X-Drycc-Release: 3
{
"owner": "test",
"app": "example-go",
"values": {
"DRYCC_APP": "example-go",
"DRYCC_RELEASE": "v3",
"HELLO": "world",
"PLATFORM": "drycc"
},
"memory": {},
"cpu": {},
"tags": {},
"healthcheck": {},
"created": "2014-01-01T00:00:00UTC",
"updated": "2014-01-01T00:00:00UTC",
"uuid": "de1bf5b5-4a72-4f94-a10c-d2a3741cdf75"
}
Unset Config Variable
Example Request:
POST /v2/apps/example-go/config/ HTTP/1.1
Host: drycc.example.com
Content-Type: application/json
Authorization: token abc123
{"values": {"HELLO": null}}
Example Response:
HTTP/1.1 201 CREATED
DRYCC_API_VERSION: 2.0
DRYCC_PLATFORM_VERSION: 2.1.0
Content-Type: application/json
X-Drycc-Release: 4
{
"owner": "test",
"app": "example-go",
"values": {
"DRYCC_APP": "example-go",
"DRYCC_RELEASE": "v4",
"PLATFORM": "drycc"
},
"memory": {},
"cpu": {},
"tags": {},
"healthcheck": {},
"created": "2014-01-01T00:00:00UTC",
"updated": "2014-01-01T00:00:00UTC",
"uuid": "de1bf5b5-4a72-4f94-a10c-d2a3741cdf75"
}
Domains
List Application Domains
Example Request:
GET /v2/apps/example-go/domains/ HTTP/1.1
Host: drycc.example.com
Authorization: token abc123
Example Response:
HTTP/1.1 200 OK
DRYCC_API_VERSION: 2.0
DRYCC_PLATFORM_VERSION: 2.1.0
Content-Type: application/json
{
"count": 1,
"next": null,
"previous": null,
"results": [
{
"app": "example-go",
"created": "2014-01-01T00:00:00UTC",
"domain": "example.example.com",
"owner": "test",
"updated": "2014-01-01T00:00:00UTC"
}
]
}
Add Domain
Example Request:
POST /v2/apps/example-go/domains/ HTTP/1.1
Host: drycc.example.com
Authorization: token abc123
{'domain': 'example.example.com'}
Example Response:
HTTP/1.1 201 CREATED
DRYCC_API_VERSION: 2.0
DRYCC_PLATFORM_VERSION: 2.1.0
Content-Type: application/json
{
"app": "example-go",
"created": "2014-01-01T00:00:00UTC",
"domain": "example.example.com",
"owner": "test",
"updated": "2014-01-01T00:00:00UTC"
}
Remove Domain
Example Request:
DELETE /v2/apps/example-go/domains/example.example.com HTTP/1.1
Host: drycc.example.com
Authorization: token abc123
Example Response:
HTTP/1.1 204 NO CONTENT
DRYCC_API_VERSION: 2.0
DRYCC_PLATFORM_VERSION: 2.1.0
Builds
List Application Builds
Example Request:
GET /v2/apps/example-go/build/ HTTP/1.1
Host: drycc.example.com
Authorization: token abc123
Example Response:
HTTP/1.1 200 OK
DRYCC_API_VERSION: 2.0
DRYCC_PLATFORM_VERSION: 2.1.0
Content-Type: application/json
{
"app": "example-go",
"created": "2014-01-01T00:00:00UTC",
"dockerfile": "FROM drycc/slugrunner RUN mkdir -p /app WORKDIR /app ENTRYPOINT [\"/runner/init\"] ADD slug.tgz /app ENV GIT_SHA 060da68f654e75fac06dbedd1995d5f8ad9084db",
"image": "example-go",
"owner": "test",
"procfile": {
"web": "example-go"
},
"sha": "060da68f",
"updated": "2014-01-01T00:00:00UTC",
"uuid": "de1bf5b5-4a72-4f94-a10c-d2a3741cdf75"
}
Create Application Build
Example Request:
POST /v2/apps/example-go/build/ HTTP/1.1
Host: drycc.example.com
Content-Type: application/json
Authorization: token abc123
{"image": "drycc/example-go:latest"}
Optional Parameters:
{
"procfile": {
"web": "./cmd"
}
}
Example Response:
HTTP/1.1 201 CREATED
DRYCC_API_VERSION: 2.0
DRYCC_PLATFORM_VERSION: 2.1.0
Content-Type: application/json
X-Drycc-Release: 4
{
"app": "example-go",
"created": "2014-01-01T00:00:00UTC",
"dockerfile": "",
"image": "drycc/example-go:latest",
"owner": "test",
"procfile": {},
"sha": "",
"updated": "2014-01-01T00:00:00UTC",
"uuid": "de1bf5b5-4a72-4f94-a10c-d2a3741cdf75"
}
Releases
List Application Releases
Example Request:
GET /v2/apps/example-go/releases/ HTTP/1.1
Host: drycc.example.com
Authorization: token abc123
Example Response:
HTTP/1.1 200 OK
DRYCC_API_VERSION: 2.0
DRYCC_PLATFORM_VERSION: 2.1.0
Content-Type: application/json
{
"count": 3,
"next": null,
"previous": null,
"results": [
{
"app": "example-go",
"build": "202d8e4b-600e-4425-a85c-ffc7ea607f61",
"config": "ed637ceb-5d32-44bd-9406-d326a777a513",
"created": "2014-01-01T00:00:00UTC",
"owner": "test",
"summary": "test changed nothing",
"updated": "2014-01-01T00:00:00UTC",
"uuid": "de1bf5b5-4a72-4f94-a10c-d2a3741cdf75",
"version": 3
},
{
"app": "example-go",
"build": "202d8e4b-600e-4425-a85c-ffc7ea607f61",
"config": "95bd6dea-1685-4f78-a03d-fd7270b058d1",
"created": "2014-01-01T00:00:00UTC",
"owner": "test",
"summary": "test deployed 060da68",
"updated": "2014-01-01T00:00:00UTC",
"uuid": "de1bf5b5-4a72-4f94-a10c-d2a3741cdf75",
"version": 2
},
{
"app": "example-go",
"build": null,
"config": "95bd6dea-1685-4f78-a03d-fd7270b058d1",
"created": "2014-01-01T00:00:00UTC",
"owner": "test",
"summary": "test created initial release",
"updated": "2014-01-01T00:00:00UTC",
"uuid": "de1bf5b5-4a72-4f94-a10c-d2a3741cdf75",
"version": 1
}
]
}
List Release Details
Example Request:
GET /v2/apps/example-go/releases/v2/ HTTP/1.1
Host: drycc.example.com
Authorization: token abc123
Example Response:
HTTP/1.1 200 OK
DRYCC_API_VERSION: 2.0
DRYCC_PLATFORM_VERSION: 2.1.0
Content-Type: application/json
{
"app": "example-go",
"build": null,
"config": "95bd6dea-1685-4f78-a03d-fd7270b058d1",
"created": "2014-01-01T00:00:00UTC",
"owner": "test",
"summary": "test created initial release",
"updated": "2014-01-01T00:00:00UTC",
"uuid": "de1bf5b5-4a72-4f94-a10c-d2a3741cdf75",
"version": 1
}
Rollback Release
Example Request:
POST /v2/apps/example-go/releases/rollback/ HTTP/1.1
Host: drycc.example.com
Content-Type: application/json
Authorization: token abc123
{"version": 1}
Example Response:
HTTP/1.1 201 CREATED
DRYCC_API_VERSION: 2.0
DRYCC_PLATFORM_VERSION: 2.1.0
Content-Type: application/json
{"version": 5}
Keys
List Keys
Example Request:
GET /v2/keys/ HTTP/1.1
Host: drycc.example.com
Authorization: token abc123
Example Response:
HTTP/1.1 201 CREATED
DRYCC_API_VERSION: 2.0
DRYCC_PLATFORM_VERSION: 2.1.0
Content-Type: application/json
{
"count": 1,
"next": null,
"previous": null,
"results": [
{
"created": "2014-01-01T00:00:00UTC",
"id": "test@example.com",
"owner": "test",
"public": "ssh-rsa <...>",
"updated": "2014-01-01T00:00:00UTC",
"uuid": "de1bf5b5-4a72-4f94-a10c-d2a3741cdf75"
}
]
}
Add Key to User
Example Request:
POST /v2/keys/ HTTP/1.1
Host: drycc.example.com
Authorization: token abc123
{
"id": "example",
"public": "ssh-rsa <...>"
}
Example Response:
HTTP/1.1 201 CREATED
DRYCC_API_VERSION: 2.0
DRYCC_PLATFORM_VERSION: 2.1.0
Content-Type: application/json
{
"created": "2014-01-01T00:00:00UTC",
"id": "example",
"owner": "example",
"public": "ssh-rsa <...>",
"updated": "2014-01-01T00:00:00UTC",
"uuid": "de1bf5b5-4a72-4f94-a10c-d2a3741cdf75"
}
Remove Key from User
Example Request:
DELETE /v2/keys/example HTTP/1.1
Host: drycc.example.com
Authorization: token abc123
Example Response:
HTTP/1.1 204 NO CONTENT
DRYCC_API_VERSION: 2.0
DRYCC_PLATFORM_VERSION: 2.1.0
Permissions
List Application Permissions
note
This does not include the app owner.
Example Request:
GET /v2/apps/example-go/perms/ HTTP/1.1
Host: drycc.example.com
Authorization: token abc123
Example Response:
HTTP/1.1 200 OK
DRYCC_API_VERSION: 2.0
DRYCC_PLATFORM_VERSION: 2.1.0
Content-Type: application/json
{
"users": [
"test",
"foo"
]
}
Create Application Permission
Example Request:
POST /v2/apps/example-go/perms/ HTTP/1.1
Host: drycc.example.com
Authorization: token abc123
{"username": "example"}
Example Response:
HTTP/1.1 201 CREATED
DRYCC_API_VERSION: 2.0
DRYCC_PLATFORM_VERSION: 2.1.0
Remove Application Permission
Example Request:
DELETE /v2/apps/example-go/perms/example HTTP/1.1
Host: drycc.example.com
Authorization: token abc123
Example Response:
HTTP/1.1 204 NO CONTENT
DRYCC_API_VERSION: 2.0
DRYCC_PLATFORM_VERSION: 2.1.0
List Administrators
Example Request:
GET /v2/admin/perms/ HTTP/1.1
Host: drycc.example.com
Authorization: token abc123
Example Response:
HTTP/1.1 200 OK
DRYCC_API_VERSION: 2.0
DRYCC_PLATFORM_VERSION: 2.1.0
Content-Type: application/json
{
"count": 2,
"next": null,
"previous": null,
"results": [
{
"username": "test",
"is_superuser": true
},
{
"username": "foo",
"is_superuser": true
}
]
}
Grant User Administrative Privileges
note
This command requires administrative privileges
Example Request:
POST /v2/admin/perms HTTP/1.1
Host: drycc.example.com
Authorization: token abc123
{"username": "example"}
Example Response:
HTTP/1.1 201 CREATED
DRYCC_API_VERSION: 2.0
DRYCC_PLATFORM_VERSION: 2.1.0
Remove User’s Administrative Privileges
note
This command requires administrative privileges
Example Request:
DELETE /v2/admin/perms/example HTTP/1.1
Host: drycc.example.com
Authorization: token abc123
Example Response:
HTTP/1.1 204 NO CONTENT
DRYCC_API_VERSION: 2.0
DRYCC_PLATFORM_VERSION: 2.1.0
Users
List all users
note
This command requires administrative privileges
Example Request:
GET /v2/users HTTP/1.1
Host: drycc.example.com
Authorization: token abc123
Example Response:
HTTP/1.1 200 OK
DRYCC_API_VERSION: 2.0
DRYCC_PLATFORM_VERSION: 2.1.0
Content-Type: application/json
{
"count": 1,
"next": null,
"previous": null,
"results": [
{
"id": 1,
"last_login": "2014-10-19T22:01:00.601Z",
"is_superuser": true,
"username": "test",
"first_name": "test",
"last_name": "testerson",
"email": "test@example.com",
"is_staff": true,
"is_active": true,
"date_joined": "2014-10-19T22:01:00.601Z",
"groups": [],
"user_permissions": []
}
]
}
10.3 - Controller API v2.1
This is the v2.1 REST API for the Controller.
What’s New
New! healthcheck field in configuration, deprecates the HEALTHCHECK_* environment variables.
New! Unsetting a configuration variable that does not exist will return a 422.
New! Creating an identical sequential release returns a 409 rather than create a no-op release.
Authentication
Register a New User
Example Request:
POST /v2/auth/register/ HTTP/1.1
Host: drycc.example.com
Content-Type: application/json
{
"username": "test",
"password": "opensesame",
"email": "test@example.com"
}
Optional Parameters:
{
"first_name": "test",
"last_name": "testerson"
}
Example Response:
HTTP/1.1 201 CREATED
DRYCC_API_VERSION: 2.1
DRYCC_PLATFORM_VERSION: 2.1.0
Content-Type: application/json
{
"id": 1,
"last_login": "2014-10-19T22:01:00.601Z",
"is_superuser": true,
"username": "test",
"first_name": "test",
"last_name": "testerson",
"email": "test@example.com",
"is_staff": true,
"is_active": true,
"date_joined": "2014-10-19T22:01:00.601Z",
"groups": [],
"user_permissions": []
}
Log in
Example Request:
POST /v2/auth/login/ HTTP/1.1
Host: drycc.example.com
Content-Type: application/json
{"username": "test", "password": "opensesame"}
Example Response:
HTTP/1.1 200 OK
DRYCC_API_VERSION: 2.1
DRYCC_PLATFORM_VERSION: 2.1.0
Content-Type: application/json
{"token": "abc123"}
Cancel Account
Example Request:
DELETE /v2/auth/cancel/ HTTP/1.1
Host: drycc.example.com
Authorization: token abc123
Example Response:
HTTP/1.1 204 NO CONTENT
DRYCC_API_VERSION: 2.1
DRYCC_PLATFORM_VERSION: 2.1.0
Regenerate Token
note
This command could require administrative privileges
Example Request:
POST /v2/auth/tokens/ HTTP/1.1
Host: drycc.example.com
Authorization: token abc123
Optional Parameters:
{
"username" : "test"
"all" : "true"
}
Example Response:
HTTP/1.1 200 OK
DRYCC_API_VERSION: 2.1
DRYCC_PLATFORM_VERSION: 2.1.0
Content-Type: application/json
{"token": "abc123"}
Change Password
Example Request:
POST /v2/auth/passwd/ HTTP/1.1
Host: drycc.example.com
Authorization: token abc123
{
"password": "foo",
"new_password": "bar"
}
Optional parameters:
{"username": "testuser"}
note
Using the username parameter requires administrative privileges and makes the password parameter optional.
Example Response:
HTTP/1.1 200 OK
DRYCC_API_VERSION: 2.1
DRYCC_PLATFORM_VERSION: 2.1.0
Applications
List all Applications
Example Request:
GET /v2/apps HTTP/1.1
Host: drycc.example.com
Authorization: token abc123
Example Response:
HTTP/1.1 200 OK
DRYCC_API_VERSION: 2.1
DRYCC_PLATFORM_VERSION: 2.1.0
Content-Type: application/json
{
"count": 1,
"next": null,
"previous": null,
"results": [
{
"created": "2014-01-01T00:00:00UTC",
"id": "example-go",
"owner": "test",
"structure": {},
"updated": "2014-01-01T00:00:00UTC",
"url": "example-go.example.com",
"uuid": "de1bf5b5-4a72-4f94-a10c-d2a3741cdf75"
}
]
}
Create an Application
Example Request:
POST /v2/apps/ HTTP/1.1
Host: drycc.example.com
Content-Type: application/json
Authorization: token abc123
Optional parameters:
{"id": "example-go"}
Example Response:
HTTP/1.1 201 CREATED
DRYCC_API_VERSION: 2.1
DRYCC_PLATFORM_VERSION: 2.1.0
Content-Type: application/json
{
"created": "2014-01-01T00:00:00UTC",
"id": "example-go",
"owner": "test",
"structure": {},
"updated": "2014-01-01T00:00:00UTC",
"url": "example-go.example.com",
"uuid": "de1bf5b5-4a72-4f94-a10c-d2a3741cdf75"
}
Destroy an Application
Example Request:
DELETE /v2/apps/example-go/ HTTP/1.1
Host: drycc.example.com
Authorization: token abc123
Example Response:
HTTP/1.1 204 NO CONTENT
DRYCC_API_VERSION: 2.1
DRYCC_PLATFORM_VERSION: 2.1.0
List Application Details
Example Request:
GET /v2/apps/example-go/ HTTP/1.1
Host: drycc.example.com
Authorization: token abc123
Example Response:
HTTP/1.1 200 OK
DRYCC_API_VERSION: 2.1
DRYCC_PLATFORM_VERSION: 2.1.0
Content-Type: application/json
{
"created": "2014-01-01T00:00:00UTC",
"id": "example-go",
"owner": "test",
"structure": {},
"updated": "2014-01-01T00:00:00UTC",
"url": "example-go.example.com",
"uuid": "de1bf5b5-4a72-4f94-a10c-d2a3741cdf75"
}
Update Application Details
Example Request:
POST /v2/apps/example-go/ HTTP/1.1
Host: drycc.example.com
Authorization: token abc123
Optional parameters:
{
"owner": "test"
}
Example Response:
HTTP/1.1 200 OK
DRYCC_API_VERSION: 2.1
DRYCC_PLATFORM_VERSION: 1.8.0
Content-Type: application/json
Retrieve Application Logs
Example Request:
GET /v2/apps/example-go/logs/ HTTP/1.1
Host: drycc.example.com
Authorization: token abc123
Optional URL Query Parameters:
?log_lines=
Example Response:
HTTP/1.1 200 OK
DRYCC_API_VERSION: 2.1
DRYCC_PLATFORM_VERSION: 2.1.0
Content-Type: text/plain
"16:51:14 drycc[api]: test created initial release\n"
Run one-off Commands
POST /v2/apps/example-go/run/ HTTP/1.1
Host: drycc.example.com
Content-Type: application/json
Authorization: token abc123
{"command": "echo hi"}
Example Response:
HTTP/1.1 200 OK
DRYCC_API_VERSION: 2.1
DRYCC_PLATFORM_VERSION: 2.1.0
Content-Type: application/json
{"exit_code": 0, "output": "hi\n"}
Certificates
List all Certificates
Example Request:
GET /v2/certs HTTP/1.1
Host: drycc.example.com
Authorization: token abc123
Example Response:
HTTP/1.1 200 OK
DRYCC_API_VERSION: 2.1
DRYCC_PLATFORM_VERSION: 2.1.0
Content-Type: application/json
{
"count": 1,
"next": null,
"previous": null,
"results": [
{
"id": 22,
"owner": "test",
"san": [],
"domains": [],
"created": "2016-06-22T22:24:20Z",
"updated": "2016-06-22T22:24:20Z",
"name": "foo",
"common_name": "bar.com",
"fingerprint": "7A:CA:B8:50:FF:8D:EB:03:3D:AC:AD:13:4F:EE:03:D5:5D:EB:5E:37:51:8C:E0:98:F8:1B:36:2B:20:83:0D:C0",
"expires": "2017-01-14T23:57:57Z",
"starts": "2016-01-15T23:57:57Z",
"issuer": "/C=US/ST=CA/L=San Francisco/O=Drycc/OU=Engineering/CN=bar.com/emailAddress=engineering@drycc.cc",
"subject": "/C=US/ST=CA/L=San Francisco/O=Drycc/OU=Engineering/CN=bar.com/emailAddress=engineering@drycc.cc"
}
]
}
Get Certificate Details
Example Request:
GET /v2/certs/foo HTTP/1.1
Host: drycc.example.com
Authorization: token abc123
Example Response:
HTTP/1.1 200 OK
DRYCC_API_VERSION: 2.1
DRYCC_PLATFORM_VERSION: 2.1.0
Content-Type: application/json
{
"id": 22,
"owner": "test",
"san": [],
"domains": [],
"created": "2016-06-22T22:24:20Z",
"updated": "2016-06-22T22:24:20Z",
"name": "foo",
"common_name": "bar.com",
"fingerprint": "7A:CA:B8:50:FF:8D:EB:03:3D:AC:AD:13:4F:EE:03:D5:5D:EB:5E:37:51:8C:E0:98:F8:1B:36:2B:20:83:0D:C0",
"expires": "2017-01-14T23:57:57Z",
"starts": "2016-01-15T23:57:57Z",
"issuer": "/C=US/ST=CA/L=San Francisco/O=Drycc/OU=Engineering/CN=bar.com/emailAddress=engineering@drycc.cc",
"subject": "/C=US/ST=CA/L=San Francisco/O=Drycc/OU=Engineering/CN=bar.com/emailAddress=engineering@drycc.cc"
}
Create Certificate
Example Request:
POST /v2/certs/ HTTP/1.1
Host: drycc.example.com
Content-Type: application/json
Authorization: token abc123
{
"name": "foo"
"certificate": "-----BEGIN CERTIFICATE-----",
"key": "-----BEGIN RSA PRIVATE KEY-----"
}
Example Response:
HTTP/1.1 201 CREATED
DRYCC_API_VERSION: 2.1
DRYCC_PLATFORM_VERSION: 2.1.0
Content-Type: application/json
{
"id": 22,
"owner": "test",
"san": [],
"domains": [],
"created": "2016-06-22T22:24:20Z",
"updated": "2016-06-22T22:24:20Z",
"name": "foo",
"common_name": "bar.com",
"fingerprint": "7A:CA:B8:50:FF:8D:EB:03:3D:AC:AD:13:4F:EE:03:D5:5D:EB:5E:37:51:8C:E0:98:F8:1B:36:2B:20:83:0D:C0",
"expires": "2017-01-14T23:57:57Z",
"starts": "2016-01-15T23:57:57Z",
"issuer": "/C=US/ST=CA/L=San Francisco/O=Drycc/OU=Engineering/CN=bar.com/emailAddress=engineering@drycc.cc",
"subject": "/C=US/ST=CA/L=San Francisco/O=Drycc/OU=Engineering/CN=bar.com/emailAddress=engineering@drycc.cc"
}
Destroy a Certificate
Example Request:
DELETE /v2/certs/foo HTTP/1.1
Host: drycc.example.com
Authorization: token abc123
Example Response:
HTTP/1.1 204 NO CONTENT
DRYCC_API_VERSION: 2.1
DRYCC_PLATFORM_VERSION: 2.1.0
Attach a Domain to a Certificate
Example Request:
POST /v2/certs/foo/domain/ HTTP/1.1
Host: drycc.example.com
Authorization: token abc123
{
"domain": "test.com"
}
Example Response:
HTTP/1.1 201 CREATED
DRYCC_API_VERSION: 2.1
DRYCC_PLATFORM_VERSION: 2.1.0
Remove a Domain from a Certificate
Example Request:
DELETE /v2/certs/foo/domain/test.com/ HTTP/1.1
Host: drycc.example.com
Authorization: token abc123
Example Response:
HTTP/1.1 204 NO CONTENT
DRYCC_API_VERSION: 2.1
DRYCC_PLATFORM_VERSION: 2.1.0
Pods
List all Pods
Example Request:
GET /v2/apps/example-go/pods/ HTTP/1.1
Host: drycc.example.com
Authorization: token abc123
Example Response:
HTTP/1.1 200 OK
DRYCC_API_VERSION: 2.1
DRYCC_PLATFORM_VERSION: 2.1.0
Content-Type: application/json
{
"count": 1,
"results": [
{
"name": "go-v2-web-e7dej",
"release": "v2",
"started": "2014-01-01T00:00:00Z",
"state": "up",
"type": "web"
}
]
}
List all Pods by Type
Example Request:
GET /v2/apps/example-go/pods/web/ HTTP/1.1
Host: drycc.example.com
Authorization: token abc123
Example Response:
HTTP/1.1 200 OK
DRYCC_API_VERSION: 2.1
DRYCC_PLATFORM_VERSION: 2.1.0
Content-Type: application/json
{
"count": 1,
"results": [
{
"name": "go-v2-web-e7dej",
"release": "v2",
"started": "2014-01-01T00:00:00Z",
"state": "up",
"type": "web"
}
]
}
Restart All Pods
Example Request:
POST /v2/apps/example-go/pods/restart/ HTTP/1.1
Host: drycc.example.com
Authorization: token abc123
Example Response:
HTTP/1.1 200 OK
DRYCC_API_VERSION: 2.1
DRYCC_PLATFORM_VERSION: 2.1.0
Content-Type: application/json
[
{
"name": "go-v2-web-atots",
"release": "v2",
"started": "2016-04-11T21:07:54Z",
"state": "up",
"type": "web"
}
]
Restart Pods by Type
Example Request:
POST /v2/apps/example-go/pods/web/restart/ HTTP/1.1
Host: drycc.example.com
Authorization: token abc123
Example Response:
HTTP/1.1 200 OK
DRYCC_API_VERSION: 2.1
DRYCC_PLATFORM_VERSION: 2.1.0
Content-Type: application/json
[
{
"name": "go-v2-web-atots",
"release": "v2",
"started": "2016-04-11T21:07:54Z",
"state": "up",
"type": "web"
}
]
Restart Pods by Type and Name
Example Request:
POST /v2/apps/example-go/pods/go-v2-web-atots/restart/ HTTP/1.1
Host: drycc.example.com
Authorization: token abc123
Example Response:
HTTP/1.1 200 OK
DRYCC_API_VERSION: 2.1
DRYCC_PLATFORM_VERSION: 2.1.0
Content-Type: application/json
[
{
"name": "go-v2-web-atots",
"release": "v2",
"started": "2016-04-11T21:07:54Z",
"state": "up",
"type": "web"
}
]
Scale Pods
Example Request:
POST /v2/apps/example-go/scale/ HTTP/1.1
Host: drycc.example.com
Content-Type: application/json
Authorization: token abc123
{"web": 3}
Example Response:
HTTP/1.1 204 NO CONTENT
DRYCC_API_VERSION: 2.1
DRYCC_PLATFORM_VERSION: 2.1.0
Configuration
List Application Configuration
Example Request:
GET /v2/apps/example-go/config/ HTTP/1.1
Host: drycc.example.com
Authorization: token abc123
Example Response:
HTTP/1.1 200 OK
DRYCC_API_VERSION: 2.1
DRYCC_PLATFORM_VERSION: 2.1.0
Content-Type: application/json
{
"owner": "test",
"app": "example-go",
"values": {
"PLATFORM": "drycc"
},
"memory": {},
"cpu": {},
"tags": {},
"healthcheck": {},
"created": "2014-01-01T00:00:00UTC",
"updated": "2014-01-01T00:00:00UTC",
"uuid": "de1bf5b5-4a72-4f94-a10c-d2a3741cdf75"
}
Create new Config
Example Request:
POST /v2/apps/example-go/config/ HTTP/1.1
Host: drycc.example.com
Content-Type: application/json
Authorization: token abc123
{"values": {"HELLO": "world", "PLATFORM": "drycc"}}
Example Response:
HTTP/1.1 201 CREATED
DRYCC_API_VERSION: 2.1
DRYCC_PLATFORM_VERSION: 2.1.0
Content-Type: application/json
{
"owner": "test",
"app": "example-go",
"values": {
"DRYCC_APP": "example-go",
"DRYCC_RELEASE": "v3",
"HELLO": "world",
"PLATFORM": "drycc"
},
"memory": {},
"cpu": {},
"tags": {},
"healthcheck": {},
"created": "2014-01-01T00:00:00UTC",
"updated": "2014-01-01T00:00:00UTC",
"uuid": "de1bf5b5-4a72-4f94-a10c-d2a3741cdf75"
}
Unset Config Variable
Example Request:
POST /v2/apps/example-go/config/ HTTP/1.1
Host: drycc.example.com
Content-Type: application/json
Authorization: token abc123
{"values": {"HELLO": null}}
Example Response:
HTTP/1.1 201 CREATED
DRYCC_API_VERSION: 2.1
DRYCC_PLATFORM_VERSION: 2.1.0
Content-Type: application/json
{
"owner": "test",
"app": "example-go",
"values": {
"DRYCC_APP": "example-go",
"DRYCC_RELEASE": "v4",
"PLATFORM": "drycc"
},
"memory": {},
"cpu": {},
"tags": {},
"healthcheck": {},
"created": "2014-01-01T00:00:00UTC",
"updated": "2014-01-01T00:00:00UTC",
"uuid": "de1bf5b5-4a72-4f94-a10c-d2a3741cdf75"
}
Domains
List Application Domains
Example Request:
GET /v2/apps/example-go/domains/ HTTP/1.1
Host: drycc.example.com
Authorization: token abc123
Example Response:
HTTP/1.1 200 OK
DRYCC_API_VERSION: 2.1
DRYCC_PLATFORM_VERSION: 2.1.0
Content-Type: application/json
{
"count": 1,
"next": null,
"previous": null,
"results": [
{
"app": "example-go",
"created": "2014-01-01T00:00:00UTC",
"domain": "example.example.com",
"owner": "test",
"updated": "2014-01-01T00:00:00UTC"
}
]
}
Add Domain
Example Request:
POST /v2/apps/example-go/domains/ HTTP/1.1
Host: drycc.example.com
Authorization: token abc123
{'domain': 'example.example.com'}
Example Response:
HTTP/1.1 201 CREATED
DRYCC_API_VERSION: 2.1
DRYCC_PLATFORM_VERSION: 2.1.0
Content-Type: application/json
{
"app": "example-go",
"created": "2014-01-01T00:00:00UTC",
"domain": "example.example.com",
"owner": "test",
"updated": "2014-01-01T00:00:00UTC"
}
Remove Domain
Example Request:
DELETE /v2/apps/example-go/domains/example.example.com HTTP/1.1
Host: drycc.example.com
Authorization: token abc123
Example Response:
HTTP/1.1 204 NO CONTENT
DRYCC_API_VERSION: 2.1
DRYCC_PLATFORM_VERSION: 2.1.0
Builds
List Application Builds
Example Request:
GET /v2/apps/example-go/build/ HTTP/1.1
Host: drycc.example.com
Authorization: token abc123
Example Response:
HTTP/1.1 200 OK
DRYCC_API_VERSION: 2.1
DRYCC_PLATFORM_VERSION: 2.1.0
Content-Type: application/json
{
"app": "example-go",
"created": "2014-01-01T00:00:00UTC",
"dockerfile": "FROM drycc/slugrunner RUN mkdir -p /app WORKDIR /app ENTRYPOINT [\"/runner/init\"] ADD slug.tgz /app ENV GIT_SHA 060da68f654e75fac06dbedd1995d5f8ad9084db",
"image": "example-go",
"owner": "test",
"procfile": {
"web": "example-go"
},
"sha": "060da68f",
"updated": "2014-01-01T00:00:00UTC",
"uuid": "de1bf5b5-4a72-4f94-a10c-d2a3741cdf75"
}
Create Application Build
Example Request:
POST /v2/apps/example-go/build/ HTTP/1.1
Host: drycc.example.com
Content-Type: application/json
Authorization: token abc123
{"image": "drycc/example-go:latest"}
Optional Parameters:
{
"procfile": {
"web": "./cmd"
}
}
Example Response:
HTTP/1.1 201 CREATED
DRYCC_API_VERSION: 2.1
DRYCC_PLATFORM_VERSION: 2.1.0
Content-Type: application/json
{
"app": "example-go",
"created": "2014-01-01T00:00:00UTC",
"dockerfile": "",
"image": "drycc/example-go:latest",
"owner": "test",
"procfile": {},
"sha": "",
"updated": "2014-01-01T00:00:00UTC",
"uuid": "de1bf5b5-4a72-4f94-a10c-d2a3741cdf75"
}
Releases
List Application Releases
Example Request:
GET /v2/apps/example-go/releases/ HTTP/1.1
Host: drycc.example.com
Authorization: token abc123
Example Response:
HTTP/1.1 200 OK
DRYCC_API_VERSION: 2.1
DRYCC_PLATFORM_VERSION: 2.1.0
Content-Type: application/json
{
"count": 3,
"next": null,
"previous": null,
"results": [
{
"app": "example-go",
"build": "202d8e4b-600e-4425-a85c-ffc7ea607f61",
"config": "ed637ceb-5d32-44bd-9406-d326a777a513",
"created": "2014-01-01T00:00:00UTC",
"owner": "test",
"summary": "test changed nothing",
"updated": "2014-01-01T00:00:00UTC",
"uuid": "de1bf5b5-4a72-4f94-a10c-d2a3741cdf75",
"version": 3
},
{
"app": "example-go",
"build": "202d8e4b-600e-4425-a85c-ffc7ea607f61",
"config": "95bd6dea-1685-4f78-a03d-fd7270b058d1",
"created": "2014-01-01T00:00:00UTC",
"owner": "test",
"summary": "test deployed 060da68",
"updated": "2014-01-01T00:00:00UTC",
"uuid": "de1bf5b5-4a72-4f94-a10c-d2a3741cdf75",
"version": 2
},
{
"app": "example-go",
"build": null,
"config": "95bd6dea-1685-4f78-a03d-fd7270b058d1",
"created": "2014-01-01T00:00:00UTC",
"owner": "test",
"summary": "test created initial release",
"updated": "2014-01-01T00:00:00UTC",
"uuid": "de1bf5b5-4a72-4f94-a10c-d2a3741cdf75",
"version": 1
}
]
}
List Release Details
Example Request:
GET /v2/apps/example-go/releases/v2/ HTTP/1.1
Host: drycc.example.com
Authorization: token abc123
Example Response:
HTTP/1.1 200 OK
DRYCC_API_VERSION: 2.1
DRYCC_PLATFORM_VERSION: 2.1.0
Content-Type: application/json
{
"app": "example-go",
"build": null,
"config": "95bd6dea-1685-4f78-a03d-fd7270b058d1",
"created": "2014-01-01T00:00:00UTC",
"owner": "test",
"summary": "test created initial release",
"updated": "2014-01-01T00:00:00UTC",
"uuid": "de1bf5b5-4a72-4f94-a10c-d2a3741cdf75",
"version": 1
}
Rollback Release
Example Request:
POST /v2/apps/example-go/releases/rollback/ HTTP/1.1
Host: drycc.example.com
Content-Type: application/json
Authorization: token abc123
{"version": 1}
Example Response:
HTTP/1.1 201 CREATED
DRYCC_API_VERSION: 2.1
DRYCC_PLATFORM_VERSION: 2.1.0
Content-Type: application/json
{"version": 5}
Keys
List Keys
Example Request:
GET /v2/keys/ HTTP/1.1
Host: drycc.example.com
Authorization: token abc123
Example Response:
HTTP/1.1 201 CREATED
DRYCC_API_VERSION: 2.1
DRYCC_PLATFORM_VERSION: 2.1.0
Content-Type: application/json
{
"count": 1,
"next": null,
"previous": null,
"results": [
{
"created": "2014-01-01T00:00:00UTC",
"id": "test@example.com",
"owner": "test",
"public": "ssh-rsa <...>",
"updated": "2014-01-01T00:00:00UTC",
"uuid": "de1bf5b5-4a72-4f94-a10c-d2a3741cdf75"
}
]
}
Add Key to User
Example Request:
POST /v2/keys/ HTTP/1.1
Host: drycc.example.com
Authorization: token abc123
{
"id": "example",
"public": "ssh-rsa <...>"
}
Example Response:
HTTP/1.1 201 CREATED
DRYCC_API_VERSION: 2.1
DRYCC_PLATFORM_VERSION: 2.1.0
Content-Type: application/json
{
"created": "2014-01-01T00:00:00UTC",
"id": "example",
"owner": "example",
"public": "ssh-rsa <...>",
"updated": "2014-01-01T00:00:00UTC",
"uuid": "de1bf5b5-4a72-4f94-a10c-d2a3741cdf75"
}
Remove Key from User
Example Request:
DELETE /v2/keys/example HTTP/1.1
Host: drycc.example.com
Authorization: token abc123
Example Response:
HTTP/1.1 204 NO CONTENT
DRYCC_API_VERSION: 2.1
DRYCC_PLATFORM_VERSION: 2.1.0
Permissions
List Application Permissions
note
This does not include the app owner.
Example Request:
GET /v2/apps/example-go/perms/ HTTP/1.1
Host: drycc.example.com
Authorization: token abc123
Example Response:
HTTP/1.1 200 OK
DRYCC_API_VERSION: 2.1
DRYCC_PLATFORM_VERSION: 2.1.0
Content-Type: application/json
{
"users": [
"test",
"foo"
]
}
Create Application Permission
Example Request:
POST /v2/apps/example-go/perms/ HTTP/1.1
Host: drycc.example.com
Authorization: token abc123
{"username": "example"}
Example Response:
HTTP/1.1 201 CREATED
DRYCC_API_VERSION: 2.1
DRYCC_PLATFORM_VERSION: 2.1.0
Remove Application Permission
Example Request:
DELETE /v2/apps/example-go/perms/example HTTP/1.1
Host: drycc.example.com
Authorization: token abc123
Example Response:
HTTP/1.1 204 NO CONTENT
DRYCC_API_VERSION: 2.1
DRYCC_PLATFORM_VERSION: 2.1.0
List Administrators
Example Request:
GET /v2/admin/perms/ HTTP/1.1
Host: drycc.example.com
Authorization: token abc123
Example Response:
HTTP/1.1 200 OK
DRYCC_API_VERSION: 2.1
DRYCC_PLATFORM_VERSION: 2.1.0
Content-Type: application/json
{
"count": 2,
"next": null
"previous": null,
"results": [
{
"username": "test",
"is_superuser": true
},
{
"username": "foo",
"is_superuser": true
}
]
}
Grant User Administrative Privileges
note
This command requires administrative privileges
Example Request:
POST /v2/admin/perms HTTP/1.1
Host: drycc.example.com
Authorization: token abc123
{"username": "example"}
Example Response:
HTTP/1.1 201 CREATED
DRYCC_API_VERSION: 2.1
DRYCC_PLATFORM_VERSION: 2.1.0
Remove User’s Administrative Privileges
note
This command requires administrative privileges
Example Request:
DELETE /v2/admin/perms/example HTTP/1.1
Host: drycc.example.com
Authorization: token abc123
Example Response:
HTTP/1.1 204 NO CONTENT
DRYCC_API_VERSION: 2.1
DRYCC_PLATFORM_VERSION: 2.1.0
Users
List all users
note
This command requires administrative privileges
Example Request:
GET /v2/users HTTP/1.1
Host: drycc.example.com
Authorization: token abc123
Example Response:
HTTP/1.1 200 OK
DRYCC_API_VERSION: 2.1
DRYCC_PLATFORM_VERSION: 2.1.0
Content-Type: application/json
{
"count": 1,
"next": null,
"previous": null,
"results": [
{
"id": 1,
"last_login": "2014-10-19T22:01:00.601Z",
"is_superuser": true,
"username": "test",
"first_name": "test",
"last_name": "testerson",
"email": "test@example.com",
"is_staff": true,
"is_active": true,
"date_joined": "2014-10-19T22:01:00.601Z",
"groups": [],
"user_permissions": []
}
]
}
10.4 - Controller API v2.2
This is the v2.2 REST API for the Controller.
What’s New
New! /v2/auth/whoami endpoint
Authentication
Register a New User
Example Request:
POST /v2/auth/register/ HTTP/1.1
Host: drycc.example.com
Content-Type: application/json
{
"username": "test",
"password": "opensesame",
"email": "test@example.com"
}
Optional Parameters:
{
"first_name": "test",
"last_name": "testerson"
}
Example Response:
HTTP/1.1 201 CREATED
DRYCC_API_VERSION: 2.2
DRYCC_PLATFORM_VERSION: 2.2.0
Content-Type: application/json
{
"id": 1,
"last_login": "2014-10-19T22:01:00.601Z",
"is_superuser": true,
"username": "test",
"first_name": "test",
"last_name": "testerson",
"email": "test@example.com",
"is_staff": true,
"is_active": true,
"date_joined": "2014-10-19T22:01:00.601Z",
"groups": [],
"user_permissions": []
}
Log in
Example Request:
POST /v2/auth/login/ HTTP/1.1
Host: drycc.example.com
Content-Type: application/json
{"username": "test", "password": "opensesame"}
Example Response:
HTTP/1.1 200 OK
DRYCC_API_VERSION: 2.2
DRYCC_PLATFORM_VERSION: 2.2.0
Content-Type: application/json
{"token": "abc123"}
Cancel Account
Example Request:
DELETE /v2/auth/cancel/ HTTP/1.1
Host: drycc.example.com
Authorization: token abc123
Example Response:
HTTP/1.1 204 NO CONTENT
DRYCC_API_VERSION: 2.2
DRYCC_PLATFORM_VERSION: 2.2.0
Who Am I
Example Request:
GET /v2/auth/whoami/ HTTP/1.1
Host: drycc.example.com
Authorization: token abc123
Example Response:
HTTP/1.1 200 OK
DRYCC_API_VERSION: 2.2
DRYCC_PLATFORM_VERSION: 2.2.0
Content-Type: application/json
{
"id": 1,
"last_login": "2014-10-19T22:01:00.601Z",
"is_superuser": true,
"username": "test",
"first_name": "test",
"last_name": "testerson",
"email": "test@example.com",
"is_staff": true,
"is_active": true,
"date_joined": "2014-10-19T22:01:00.601Z",
"groups": [],
"user_permissions": []
}
Regenerate Token
note
This command could require administrative privileges
Example Request:
POST /v2/auth/tokens/ HTTP/1.1
Host: drycc.example.com
Authorization: token abc123
Optional Parameters:
{
"username" : "test"
"all" : "true"
}
Example Response:
HTTP/1.1 200 OK
DRYCC_API_VERSION: 2.2
DRYCC_PLATFORM_VERSION: 2.2.0
Content-Type: application/json
{"token": "abc123"}
Change Password
Example Request:
POST /v2/auth/passwd/ HTTP/1.1
Host: drycc.example.com
Authorization: token abc123
{
"password": "foo",
"new_password": "bar"
}
Optional parameters:
{"username": "testuser"}
note
Using the username parameter requires administrative privileges and makes the password parameter optional.
Example Response:
HTTP/1.1 200 OK
DRYCC_API_VERSION: 2.2
DRYCC_PLATFORM_VERSION: 2.2.0
Applications
List all Applications
Example Request:
GET /v2/apps HTTP/1.1
Host: drycc.example.com
Authorization: token abc123
Example Response:
HTTP/1.1 200 OK
DRYCC_API_VERSION: 2.2
DRYCC_PLATFORM_VERSION: 2.2.0
Content-Type: application/json
{
"count": 1,
"next": null,
"previous": null,
"results": [
{
"created": "2014-01-01T00:00:00UTC",
"id": "example-go",
"owner": "test",
"structure": {},
"updated": "2014-01-01T00:00:00UTC",
"url": "example-go.example.com",
"uuid": "de1bf5b5-4a72-4f94-a10c-d2a3741cdf75"
}
]
}
Create an Application
Example Request:
POST /v2/apps/ HTTP/1.1
Host: drycc.example.com
Content-Type: application/json
Authorization: token abc123
Optional parameters:
{"id": "example-go"}
Example Response:
HTTP/1.1 201 CREATED
DRYCC_API_VERSION: 2.2
DRYCC_PLATFORM_VERSION: 2.2.0
Content-Type: application/json
{
"created": "2014-01-01T00:00:00UTC",
"id": "example-go",
"owner": "test",
"structure": {},
"updated": "2014-01-01T00:00:00UTC",
"url": "example-go.example.com",
"uuid": "de1bf5b5-4a72-4f94-a10c-d2a3741cdf75"
}
Destroy an Application
Example Request:
DELETE /v2/apps/example-go/ HTTP/1.1
Host: drycc.example.com
Authorization: token abc123
Example Response:
HTTP/1.1 204 NO CONTENT
DRYCC_API_VERSION: 2.2
DRYCC_PLATFORM_VERSION: 2.2.0
List Application Details
Example Request:
GET /v2/apps/example-go/ HTTP/1.1
Host: drycc.example.com
Authorization: token abc123
Example Response:
HTTP/1.1 200 OK
DRYCC_API_VERSION: 2.2
DRYCC_PLATFORM_VERSION: 2.2.0
Content-Type: application/json
{
"created": "2014-01-01T00:00:00UTC",
"id": "example-go",
"owner": "test",
"structure": {},
"updated": "2014-01-01T00:00:00UTC",
"url": "example-go.example.com",
"uuid": "de1bf5b5-4a72-4f94-a10c-d2a3741cdf75"
}
Update Application Details
Example Request:
POST /v2/apps/example-go/ HTTP/1.1
Host: drycc.example.com
Authorization: token abc123
Optional parameters:
{
"owner": "test"
}
Example Response:
HTTP/1.1 200 OK
DRYCC_API_VERSION: 2.2
DRYCC_PLATFORM_VERSION: 1.8.0
Content-Type: application/json
Retrieve Application Logs
Example Request:
GET /v2/apps/example-go/logs/ HTTP/1.1
Host: drycc.example.com
Authorization: token abc123
Optional URL Query Parameters:
?log_lines=
Example Response:
HTTP/1.1 200 OK
DRYCC_API_VERSION: 2.2
DRYCC_PLATFORM_VERSION: 2.2.0
Content-Type: text/plain
"16:51:14 drycc[api]: test created initial release\n"
Run one-off Commands
POST /v2/apps/example-go/run/ HTTP/1.1
Host: drycc.example.com
Content-Type: application/json
Authorization: token abc123
{"command": "echo hi"}
Example Response:
HTTP/1.1 200 OK
DRYCC_API_VERSION: 2.2
DRYCC_PLATFORM_VERSION: 2.2.0
Content-Type: application/json
{"exit_code": 0, "output": "hi\n"}
Certificates
List all Certificates
Example Request:
GET /v2/certs HTTP/1.1
Host: drycc.example.com
Authorization: token abc123
Example Response:
HTTP/1.1 200 OK
DRYCC_API_VERSION: 2.2
DRYCC_PLATFORM_VERSION: 2.2.0
Content-Type: application/json
{
"count": 1,
"next": null,
"previous": null,
"results": [
{
"id": 22,
"owner": "test",
"san": [],
"domains": [],
"created": "2016-06-22T22:24:20Z",
"updated": "2016-06-22T22:24:20Z",
"name": "foo",
"common_name": "bar.com",
"fingerprint": "7A:CA:B8:50:FF:8D:EB:03:3D:AC:AD:13:4F:EE:03:D5:5D:EB:5E:37:51:8C:E0:98:F8:1B:36:2B:20:83:0D:C0",
"expires": "2017-01-14T23:57:57Z",
"starts": "2016-01-15T23:57:57Z",
"issuer": "/C=US/ST=CA/L=San Francisco/O=Drycc/OU=Engineering/CN=bar.com/emailAddress=engineering@drycc.cc",
"subject": "/C=US/ST=CA/L=San Francisco/O=Drycc/OU=Engineering/CN=bar.com/emailAddress=engineering@drycc.cc"
}
]
}
Get Certificate Details
Example Request:
GET /v2/certs/foo HTTP/1.1
Host: drycc.example.com
Authorization: token abc123
Example Response:
HTTP/1.1 200 OK
DRYCC_API_VERSION: 2.2
DRYCC_PLATFORM_VERSION: 2.2.0
Content-Type: application/json
{
"id": 22,
"owner": "test",
"san": [],
"domains": [],
"created": "2016-06-22T22:24:20Z",
"updated": "2016-06-22T22:24:20Z",
"name": "foo",
"common_name": "bar.com",
"fingerprint": "7A:CA:B8:50:FF:8D:EB:03:3D:AC:AD:13:4F:EE:03:D5:5D:EB:5E:37:51:8C:E0:98:F8:1B:36:2B:20:83:0D:C0",
"expires": "2017-01-14T23:57:57Z",
"starts": "2016-01-15T23:57:57Z",
"issuer": "/C=US/ST=CA/L=San Francisco/O=Drycc/OU=Engineering/CN=bar.com/emailAddress=engineering@drycc.cc",
"subject": "/C=US/ST=CA/L=San Francisco/O=Drycc/OU=Engineering/CN=bar.com/emailAddress=engineering@drycc.cc"
}
Create Certificate
Example Request:
POST /v2/certs/ HTTP/1.1
Host: drycc.example.com
Content-Type: application/json
Authorization: token abc123
{
"name": "foo"
"certificate": "-----BEGIN CERTIFICATE-----",
"key": "-----BEGIN RSA PRIVATE KEY-----"
}
Example Response:
HTTP/1.1 201 CREATED
DRYCC_API_VERSION: 2.2
DRYCC_PLATFORM_VERSION: 2.2.0
Content-Type: application/json
{
"id": 22,
"owner": "test",
"san": [],
"domains": [],
"created": "2016-06-22T22:24:20Z",
"updated": "2016-06-22T22:24:20Z",
"name": "foo",
"common_name": "bar.com",
"fingerprint": "7A:CA:B8:50:FF:8D:EB:03:3D:AC:AD:13:4F:EE:03:D5:5D:EB:5E:37:51:8C:E0:98:F8:1B:36:2B:20:83:0D:C0",
"expires": "2017-01-14T23:57:57Z",
"starts": "2016-01-15T23:57:57Z",
"issuer": "/C=US/ST=CA/L=San Francisco/O=Drycc/OU=Engineering/CN=bar.com/emailAddress=engineering@drycc.cc",
"subject": "/C=US/ST=CA/L=San Francisco/O=Drycc/OU=Engineering/CN=bar.com/emailAddress=engineering@drycc.cc"
}
Destroy a Certificate
Example Request:
DELETE /v2/certs/foo HTTP/1.1
Host: drycc.example.com
Authorization: token abc123
Example Response:
HTTP/1.1 204 NO CONTENT
DRYCC_API_VERSION: 2.2
DRYCC_PLATFORM_VERSION: 2.2.0
Attach a Domain to a Certificate
Example Request:
POST /v2/certs/foo/domain/ HTTP/1.1
Host: drycc.example.com
Authorization: token abc123
{
"domain": "test.com"
}
Example Response:
HTTP/1.1 201 CREATED
DRYCC_API_VERSION: 2.2
DRYCC_PLATFORM_VERSION: 2.2.0
Remove a Domain from a Certificate
Example Request:
DELETE /v2/certs/foo/domain/test.com/ HTTP/1.1
Host: drycc.example.com
Authorization: token abc123
Example Response:
HTTP/1.1 204 NO CONTENT
DRYCC_API_VERSION: 2.2
DRYCC_PLATFORM_VERSION: 2.2.0
Pods
List all Pods
Example Request:
GET /v2/apps/example-go/pods/ HTTP/1.1
Host: drycc.example.com
Authorization: token abc123
Example Response:
HTTP/1.1 200 OK
DRYCC_API_VERSION: 2.2
DRYCC_PLATFORM_VERSION: 2.2.0
Content-Type: application/json
{
"count": 1,
"results": [
{
"name": "go-v2-web-e7dej",
"release": "v2",
"started": "2014-01-01T00:00:00Z",
"state": "up",
"type": "web"
}
]
}
List all Pods by Type
Example Request:
GET /v2/apps/example-go/pods/web/ HTTP/1.1
Host: drycc.example.com
Authorization: token abc123
Example Response:
HTTP/1.1 200 OK
DRYCC_API_VERSION: 2.2
DRYCC_PLATFORM_VERSION: 2.2.0
Content-Type: application/json
{
"count": 1,
"results": [
{
"name": "go-v2-web-e7dej",
"release": "v2",
"started": "2014-01-01T00:00:00Z",
"state": "up",
"type": "web"
}
]
}
Restart All Pods
Example Request:
POST /v2/apps/example-go/pods/restart/ HTTP/1.1
Host: drycc.example.com
Authorization: token abc123
Example Response:
HTTP/1.1 200 OK
DRYCC_API_VERSION: 2.2
DRYCC_PLATFORM_VERSION: 2.2.0
Content-Type: application/json
[
{
"name": "go-v2-web-atots",
"release": "v2",
"started": "2016-04-11T21:07:54Z",
"state": "up",
"type": "web"
}
]
Restart Pods by Type
Example Request:
POST /v2/apps/example-go/pods/web/restart/ HTTP/1.1
Host: drycc.example.com
Authorization: token abc123
Example Response:
HTTP/1.1 200 OK
DRYCC_API_VERSION: 2.2
DRYCC_PLATFORM_VERSION: 2.2.0
Content-Type: application/json
[
{
"name": "go-v2-web-atots",
"release": "v2",
"started": "2016-04-11T21:07:54Z",
"state": "up",
"type": "web"
}
]
Restart Pods by Type and Name
Example Request:
POST /v2/apps/example-go/pods/go-v2-web-atots/restart/ HTTP/1.1
Host: drycc.example.com
Authorization: token abc123
Example Response:
HTTP/1.1 200 OK
DRYCC_API_VERSION: 2.2
DRYCC_PLATFORM_VERSION: 2.2.0
Content-Type: application/json
[
{
"name": "go-v2-web-atots",
"release": "v2",
"started": "2016-04-11T21:07:54Z",
"state": "up",
"type": "web"
}
]
Scale Pods
Example Request:
POST /v2/apps/example-go/scale/ HTTP/1.1
Host: drycc.example.com
Content-Type: application/json
Authorization: token abc123
{"web": 3}
Example Response:
HTTP/1.1 204 NO CONTENT
DRYCC_API_VERSION: 2.2
DRYCC_PLATFORM_VERSION: 2.2.0
Configuration
List Application Configuration
Example Request:
GET /v2/apps/example-go/config/ HTTP/1.1
Host: drycc.example.com
Authorization: token abc123
Example Response:
HTTP/1.1 200 OK
DRYCC_API_VERSION: 2.2
DRYCC_PLATFORM_VERSION: 2.2.0
Content-Type: application/json
{
"owner": "test",
"app": "example-go",
"values": {
"PLATFORM": "drycc"
},
"memory": {},
"cpu": {},
"tags": {},
"healthcheck": {},
"created": "2014-01-01T00:00:00UTC",
"updated": "2014-01-01T00:00:00UTC",
"uuid": "de1bf5b5-4a72-4f94-a10c-d2a3741cdf75"
}
Create new Config
Example Request:
POST /v2/apps/example-go/config/ HTTP/1.1
Host: drycc.example.com
Content-Type: application/json
Authorization: token abc123
{"values": {"HELLO": "world", "PLATFORM": "drycc"}}
Example Response:
HTTP/1.1 201 CREATED
DRYCC_API_VERSION: 2.2
DRYCC_PLATFORM_VERSION: 2.2.0
Content-Type: application/json
{
"owner": "test",
"app": "example-go",
"values": {
"DRYCC_APP": "example-go",
"DRYCC_RELEASE": "v3",
"HELLO": "world",
"PLATFORM": "drycc"
},
"memory": {},
"cpu": {},
"tags": {},
"healthcheck": {},
"created": "2014-01-01T00:00:00UTC",
"updated": "2014-01-01T00:00:00UTC",
"uuid": "de1bf5b5-4a72-4f94-a10c-d2a3741cdf75"
}
Unset Config Variable
Example Request:
POST /v2/apps/example-go/config/ HTTP/1.1
Host: drycc.example.com
Content-Type: application/json
Authorization: token abc123
{"values": {"HELLO": null}}
Example Response:
HTTP/1.1 201 CREATED
DRYCC_API_VERSION: 2.2
DRYCC_PLATFORM_VERSION: 2.2.0
Content-Type: application/json
{
"owner": "test",
"app": "example-go",
"values": {
"DRYCC_APP": "example-go",
"DRYCC_RELEASE": "v4",
"PLATFORM": "drycc"
},
"memory": {},
"cpu": {},
"tags": {},
"healthcheck": {},
"created": "2014-01-01T00:00:00UTC",
"updated": "2014-01-01T00:00:00UTC",
"uuid": "de1bf5b5-4a72-4f94-a10c-d2a3741cdf75"
}
Domains
List Application Domains
Example Request:
GET /v2/apps/example-go/domains/ HTTP/1.1
Host: drycc.example.com
Authorization: token abc123
Example Response:
HTTP/1.1 200 OK
DRYCC_API_VERSION: 2.2
DRYCC_PLATFORM_VERSION: 2.2.0
Content-Type: application/json
{
"count": 1,
"next": null,
"previous": null,
"results": [
{
"app": "example-go",
"created": "2014-01-01T00:00:00UTC",
"domain": "example.example.com",
"owner": "test",
"updated": "2014-01-01T00:00:00UTC"
}
]
}
Add Domain
Example Request:
POST /v2/apps/example-go/domains/ HTTP/1.1
Host: drycc.example.com
Authorization: token abc123
{'domain': 'example.example.com'}
Example Response:
HTTP/1.1 201 CREATED
DRYCC_API_VERSION: 2.2
DRYCC_PLATFORM_VERSION: 2.2.0
Content-Type: application/json
{
"app": "example-go",
"created": "2014-01-01T00:00:00UTC",
"domain": "example.example.com",
"owner": "test",
"updated": "2014-01-01T00:00:00UTC"
}
Remove Domain
Example Request:
DELETE /v2/apps/example-go/domains/example.example.com HTTP/1.1
Host: drycc.example.com
Authorization: token abc123
Example Response:
HTTP/1.1 204 NO CONTENT
DRYCC_API_VERSION: 2.2
DRYCC_PLATFORM_VERSION: 2.2.0
Builds
List Application Builds
Example Request:
GET /v2/apps/example-go/build/ HTTP/1.1
Host: drycc.example.com
Authorization: token abc123
Example Response:
HTTP/1.1 200 OK
DRYCC_API_VERSION: 2.2
DRYCC_PLATFORM_VERSION: 2.2.0
Content-Type: application/json
{
"app": "example-go",
"created": "2014-01-01T00:00:00UTC",
"dockerfile": "FROM drycc/slugrunner RUN mkdir -p /app WORKDIR /app ENTRYPOINT [\"/runner/init\"] ADD slug.tgz /app ENV GIT_SHA 060da68f654e75fac06dbedd1995d5f8ad9084db",
"image": "example-go",
"owner": "test",
"procfile": {
"web": "example-go"
},
"sha": "060da68f",
"updated": "2014-01-01T00:00:00UTC",
"uuid": "de1bf5b5-4a72-4f94-a10c-d2a3741cdf75"
}
Create Application Build
Example Request:
POST /v2/apps/example-go/build/ HTTP/1.1
Host: drycc.example.com
Content-Type: application/json
Authorization: token abc123
{"image": "drycc/example-go:latest"}
Optional Parameters:
{
"procfile": {
"web": "./cmd"
}
}
Example Response:
HTTP/1.1 201 CREATED
DRYCC_API_VERSION: 2.2
DRYCC_PLATFORM_VERSION: 2.2.0
Content-Type: application/json
{
"app": "example-go",
"created": "2014-01-01T00:00:00UTC",
"dockerfile": "",
"image": "drycc/example-go:latest",
"owner": "test",
"procfile": {},
"sha": "",
"updated": "2014-01-01T00:00:00UTC",
"uuid": "de1bf5b5-4a72-4f94-a10c-d2a3741cdf75"
}
Releases
List Application Releases
Example Request:
GET /v2/apps/example-go/releases/ HTTP/1.1
Host: drycc.example.com
Authorization: token abc123
Example Response:
HTTP/1.1 200 OK
DRYCC_API_VERSION: 2.2
DRYCC_PLATFORM_VERSION: 2.2.0
Content-Type: application/json
{
"count": 3,
"next": null,
"previous": null,
"results": [
{
"app": "example-go",
"build": "202d8e4b-600e-4425-a85c-ffc7ea607f61",
"config": "ed637ceb-5d32-44bd-9406-d326a777a513",
"created": "2014-01-01T00:00:00UTC",
"owner": "test",
"summary": "test changed nothing",
"updated": "2014-01-01T00:00:00UTC",
"uuid": "de1bf5b5-4a72-4f94-a10c-d2a3741cdf75",
"version": 3
},
{
"app": "example-go",
"build": "202d8e4b-600e-4425-a85c-ffc7ea607f61",
"config": "95bd6dea-1685-4f78-a03d-fd7270b058d1",
"created": "2014-01-01T00:00:00UTC",
"owner": "test",
"summary": "test deployed 060da68",
"updated": "2014-01-01T00:00:00UTC",
"uuid": "de1bf5b5-4a72-4f94-a10c-d2a3741cdf75",
"version": 2
},
{
"app": "example-go",
"build": null,
"config": "95bd6dea-1685-4f78-a03d-fd7270b058d1",
"created": "2014-01-01T00:00:00UTC",
"owner": "test",
"summary": "test created initial release",
"updated": "2014-01-01T00:00:00UTC",
"uuid": "de1bf5b5-4a72-4f94-a10c-d2a3741cdf75",
"version": 1
}
]
}
List Release Details
Example Request:
GET /v2/apps/example-go/releases/v2/ HTTP/1.1
Host: drycc.example.com
Authorization: token abc123
Example Response:
HTTP/1.1 200 OK
DRYCC_API_VERSION: 2.2
DRYCC_PLATFORM_VERSION: 2.2.0
Content-Type: application/json
{
"app": "example-go",
"build": null,
"config": "95bd6dea-1685-4f78-a03d-fd7270b058d1",
"created": "2014-01-01T00:00:00UTC",
"owner": "test",
"summary": "test created initial release",
"updated": "2014-01-01T00:00:00UTC",
"uuid": "de1bf5b5-4a72-4f94-a10c-d2a3741cdf75",
"version": 1
}
Rollback Release
Example Request:
POST /v2/apps/example-go/releases/rollback/ HTTP/1.1
Host: drycc.example.com
Content-Type: application/json
Authorization: token abc123
{"version": 1}
Example Response:
HTTP/1.1 201 CREATED
DRYCC_API_VERSION: 2.2
DRYCC_PLATFORM_VERSION: 2.2.0
Content-Type: application/json
{"version": 5}
Keys
List Keys
Example Request:
GET /v2/keys/ HTTP/1.1
Host: drycc.example.com
Authorization: token abc123
Example Response:
HTTP/1.1 201 CREATED
DRYCC_API_VERSION: 2.2
DRYCC_PLATFORM_VERSION: 2.2.0
Content-Type: application/json
{
"count": 1,
"next": null,
"previous": null,
"results": [
{
"created": "2014-01-01T00:00:00UTC",
"id": "test@example.com",
"owner": "test",
"public": "ssh-rsa <...>",
"updated": "2014-01-01T00:00:00UTC",
"uuid": "de1bf5b5-4a72-4f94-a10c-d2a3741cdf75"
}
]
}
Add Key to User
Example Request:
POST /v2/keys/ HTTP/1.1
Host: drycc.example.com
Authorization: token abc123
{
"id": "example",
"public": "ssh-rsa <...>"
}
Example Response:
HTTP/1.1 201 CREATED
DRYCC_API_VERSION: 2.2
DRYCC_PLATFORM_VERSION: 2.2.0
Content-Type: application/json
{
"created": "2014-01-01T00:00:00UTC",
"id": "example",
"owner": "example",
"public": "ssh-rsa <...>",
"updated": "2014-01-01T00:00:00UTC",
"uuid": "de1bf5b5-4a72-4f94-a10c-d2a3741cdf75"
}
Remove Key from User
Example Request:
DELETE /v2/keys/example HTTP/1.1
Host: drycc.example.com
Authorization: token abc123
Example Response:
HTTP/1.1 204 NO CONTENT
DRYCC_API_VERSION: 2.2
DRYCC_PLATFORM_VERSION: 2.2.0
Permissions
List Application Permissions
note
This does not include the app owner.
Example Request:
GET /v2/apps/example-go/perms/ HTTP/1.1
Host: drycc.example.com
Authorization: token abc123
Example Response:
HTTP/1.1 200 OK
DRYCC_API_VERSION: 2.2
DRYCC_PLATFORM_VERSION: 2.2.0
Content-Type: application/json
{
"users": [
"test",
"foo"
]
}
Create Application Permission
Example Request:
POST /v2/apps/example-go/perms/ HTTP/1.1
Host: drycc.example.com
Authorization: token abc123
{"username": "example"}
Example Response:
HTTP/1.1 201 CREATED
DRYCC_API_VERSION: 2.2
DRYCC_PLATFORM_VERSION: 2.2.0
Remove Application Permission
Example Request:
DELETE /v2/apps/example-go/perms/example HTTP/1.1
Host: drycc.example.com
Authorization: token abc123
Example Response:
HTTP/1.1 204 NO CONTENT
DRYCC_API_VERSION: 2.2
DRYCC_PLATFORM_VERSION: 2.2.0
List Administrators
Example Request:
GET /v2/admin/perms/ HTTP/1.1
Host: drycc.example.com
Authorization: token abc123
Example Response:
HTTP/1.1 200 OK
DRYCC_API_VERSION: 2.2
DRYCC_PLATFORM_VERSION: 2.2.0
Content-Type: application/json
{
"count": 2,
"next": null
"previous": null,
"results": [
{
"username": "test",
"is_superuser": true
},
{
"username": "foo",
"is_superuser": true
}
]
}
Grant User Administrative Privileges
note
This command requires administrative privileges
Example Request:
POST /v2/admin/perms HTTP/1.1
Host: drycc.example.com
Authorization: token abc123
{"username": "example"}
Example Response:
HTTP/1.1 201 CREATED
DRYCC_API_VERSION: 2.2
DRYCC_PLATFORM_VERSION: 2.2.0
Remove User’s Administrative Privileges
note
This command requires administrative privileges
Example Request:
DELETE /v2/admin/perms/example HTTP/1.1
Host: drycc.example.com
Authorization: token abc123
Example Response:
HTTP/1.1 204 NO CONTENT
DRYCC_API_VERSION: 2.2
DRYCC_PLATFORM_VERSION: 2.2.0
Users
List all users
note
This command requires administrative privileges
Example Request:
GET /v2/users HTTP/1.1
Host: drycc.example.com
Authorization: token abc123
Example Response:
HTTP/1.1 200 OK
DRYCC_API_VERSION: 2.2
DRYCC_PLATFORM_VERSION: 2.2.0
Content-Type: application/json
{
"count": 1,
"next": null,
"previous": null,
"results": [
{
"id": 1,
"last_login": "2014-10-19T22:01:00.601Z",
"is_superuser": true,
"username": "test",
"first_name": "test",
"last_name": "testerson",
"email": "test@example.com",
"is_staff": true,
"is_active": true,
"date_joined": "2014-10-19T22:01:00.601Z",
"groups": [],
"user_permissions": []
}
]
}
10.5 - Controller API v2.3
This is the v2.3 REST API for the Controller.
What’s New
New! /v2/apps/{name}/logs endpoint was fixed and no longer returns b'log data' and instead returns a normal string log data
Authentication
Register a New User
Example Request:
POST /v2/auth/register/ HTTP/1.1
Host: drycc.example.com
Content-Type: application/json
{
"username": "test",
"password": "opensesame",
"email": "test@example.com"
}
Optional Parameters:
{
"first_name": "test",
"last_name": "testerson"
}
Example Response:
HTTP/1.1 201 CREATED
DRYCC_API_VERSION: 2.3
DRYCC_PLATFORM_VERSION: 2.3.0
Content-Type: application/json
{
"id": 1,
"last_login": "2014-10-19T22:01:00.601Z",
"is_superuser": true,
"username": "test",
"first_name": "test",
"last_name": "testerson",
"email": "test@example.com",
"is_staff": true,
"is_active": true,
"date_joined": "2014-10-19T22:01:00.601Z",
"groups": [],
"user_permissions": []
}
Log in
Example Request:
POST /v2/auth/login/ HTTP/1.1
Host: drycc.example.com
Content-Type: application/json
{"username": "test", "password": "opensesame"}
Example Response:
HTTP/1.1 200 OK
DRYCC_API_VERSION: 2.3
DRYCC_PLATFORM_VERSION: 2.3.0
Content-Type: application/json
{"token": "abc123"}
Cancel Account
Example Request:
DELETE /v2/auth/cancel/ HTTP/1.1
Host: drycc.example.com
Authorization: token abc123
Example Response:
HTTP/1.1 204 NO CONTENT
DRYCC_API_VERSION: 2.3
DRYCC_PLATFORM_VERSION: 2.3.0
Who Am I
Example Request:
GET /v2/auth/whoami/ HTTP/1.1
Host: drycc.example.com
Authorization: token abc123
Example Response:
HTTP/1.1 200 OK
DRYCC_API_VERSION: 2.3
DRYCC_PLATFORM_VERSION: 2.3.0
Content-Type: application/json
{
"id": 1,
"last_login": "2014-10-19T22:01:00.601Z",
"is_superuser": true,
"username": "test",
"first_name": "test",
"last_name": "testerson",
"email": "test@example.com",
"is_staff": true,
"is_active": true,
"date_joined": "2014-10-19T22:01:00.601Z",
"groups": [],
"user_permissions": []
}
Regenerate Token
note
This command could require administrative privileges
Example Request:
POST /v2/auth/tokens/ HTTP/1.1
Host: drycc.example.com
Authorization: token abc123
Optional Parameters:
{
"username" : "test"
"all" : "true"
}
Example Response:
HTTP/1.1 200 OK
DRYCC_API_VERSION: 2.3
DRYCC_PLATFORM_VERSION: 2.3.0
Content-Type: application/json
{"token": "abc123"}
Change Password
Example Request:
POST /v2/auth/passwd/ HTTP/1.1
Host: drycc.example.com
Authorization: token abc123
{
"password": "foo",
"new_password": "bar"
}
Optional parameters:
{"username": "testuser"}
note
Using the username parameter requires administrative privileges and makes the password parameter optional.
Example Response:
HTTP/1.1 200 OK
DRYCC_API_VERSION: 2.3
DRYCC_PLATFORM_VERSION: 2.3.0
Applications
List all Applications
Example Request:
GET /v2/apps HTTP/1.1
Host: drycc.example.com
Authorization: token abc123
Example Response:
HTTP/1.1 200 OK
DRYCC_API_VERSION: 2.3
DRYCC_PLATFORM_VERSION: 2.3.0
Content-Type: application/json
{
"count": 1,
"next": null,
"previous": null,
"results": [
{
"created": "2014-01-01T00:00:00UTC",
"id": "example-go",
"owner": "test",
"structure": {},
"updated": "2014-01-01T00:00:00UTC",
"url": "example-go.example.com",
"uuid": "de1bf5b5-4a72-4f94-a10c-d2a3741cdf75"
}
]
}
Create an Application
Example Request:
POST /v2/apps/ HTTP/1.1
Host: drycc.example.com
Content-Type: application/json
Authorization: token abc123
Optional parameters:
{"id": "example-go"}
Example Response:
HTTP/1.1 201 CREATED
DRYCC_API_VERSION: 2.3
DRYCC_PLATFORM_VERSION: 2.3.0
Content-Type: application/json
{
"created": "2014-01-01T00:00:00UTC",
"id": "example-go",
"owner": "test",
"structure": {},
"updated": "2014-01-01T00:00:00UTC",
"url": "example-go.example.com",
"uuid": "de1bf5b5-4a72-4f94-a10c-d2a3741cdf75"
}
Destroy an Application
Example Request:
DELETE /v2/apps/example-go/ HTTP/1.1
Host: drycc.example.com
Authorization: token abc123
Example Response:
HTTP/1.1 204 NO CONTENT
DRYCC_API_VERSION: 2.3
DRYCC_PLATFORM_VERSION: 2.3.0
List Application Details
Example Request:
GET /v2/apps/example-go/ HTTP/1.1
Host: drycc.example.com
Authorization: token abc123
Example Response:
HTTP/1.1 200 OK
DRYCC_API_VERSION: 2.3
DRYCC_PLATFORM_VERSION: 2.3.0
Content-Type: application/json
{
"created": "2014-01-01T00:00:00UTC",
"id": "example-go",
"owner": "test",
"structure": {},
"updated": "2014-01-01T00:00:00UTC",
"url": "example-go.example.com",
"uuid": "de1bf5b5-4a72-4f94-a10c-d2a3741cdf75"
}
Update Application Details
Example Request:
POST /v2/apps/example-go/ HTTP/1.1
Host: drycc.example.com
Authorization: token abc123
Optional parameters:
{
"owner": "test"
}
Example Response:
HTTP/1.1 200 OK
DRYCC_API_VERSION: 2.3
DRYCC_PLATFORM_VERSION: 1.8.0
Content-Type: application/json
Retrieve Application Logs
Example Request:
GET /v2/apps/example-go/logs/ HTTP/1.1
Host: drycc.example.com
Authorization: token abc123
Optional URL Query Parameters:
?log_lines=
Example Response:
HTTP/1.1 200 OK
DRYCC_API_VERSION: 2.3
DRYCC_PLATFORM_VERSION: 2.3.0
Content-Type: text/plain
"16:51:14 drycc[api]: test created initial release\n"
Run one-off Commands
POST /v2/apps/example-go/run/ HTTP/1.1
Host: drycc.example.com
Content-Type: application/json
Authorization: token abc123
{"command": "echo hi"}
Example Response:
HTTP/1.1 200 OK
DRYCC_API_VERSION: 2.3
DRYCC_PLATFORM_VERSION: 2.3.0
Content-Type: application/json
{"exit_code": 0, "output": "hi\n"}
Certificates
List all Certificates
Example Request:
GET /v2/certs HTTP/1.1
Host: drycc.example.com
Authorization: token abc123
Example Response:
HTTP/1.1 200 OK
DRYCC_API_VERSION: 2.3
DRYCC_PLATFORM_VERSION: 2.3.0
Content-Type: application/json
{
"count": 1,
"next": null,
"previous": null,
"results": [
{
"id": 22,
"owner": "test",
"san": [],
"domains": [],
"created": "2016-06-22.32.34:20Z",
"updated": "2016-06-22.32.34:20Z",
"name": "foo",
"common_name": "bar.com",
"fingerprint": "7A:CA:B8:50:FF:8D:EB:03:3D:AC:AD:13:4F:EE:03:D5:5D:EB:5E:37:51:8C:E0:98:F8:1B:36:2B:20:83:0D:C0",
"expires": "2017-01-14T23:57:57Z",
"starts": "2016-01-15T23:57:57Z",
"issuer": "/C=US/ST=CA/L=San Francisco/O=Drycc/OU=Engineering/CN=bar.com/emailAddress=engineering@drycc.cc",
"subject": "/C=US/ST=CA/L=San Francisco/O=Drycc/OU=Engineering/CN=bar.com/emailAddress=engineering@drycc.cc"
}
]
}
Get Certificate Details
Example Request:
GET /v2/certs/foo HTTP/1.1
Host: drycc.example.com
Authorization: token abc123
Example Response:
HTTP/1.1 200 OK
DRYCC_API_VERSION: 2.3
DRYCC_PLATFORM_VERSION: 2.3.0
Content-Type: application/json
{
"id": 22,
"owner": "test",
"san": [],
"domains": [],
"created": "2016-06-22.32.34:20Z",
"updated": "2016-06-22.32.34:20Z",
"name": "foo",
"common_name": "bar.com",
"fingerprint": "7A:CA:B8:50:FF:8D:EB:03:3D:AC:AD:13:4F:EE:03:D5:5D:EB:5E:37:51:8C:E0:98:F8:1B:36:2B:20:83:0D:C0",
"expires": "2017-01-14T23:57:57Z",
"starts": "2016-01-15T23:57:57Z",
"issuer": "/C=US/ST=CA/L=San Francisco/O=Drycc/OU=Engineering/CN=bar.com/emailAddress=engineering@drycc.cc",
"subject": "/C=US/ST=CA/L=San Francisco/O=Drycc/OU=Engineering/CN=bar.com/emailAddress=engineering@drycc.cc"
}
Create Certificate
Example Request:
POST /v2/certs/ HTTP/1.1
Host: drycc.example.com
Content-Type: application/json
Authorization: token abc123
{
"name": "foo"
"certificate": "-----BEGIN CERTIFICATE-----",
"key": "-----BEGIN RSA PRIVATE KEY-----"
}
Example Response:
HTTP/1.1 201 CREATED
DRYCC_API_VERSION: 2.3
DRYCC_PLATFORM_VERSION: 2.3.0
Content-Type: application/json
{
"id": 22,
"owner": "test",
"san": [],
"domains": [],
"created": "2016-06-22.32.34:20Z",
"updated": "2016-06-22.32.34:20Z",
"name": "foo",
"common_name": "bar.com",
"fingerprint": "7A:CA:B8:50:FF:8D:EB:03:3D:AC:AD:13:4F:EE:03:D5:5D:EB:5E:37:51:8C:E0:98:F8:1B:36:2B:20:83:0D:C0",
"expires": "2017-01-14T23:57:57Z",
"starts": "2016-01-15T23:57:57Z",
"issuer": "/C=US/ST=CA/L=San Francisco/O=Drycc/OU=Engineering/CN=bar.com/emailAddress=engineering@drycc.cc",
"subject": "/C=US/ST=CA/L=San Francisco/O=Drycc/OU=Engineering/CN=bar.com/emailAddress=engineering@drycc.cc"
}
Destroy a Certificate
Example Request:
DELETE /v2/certs/foo HTTP/1.1
Host: drycc.example.com
Authorization: token abc123
Example Response:
HTTP/1.1 204 NO CONTENT
DRYCC_API_VERSION: 2.3
DRYCC_PLATFORM_VERSION: 2.3.0
Attach a Domain to a Certificate
Example Request:
POST /v2/certs/foo/domain/ HTTP/1.1
Host: drycc.example.com
Authorization: token abc123
{
"domain": "test.com"
}
Example Response:
HTTP/1.1 201 CREATED
DRYCC_API_VERSION: 2.3
DRYCC_PLATFORM_VERSION: 2.3.0
Remove a Domain from a Certificate
Example Request:
DELETE /v2/certs/foo/domain/test.com/ HTTP/1.1
Host: drycc.example.com
Authorization: token abc123
Example Response:
HTTP/1.1 204 NO CONTENT
DRYCC_API_VERSION: 2.3
DRYCC_PLATFORM_VERSION: 2.3.0
Enable or disable TLS
Example Request:
POST /v2/apps/example-go/tls/ HTTP/1.1
Host: drycc.example.com
Content-Type: application/json
Authorization: token abc123
{
"https_enforced": true
}
Example Response:
HTTP/1.1 201 CREATED
DRYCC_API_VERSION: 2.3
DRYCC_PLATFORM_VERSION: 2.3.0
Content-Type: application/json
{
"created": "2014-01-01T00:00:00UTC",
"app": "example-go",
"owner": "test",
"https_enforced": true,
"updated": "2014-01-01T00:00:00UTC",
"uuid": "de1bf5b5-4a72-4f94-a10c-d2a3741cdf75"
}
Get TLS status
Example Request:
GET /v2/apps/example-go/tls/ HTTP/1.1
Host: drycc.example.com
Authorization: token abc123
Example Response:
HTTP/1.1 200 OK
DRYCC_API_VERSION: 2.3
DRYCC_PLATFORM_VERSION: 2.3.0
Content-Type: application/json
{
"created": "2014-01-01T00:00:00UTC",
"app": "example-go",
"owner": "test",
"https_enforced": false,
"updated": "2014-01-01T00:00:00UTC",
"uuid": "de1bf5b5-4a72-4f94-a10c-d2a3741cdf75"
}
Pods
List all Pods
Example Request:
GET /v2/apps/example-go/pods/ HTTP/1.1
Host: drycc.example.com
Authorization: token abc123
Example Response:
HTTP/1.1 200 OK
DRYCC_API_VERSION: 2.3
DRYCC_PLATFORM_VERSION: 2.3.0
Content-Type: application/json
{
"count": 1,
"results": [
{
"name": "go-v2-web-e7dej",
"release": "v2",
"started": "2014-01-01T00:00:00Z",
"state": "up",
"type": "web"
}
]
}
List all Pods by Type
Example Request:
GET /v2/apps/example-go/pods/web/ HTTP/1.1
Host: drycc.example.com
Authorization: token abc123
Example Response:
HTTP/1.1 200 OK
DRYCC_API_VERSION: 2.3
DRYCC_PLATFORM_VERSION: 2.3.0
Content-Type: application/json
{
"count": 1,
"results": [
{
"name": "go-v2-web-e7dej",
"release": "v2",
"started": "2014-01-01T00:00:00Z",
"state": "up",
"type": "web"
}
]
}
Restart All Pods
Example Request:
POST /v2/apps/example-go/pods/restart/ HTTP/1.1
Host: drycc.example.com
Authorization: token abc123
Example Response:
HTTP/1.1 200 OK
DRYCC_API_VERSION: 2.3
DRYCC_PLATFORM_VERSION: 2.3.0
Content-Type: application/json
[
{
"name": "go-v2-web-atots",
"release": "v2",
"started": "2016-04-11T21:07:54Z",
"state": "up",
"type": "web"
}
]
Restart Pods by Type
Example Request:
POST /v2/apps/example-go/pods/web/restart/ HTTP/1.1
Host: drycc.example.com
Authorization: token abc123
Example Response:
HTTP/1.1 200 OK
DRYCC_API_VERSION: 2.3
DRYCC_PLATFORM_VERSION: 2.3.0
Content-Type: application/json
[
{
"name": "go-v2-web-atots",
"release": "v2",
"started": "2016-04-11T21:07:54Z",
"state": "up",
"type": "web"
}
]
Restart Pods by Type and Name
Example Request:
POST /v2/apps/example-go/pods/go-v2-web-atots/restart/ HTTP/1.1
Host: drycc.example.com
Authorization: token abc123
Example Response:
HTTP/1.1 200 OK
DRYCC_API_VERSION: 2.3
DRYCC_PLATFORM_VERSION: 2.3.0
Content-Type: application/json
[
{
"name": "go-v2-web-atots",
"release": "v2",
"started": "2016-04-11T21:07:54Z",
"state": "up",
"type": "web"
}
]
Scale Pods
Example Request:
POST /v2/apps/example-go/scale/ HTTP/1.1
Host: drycc.example.com
Content-Type: application/json
Authorization: token abc123
{"web": 3}
Example Response:
HTTP/1.1 204 NO CONTENT
DRYCC_API_VERSION: 2.3
DRYCC_PLATFORM_VERSION: 2.3.0
Configuration
List Application Configuration
Example Request:
GET /v2/apps/example-go/config/ HTTP/1.1
Host: drycc.example.com
Authorization: token abc123
Example Response:
HTTP/1.1 200 OK
DRYCC_API_VERSION: 2.3
DRYCC_PLATFORM_VERSION: 2.3.0
Content-Type: application/json
{
"owner": "test",
"app": "example-go",
"values": {
"PLATFORM": "drycc"
},
"memory": {},
"cpu": {},
"tags": {},
"healthcheck": {},
"created": "2014-01-01T00:00:00UTC",
"updated": "2014-01-01T00:00:00UTC",
"uuid": "de1bf5b5-4a72-4f94-a10c-d2a3741cdf75"
}
Create new Config
Example Request:
POST /v2/apps/example-go/config/ HTTP/1.1
Host: drycc.example.com
Content-Type: application/json
Authorization: token abc123
{"values": {"HELLO": "world", "PLATFORM": "drycc"}}
Example Response:
HTTP/1.1 201 CREATED
DRYCC_API_VERSION: 2.3
DRYCC_PLATFORM_VERSION: 2.3.0
Content-Type: application/json
{
"owner": "test",
"app": "example-go",
"values": {
"DRYCC_APP": "example-go",
"DRYCC_RELEASE": "v3",
"HELLO": "world",
"PLATFORM": "drycc"
},
"memory": {},
"cpu": {},
"tags": {},
"healthcheck": {},
"created": "2014-01-01T00:00:00UTC",
"updated": "2014-01-01T00:00:00UTC",
"uuid": "de1bf5b5-4a72-4f94-a10c-d2a3741cdf75"
}
Unset Config Variable
Example Request:
POST /v2/apps/example-go/config/ HTTP/1.1
Host: drycc.example.com
Content-Type: application/json
Authorization: token abc123
{"values": {"HELLO": null}}
Example Response:
HTTP/1.1 201 CREATED
DRYCC_API_VERSION: 2.3
DRYCC_PLATFORM_VERSION: 2.3.0
Content-Type: application/json
{
"owner": "test",
"app": "example-go",
"values": {
"DRYCC_APP": "example-go",
"DRYCC_RELEASE": "v4",
"PLATFORM": "drycc"
},
"memory": {},
"cpu": {},
"tags": {},
"healthcheck": {},
"created": "2014-01-01T00:00:00UTC",
"updated": "2014-01-01T00:00:00UTC",
"uuid": "de1bf5b5-4a72-4f94-a10c-d2a3741cdf75"
}
Domains
List Application Domains
Example Request:
GET /v2/apps/example-go/domains/ HTTP/1.1
Host: drycc.example.com
Authorization: token abc123
Example Response:
HTTP/1.1 200 OK
DRYCC_API_VERSION: 2.3
DRYCC_PLATFORM_VERSION: 2.3.0
Content-Type: application/json
{
"count": 1,
"next": null,
"previous": null,
"results": [
{
"app": "example-go",
"created": "2014-01-01T00:00:00UTC",
"domain": "example.example.com",
"owner": "test",
"updated": "2014-01-01T00:00:00UTC"
}
]
}
Add Domain
Example Request:
POST /v2/apps/example-go/domains/ HTTP/1.1
Host: drycc.example.com
Authorization: token abc123
{'domain': 'example.example.com'}
Example Response:
HTTP/1.1 201 CREATED
DRYCC_API_VERSION: 2.3
DRYCC_PLATFORM_VERSION: 2.3.0
Content-Type: application/json
{
"app": "example-go",
"created": "2014-01-01T00:00:00UTC",
"domain": "example.example.com",
"owner": "test",
"updated": "2014-01-01T00:00:00UTC"
}
Remove Domain
Example Request:
DELETE /v2/apps/example-go/domains/example.example.com HTTP/1.1
Host: drycc.example.com
Authorization: token abc123
Example Response:
HTTP/1.1 204 NO CONTENT
DRYCC_API_VERSION: 2.3
DRYCC_PLATFORM_VERSION: 2.3.0
Builds
List Application Builds
Example Request:
GET /v2/apps/example-go/build/ HTTP/1.1
Host: drycc.example.com
Authorization: token abc123
Example Response:
HTTP/1.1 200 OK
DRYCC_API_VERSION: 2.3
DRYCC_PLATFORM_VERSION: 2.3.0
Content-Type: application/json
{
"app": "example-go",
"created": "2014-01-01T00:00:00UTC",
"dockerfile": "FROM drycc/slugrunner RUN mkdir -p /app WORKDIR /app ENTRYPOINT [\"/runner/init\"] ADD slug.tgz /app ENV GIT_SHA 060da68f654e75fac06dbedd1995d5f8ad9084db",
"image": "example-go",
"owner": "test",
"procfile": {
"web": "example-go"
},
"sha": "060da68f",
"updated": "2014-01-01T00:00:00UTC",
"uuid": "de1bf5b5-4a72-4f94-a10c-d2a3741cdf75"
}
Create Application Build
Example Request:
POST /v2/apps/example-go/build/ HTTP/1.1
Host: drycc.example.com
Content-Type: application/json
Authorization: token abc123
{"image": "drycc/example-go:latest"}
Optional Parameters:
{
"procfile": {
"web": "./cmd"
}
}
Example Response:
HTTP/1.1 201 CREATED
DRYCC_API_VERSION: 2.3
DRYCC_PLATFORM_VERSION: 2.3.0
Content-Type: application/json
{
"app": "example-go",
"created": "2014-01-01T00:00:00UTC",
"dockerfile": "",
"image": "drycc/example-go:latest",
"owner": "test",
"procfile": {},
"sha": "",
"updated": "2014-01-01T00:00:00UTC",
"uuid": "de1bf5b5-4a72-4f94-a10c-d2a3741cdf75"
}
Releases
List Application Releases
Example Request:
GET /v2/apps/example-go/releases/ HTTP/1.1
Host: drycc.example.com
Authorization: token abc123
Example Response:
HTTP/1.1 200 OK
DRYCC_API_VERSION: 2.3
DRYCC_PLATFORM_VERSION: 2.3.0
Content-Type: application/json
{
"count": 3,
"next": null,
"previous": null,
"results": [
{
"app": "example-go",
"build": "2.3d8e4b-600e-4425-a85c-ffc7ea607f61",
"config": "ed637ceb-5d32-44bd-9406-d326a777a513",
"created": "2014-01-01T00:00:00UTC",
"owner": "test",
"summary": "test changed nothing",
"updated": "2014-01-01T00:00:00UTC",
"uuid": "de1bf5b5-4a72-4f94-a10c-d2a3741cdf75",
"version": 3
},
{
"app": "example-go",
"build": "2.3d8e4b-600e-4425-a85c-ffc7ea607f61",
"config": "95bd6dea-1685-4f78-a03d-fd7270b058d1",
"created": "2014-01-01T00:00:00UTC",
"owner": "test",
"summary": "test deployed 060da68",
"updated": "2014-01-01T00:00:00UTC",
"uuid": "de1bf5b5-4a72-4f94-a10c-d2a3741cdf75",
"version": 2
},
{
"app": "example-go",
"build": null,
"config": "95bd6dea-1685-4f78-a03d-fd7270b058d1",
"created": "2014-01-01T00:00:00UTC",
"owner": "test",
"summary": "test created initial release",
"updated": "2014-01-01T00:00:00UTC",
"uuid": "de1bf5b5-4a72-4f94-a10c-d2a3741cdf75",
"version": 1
}
]
}
List Release Details
Example Request:
GET /v2/apps/example-go/releases/v2/ HTTP/1.1
Host: drycc.example.com
Authorization: token abc123
Example Response:
HTTP/1.1 200 OK
DRYCC_API_VERSION: 2.3
DRYCC_PLATFORM_VERSION: 2.3.0
Content-Type: application/json
{
"app": "example-go",
"build": null,
"config": "95bd6dea-1685-4f78-a03d-fd7270b058d1",
"created": "2014-01-01T00:00:00UTC",
"owner": "test",
"summary": "test created initial release",
"updated": "2014-01-01T00:00:00UTC",
"uuid": "de1bf5b5-4a72-4f94-a10c-d2a3741cdf75",
"version": 1
}
Rollback Release
Example Request:
POST /v2/apps/example-go/releases/rollback/ HTTP/1.1
Host: drycc.example.com
Content-Type: application/json
Authorization: token abc123
{"version": 1}
Example Response:
HTTP/1.1 201 CREATED
DRYCC_API_VERSION: 2.3
DRYCC_PLATFORM_VERSION: 2.3.0
Content-Type: application/json
{"version": 5}
Keys
List Keys
Example Request:
GET /v2/keys/ HTTP/1.1
Host: drycc.example.com
Authorization: token abc123
Example Response:
HTTP/1.1 201 CREATED
DRYCC_API_VERSION: 2.3
DRYCC_PLATFORM_VERSION: 2.3.0
Content-Type: application/json
{
"count": 1,
"next": null,
"previous": null,
"results": [
{
"created": "2014-01-01T00:00:00UTC",
"id": "test@example.com",
"owner": "test",
"public": "ssh-rsa <...>",
"updated": "2014-01-01T00:00:00UTC",
"uuid": "de1bf5b5-4a72-4f94-a10c-d2a3741cdf75"
}
]
}
Add Key to User
Example Request:
POST /v2/keys/ HTTP/1.1
Host: drycc.example.com
Authorization: token abc123
{
"id": "example",
"public": "ssh-rsa <...>"
}
Example Response:
HTTP/1.1 201 CREATED
DRYCC_API_VERSION: 2.3
DRYCC_PLATFORM_VERSION: 2.3.0
Content-Type: application/json
{
"created": "2014-01-01T00:00:00UTC",
"id": "example",
"owner": "example",
"public": "ssh-rsa <...>",
"updated": "2014-01-01T00:00:00UTC",
"uuid": "de1bf5b5-4a72-4f94-a10c-d2a3741cdf75"
}
Remove Key from User
Example Request:
DELETE /v2/keys/example HTTP/1.1
Host: drycc.example.com
Authorization: token abc123
Example Response:
HTTP/1.1 204 NO CONTENT
DRYCC_API_VERSION: 2.3
DRYCC_PLATFORM_VERSION: 2.3.0
Permissions
List Application Permissions
note
This does not include the app owner.
Example Request:
GET /v2/apps/example-go/perms/ HTTP/1.1
Host: drycc.example.com
Authorization: token abc123
Example Response:
HTTP/1.1 200 OK
DRYCC_API_VERSION: 2.3
DRYCC_PLATFORM_VERSION: 2.3.0
Content-Type: application/json
{
"users": [
"test",
"foo"
]
}
Create Application Permission
Example Request:
POST /v2/apps/example-go/perms/ HTTP/1.1
Host: drycc.example.com
Authorization: token abc123
{"username": "example"}
Example Response:
HTTP/1.1 201 CREATED
DRYCC_API_VERSION: 2.3
DRYCC_PLATFORM_VERSION: 2.3.0
Remove Application Permission
Example Request:
DELETE /v2/apps/example-go/perms/example HTTP/1.1
Host: drycc.example.com
Authorization: token abc123
Example Response:
HTTP/1.1 204 NO CONTENT
DRYCC_API_VERSION: 2.3
DRYCC_PLATFORM_VERSION: 2.3.0
List Administrators
Example Request:
GET /v2/admin/perms/ HTTP/1.1
Host: drycc.example.com
Authorization: token abc123
Example Response:
HTTP/1.1 200 OK
DRYCC_API_VERSION: 2.3
DRYCC_PLATFORM_VERSION: 2.3.0
Content-Type: application/json
{
"count": 2,
"next": null
"previous": null,
"results": [
{
"username": "test",
"is_superuser": true
},
{
"username": "foo",
"is_superuser": true
}
]
}
Grant User Administrative Privileges
note
This command requires administrative privileges
Example Request:
POST /v2/admin/perms HTTP/1.1
Host: drycc.example.com
Authorization: token abc123
{"username": "example"}
Example Response:
HTTP/1.1 201 CREATED
DRYCC_API_VERSION: 2.3
DRYCC_PLATFORM_VERSION: 2.3.0
Remove User’s Administrative Privileges
note
This command requires administrative privileges
Example Request:
DELETE /v2/admin/perms/example HTTP/1.1
Host: drycc.example.com
Authorization: token abc123
Example Response:
HTTP/1.1 204 NO CONTENT
DRYCC_API_VERSION: 2.3
DRYCC_PLATFORM_VERSION: 2.3.0
Users
List all users
note
This command requires administrative privileges
Example Request:
GET /v2/users HTTP/1.1
Host: drycc.example.com
Authorization: token abc123
Example Response:
HTTP/1.1 200 OK
DRYCC_API_VERSION: 2.3
DRYCC_PLATFORM_VERSION: 2.3.0
Content-Type: application/json
{
"count": 1,
"next": null,
"previous": null,
"results": [
{
"id": 1,
"last_login": "2014-10-19T22:01:00.601Z",
"is_superuser": true,
"username": "test",
"first_name": "test",
"last_name": "testerson",
"email": "test@example.com",
"is_staff": true,
"is_active": true,
"date_joined": "2014-10-19T22:01:00.601Z",
"groups": [],
"user_permissions": []
}
]
}